Kawaii Bobble Sleep Mask Duo: Free Crochet Pattern
Kawaii Bobble Sleep Mask Duo: Free Crochet Pattern
Introduction
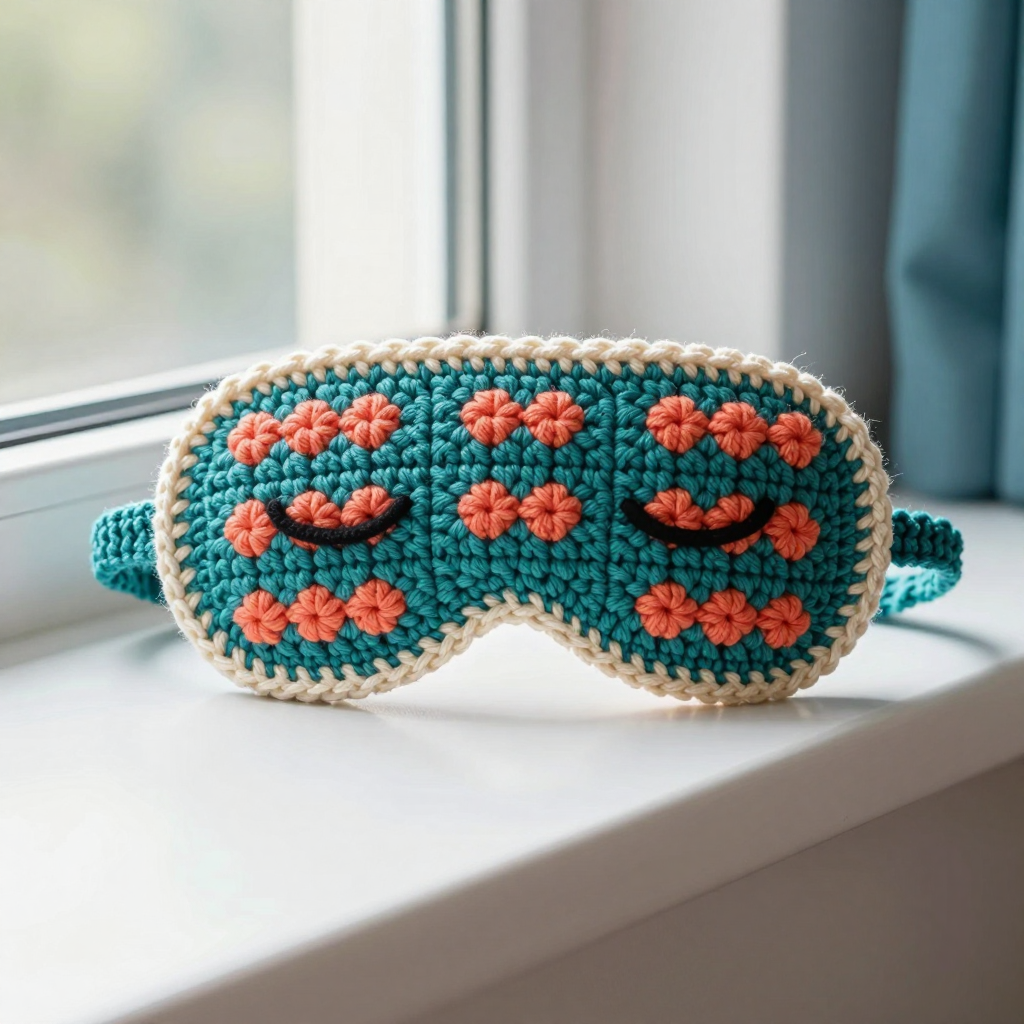
If you have ever wanted to make something adorable with your own two hands, this sleepy little sleep mask is the perfect first project. It is a soft, rounded oval worked flat in teal single crochet, dotted with a cheerful grid of raised teal and coral bobble squares, and finished with two tiny coral "sleepy eyelids" that make it look like a sweet little face. The finished mask is about 7.5 inches (19 cm) wide and 3.75 inches (9.5 cm) tall, made from cozy DK merino wool that feels gentle against your skin. It is perfect for total beginners because it uses only one basic stitch (single crochet) plus one fun texture stitch (the bobble), and it works up in just a few hours. By the end you will have a kawaii accessory you will actually want to wear, and a whole new skill under your belt.
Materials Needed
- Yarn: DK weight (light worsted) 100% merino wool, approximately 55 yds (50 m) total: 30 yds (27 m) teal, 15 yds (14 m) coral, 10 yds (9 m) cream.
- Crochet hook: 3.5 mm (US E/4) crochet hook.
- Stitch markers: At least 4, to mark your first stitch and your bobble positions.
- Tapestry needle: A blunt-tipped needle with a large eye for weaving in ends and sewing on the eyelids.
- Scissors: Sharp small scissors for trimming yarn.
- Finished size: Mask approx. 7.5 in (19 cm) wide x 3.75 in (9.5 cm) tall. Tie cord approx. 30 in (76 cm) long.
Abbreviations and Beginner Glossary
- ch – chain: make a loop with the yarn, then pull the yarn through the loop on your hook. This creates a small "V" shape. Chains are the foundation you build on.
- sc – single crochet: insert your hook into the stitch, yarn over (wrap yarn around hook), pull up a loop (2 loops on hook), yarn over again, pull through both loops. One loop remains. This is the main stitch of the whole project.
- sl st – slip stitch: insert hook into stitch, yarn over, pull the yarn through both the stitch and the loop on your hook at the same time. It makes a flat, tight join.
- bobble – 4-dc bobble: a puffy cluster made of four double crochets worked into the same stitch, then joined at the top (full instructions in the Special Stitch section below).
- st(s) – stitch(es): one completed loop or "V" in your fabric.
- yo – yarn over: wrap the working yarn over your hook from back to front.
- sc2tog – single crochet two together: insert hook into the first stitch, pull up a loop, insert hook into the next stitch, pull up a loop (3 loops on hook), yarn over, pull through all 3 loops. This makes two stitches become one, which shapes the rounded ends.
- RS – right side: the front, pretty side of your work that faces out.
- Rnd – round: one complete circle of stitches worked around.
- magic ring – an adjustable loop of yarn you crochet into, then pull closed so there is no hole in the middle.
- fasten off – cut the yarn leaving a tail, then pull the tail all the way through the last loop to lock it.
Special Stitch — 4-dc Bobble
Yarn over, insert hook in the indicated stitch, yarn over, pull up a loop, yarn over, pull through 2 loops (2 loops on hook). *Yarn over, insert hook in the same stitch, yarn over, pull up a loop, yarn over, pull through 2 loops; repeat from * 2 more times (5 loops on hook). Yarn over, pull through all 5 loops. Push the bobble to the front (the wrong side of the work).
Gauge
18 sc x 20 rows = 4 in (10 cm) in single crochet. Each bobble square measures approx. 0.6 in (1.5 cm).
Why gauge matters: Gauge is how big your stitches turn out. If your stitches are bigger than the pattern expects, your mask will be too large; if smaller, it will be too small. To check, crochet a small practice square about 5 in (13 cm) wide in single crochet. Lay a ruler across the middle and count how many stitches fit in 4 inches. If you have more than 18, try a larger hook; if fewer than 18, try a smaller hook. It is worth the five minutes — it saves you from re-making the whole mask.
Beginner Tips Before You Start
- Count every row. Single crochet rows are easy to lose track of. Place a stitch marker in the first stitch of each row so you always know where the row begins.
- Do not pull your yarn too tight. Tension should feel relaxed. Tight stitches make the mask stiff and make bobbles hard to work.
- Mark your bobble stitches. Before starting a bobble row, count and place a marker in each stitch that will receive a bobble. Then you never have to re-count mid-row.
- Keep the coral yarn loose along the edge. When you switch colors for the coral bobbles, carry the unused coral yarn loosely along the side so the edge does not pucker.
- Push bobbles to the front. After each bobble, poke it toward the right side of the work so the texture pops out on the pretty side.
- Work the turning chain loosely. The "ch 1, turn" at the start of each row should be relaxed, not tight, or your edges will curl.
Step-by-Step Instructions
Note: The mask body is worked flat in turned rows in teal. Bobbles are worked in the row below the surface color change: work the bobble in the indicated stitch, then continue in teal. Change to coral only for the bobble clusters as charted; carry coral loosely along the edge.
Mask Body (worked flat, oval shape)
Row 1 (RS): With teal, ch 22. Sc in 2nd ch from hook and in each ch across. (21 sc)
Row 2: Ch 1, turn. 2 sc in first st, sc in each st to last st, 2 sc in last st. (23 sc)
Row 3: Ch 1, turn. Sc in each st across. (23 sc)
Row 4: Ch 1, turn. 2 sc in first st, sc in each st to last st, 2 sc in last st. (25 sc)
Rows 5–6: Ch 1, turn. Sc in each st across. (25 sc)
Row 7: Ch 1, turn. Sc in first 3 sts, [bobble in next st, sc in next 3 sts] 5 times, bobble in next st, sc in last 3 sts. (6 teal bobbles)
Rows 8–9: Ch 1, turn. Sc in each st across. (25 sc)
Row 10: Ch 1, turn. Sc in first 5 sts, [coral bobble in next st, sc in next 3 sts] 4 times, coral bobble in next st, sc in last 5 sts. (5 coral bobbles)
Rows 11–12: Ch 1, turn. Sc in each st across. (25 sc)
Row 13: Ch 1, turn. Sc in first 3 sts, [teal bobble in next st, sc in next 3 sts] 5 times, teal bobble in next st, sc in last 3 sts. (6 teal bobbles)
Rows 14–15: Ch 1, turn. Sc in each st across. (25 sc)
Row 16: Ch 1, turn. Sc in first 5 sts, [coral bobble in next st, sc in next 3 sts] 4 times, coral bobble in next st, sc in last 5 sts. (5 coral bobbles)
Rows 17–18: Ch 1, turn. Sc in each st across. (25 sc)
Row 19: Ch 1, turn. Sc in first 3 sts, [teal bobble in next st, sc in next 3 sts] 5 times, teal bobble in next st, sc in last 3 sts. (6 teal bobbles)
Row 20: Ch 1, turn. Sc in each st across. (25 sc)
Row 21: Ch 1, turn. Sc2tog, sc in each st to last 2 sts, sc2tog. (23 sc)
Row 22: Ch 1, turn. Sc in each st across. (23 sc)
Row 23: Ch 1, turn. Sc2tog, sc in each st to last 2 sts, sc2tog. (21 sc)
Row 24: Ch 1, turn. Sc in each st across. (21 sc). Fasten off teal.
Edging
With RS facing, join cream at the bottom right corner. Work 1 round of sc evenly around the entire oval edge, working 2 sc in each corner to keep the edge flat. Join with sl st to first sc. Fasten off, weave in ends.
Eyelid Appliqués (make 2)
With coral, make a magic ring.
Rnd 1: 6 sc in ring. Pull ring closed. Join with sl st to first sc. (6 sc). Fasten off, leaving a 6 in (15 cm) tail.
Using the tail, sew one eyelid appliqué flat onto the center of each of the two center coral bobble squares, positioned like closed sleepy eyes. Weave in ends.
Tie Cord
With teal, ch 90. Sl st in 2nd ch from hook and in each ch across. (89 sl sts). Fasten off. Thread the cord through the side edge of the mask at each end (approx. 1 in / 2.5 cm from each short end), knot ends securely. Trim.
Assembly and Finishing
Seaming the eyelids: Thread the 6 in (15 cm) tail onto your tapestry needle. Place the eyelid circle on the center of a center coral bobble square. Take small stitches around the edge of the circle, catching only the surface of the mask so the stitches do not show on the back. Repeat for the second eyelid.
Attaching the tie cord: Poke the end of the cord through the side edge of the mask about 1 inch (2.5 cm) from the short end, then tie a firm double knot. Repeat on the other side. Trim the yarn ends close to the knots.
Weaving in ends: Thread each loose tail onto the tapestry needle and weave it back and forth through the back of several stitches, then trim. Never knot your ends on the front of the work.
Blocking: Gently steam-block the mask to shape, keeping the bobbles raised on the right side. Hold a steam iron an inch or two above the fabric (do not press it down), let the steam relax the wool, then pat the oval into shape with your hands and let it dry flat.
Pro Tips and Variations
- Change the colors: Swap teal and coral for any two colors you love — lavender and mint, or blush and cream — to match your pajamas or a friend's favorite colors.
- Make it bigger or smaller: To widen the mask, add or remove foundation chains in multiples of 4 (each bobble repeat uses 4 stitches). To make it taller, add extra plain sc rows between the bobble rows.
- Substitute the yarn: Any DK weight yarn works, but choose something soft like merino, cotton, or a cotton-blend so it feels gentle on your face. Avoid scratchy acrylics for a sleep mask.
- Skip the tie cord: Prefer an elastic band? Replace the tie cord with a length of soft 1/4 in (6 mm) elastic, sewn securely to each side edge for a snug, no-tie fit.