Farmhouse Lion Granny Square Cube Crochet Free Pattern
Farmhouse Lion Granny Square Cube: A Beginner-Friendly Crochet Pattern
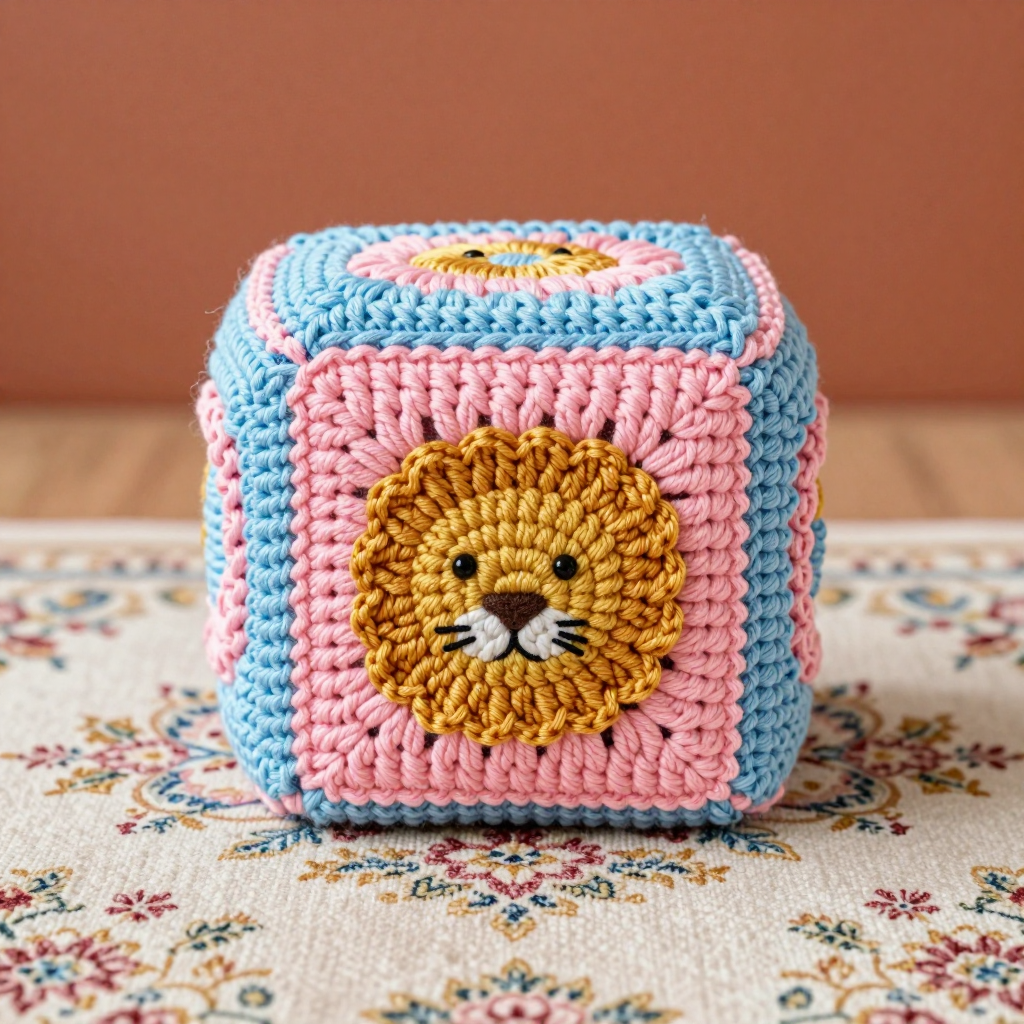
If you have never held a crochet hook before, this little cube is the perfect first project for you. It is built from six simple granny squares — the most famous beginner motif in all of crochet — stitched together into a soft 2-inch cube and topped with an adorable golden lion face. The finished piece is squishy, rustic, and charming: a tiny desk buddy or shelf sitter that looks like it came straight from a farmhouse windowsill. Because it uses only a few basic stitches and a small amount of yarn, you can finish it in an afternoon and feel genuinely proud of what you made. Let's pick up a hook together — you've got this!
Materials Needed
- Yarn: Sport weight (fine, #2) cotton yarn, approximately 60–70 yards total — about 30–35 yards of cotton candy pink and 30–35 yards of baby blue, plus a small amount (roughly 10 yards) of golden mustard for the lion face and mane.
- Crochet hook: 2.75 mm (US C-2).
- Stitch markers: at least 4, to mark corners and the first stitch of each round.
- Tapestry needle: a blunt-tipped needle with a large eye for sewing squares together and weaving in ends.
- Scissors: any small sharp pair.
- Stuffing: a small amount of polyester fiberfill.
- Eyes: two tiny 4 mm black safety eyes, OR a short length of black embroidery floss to embroider the eyes.
- Finished size: a cube approximately 2 x 2 x 2 inches (5 x 5 x 5 cm). Each granny square measures 2 x 2 inches (5 x 5 cm). The lion face circle is about 1 1/4 inches (3 cm) across, and the mane ring about 1 3/4 inches (4.5 cm) across.
Abbreviations and Beginner Glossary
- ch – chain. Wrap the yarn over your hook and pull it through the loop on your hook. This makes a small link; chains are used to start rounds and to create spaces.
- sl st – slip stitch. Insert your hook into the stitch, wrap yarn over, and pull it through both the stitch and the loop on your hook at once. It makes an almost invisible joining stitch.
- sc – single crochet. Insert hook into stitch, pull up a loop (2 loops on hook), yarn over, pull through both loops. (1 loop remains.)
- dc – double crochet. Yarn over, insert hook into stitch, pull up a loop (3 loops on hook), yarn over, pull through 2 loops, yarn over, pull through remaining 2 loops.
- ch-1 sp – chain-1 space. The little gap made by a single chain between groups of stitches; you work your next stitches into that gap, not into a stitch.
- st(s) – stitch(es).
- MR – magic ring (also called magic circle). A loop of yarn you wrap around your fingers and work stitches into, then pull tight so no hole remains in the center.
- join with sl st – finish a round by making a slip stitch into the top of the first stitch of that round, closing the circle.
- fasten off – cut the yarn a few inches from your work and pull the tail all the way through the last loop to lock it.
- whipstitch – a simple sewing stitch: pass the needle over the edge of both pieces and back through, over and over, to join them.
Gauge
Gauge: One finished granny square measures 2 x 2 inches (5 x 5 cm); 4 rounds of granny square = 2 inches square.
Gauge simply means how big your stitches turn out. It matters because if your squares come out larger or smaller than 2 inches, your cube will not match the finished size and the six squares may not line up neatly. To check, crochet one complete granny square exactly as written, then lay it flat and measure it with a ruler. If it is bigger than 2 inches, try again with a smaller hook; if it is smaller, try a larger hook. Cotton yarn does not stretch much, so what you measure is what you get — always trust the swatch, not the label.
Beginner Tips Before You Start
- Use stitch markers. Place one in the first stitch of every round and one in each corner space. It is the easiest way to never lose your place.
- Do not pull your yarn too tight. Tension is the number one beginner struggle. Hold the yarn gently — tight stitches make a stiff, tiny square that is hard to sew.
- Count after every round. The stitch counts in parentheses tell you exactly what you should have. If the number is off, fix it before moving on.
- Work your corners into the chain-1 space, not into a stitch. Corners are always [3 dc, ch 1, 3 dc] worked into the gap — that is what makes the square square.
- Keep your squares the same size. Make all six with the same hook and the same relaxed tension so the cube's edges meet evenly.
- Block before you sew. A quick steam or damp block flattens each square so assembly is much easier.
Step-by-Step Instructions
Part 1: The Granny Squares (make 6 total — 3 pink, 3 blue)
Each square is worked in joined rounds in a single color. Do not change color within a square.
Round 1: With your chosen color, make a magic ring. Ch 3 (this counts as your first dc), work 2 dc into the ring, ch 1, [3 dc into ring, ch 1] three times, join with sl st to the top of the beginning ch-3. (12 dc, 4 ch-1 sps)
Round 2: Sl st into the next 2 dc and into the first ch-1 sp. Ch 3 (counts as first dc), 2 dc into the same ch-1 sp, ch 1, 3 dc into the same ch-1 sp (first corner made), ch 1, *[3 dc, ch 1, 3 dc] into the next ch-1 sp (corner), ch 1; repeat from * around, join with sl st to the top of the beginning ch-3. (24 dc, 4 corners, 4 side ch-1 sps)
Round 3: Sl st into the next 2 dc and into the first corner ch-1 sp. Ch 3, 2 dc into the same corner sp, ch 1, 3 dc into the same corner sp, ch 1, 3 dc into the next side ch-1 sp, ch 1, *[3 dc, ch 1, 3 dc] into the next corner sp, ch 1, 3 dc into the next side ch-1 sp, ch 1; repeat from * around, join with sl st to the top of the beginning ch-3. (36 dc, 4 corners, 8 side ch-1 sps)
Round 4: Sl st into the next 2 dc and into the first corner ch-1 sp. Ch 3, 2 dc into the same corner sp, ch 1, 3 dc into the same corner sp, ch 1, [3 dc into the next side ch-1 sp, ch 1] twice, *[3 dc, ch 1, 3 dc] into the next corner sp, ch 1, [3 dc into the next side ch-1 sp, ch 1] twice; repeat from * around, join with sl st to the top of the beginning ch-3. Fasten off and weave in ends. (48 dc, 4 corners, 12 side ch-1 sps)
Block each square lightly to 2 x 2 inches (5 x 5 cm) and press flat. You should now have 6 squares: 3 pink and 3 blue.
Part 2: The Lion Face Appliqué (make 1 in golden mustard)
Work in continuous rounds; do not join at the end of each round.
Round 1: Make a magic ring, work 6 sc into the ring. (6 sc)
Round 2: 2 sc in each st around. (12 sc)
Round 3: [Sc in next st, 2 sc in next st] around. (18 sc)
Round 4: [Sc in next 2 sts, 2 sc in next st] around. (24 sc)
Round 5: Sc in each st around, join with sl st to first sc. Fasten off, leaving a 10-inch tail for sewing. (24 sc)
The face circle should measure about 1 1/4 inches (3 cm) across.
Part 3: The Mane (worked in golden mustard)
The mane is a simple ruffled ring that is sewn around the face.
Round 1: Make a magic ring, ch 1, work 12 sc into the ring, join with sl st to first sc. (12 sc)
Round 2: Ch 1, 2 sc in each st around, join with sl st to first sc. (24 sc)
Round 3: Ch 1, [sc in next st, 2 sc in next st] around, join with sl st to first sc. (36 sc)
Fasten off, leaving a long tail. The mane ring should measure about 1 3/4 inches (4.5 cm) across.
Assembly and Finishing
Step 1 — Arrange the squares. Lay out your six squares: place one pink square as the front, one blue as the back, and alternate the remaining four (pink, blue, pink, blue) as the top, bottom, left, and right sides.
Step 2 — Join the sides. With wrong sides facing out (or right sides out, as you prefer), whipstitch or single crochet the squares together along their edges, matching stitch for stitch. Join four squares into a ring for the sides, then attach the bottom square, then attach the top square, leaving a 1 1/2 inch opening along one edge. To whipstitch: thread your tapestry needle, bring it up through the edge stitch of one square and down through the matching stitch of the other, and repeat along the whole edge, keeping your stitches even and snug.
Step 3 — Stuff the cube. Stuff lightly and evenly with polyester fiberfill until it holds its shape but is not overstuffed — you want a soft squish, not a tight ball. Sew the opening closed with small whipstitches.
Step 4 — Attach the face. Center the golden face circle on the pink front square. Pin it in place and sew around the edge with the yarn tail, using small whipstitches.
Step 5 — Attach the mane. Place the mane ring behind and around the face circle so the ruffled edge shows around the face. Pin it and sew the inner edge of the mane to the cube, just outside the face circle.
Step 6 — Add the features. Attach two tiny black safety eyes to the face, or embroider two small black French knots for eyes. Embroider a small triangular nose in black or dark brown just below the eyes.
Step 7 — Finish. Weave in all remaining ends on the wrong side of the work, threading each tail through a few stitches before trimming. Lightly steam or block the finished cube to sharpen the corners. Trim any loose yarn tails — your farmhouse lion granny square cube is complete!
Pro Tips and Variations
- Play with color. Swap the pink and blue for any two colors you love — sage green and cream make a lovely farmhouse look, while bright yellow and orange make a sunny lion. Keep the mustard mane for contrast.
- Adjust the size. Add a fifth round to each granny square (working [3 dc into next side ch-1 sp, ch 1] three times between corners) to make a larger cube, or stop at Round 3 for a tiny keychain-size version. Just make sure all six squares match.
- Substitute yarn. Any sport weight (#2) cotton works beautifully. Avoid fluffy or fuzzy yarns for your first cube — smooth cotton makes it much easier to see your stitches.
- Make a set. Crochet a whole family of little animal cubes by changing the face and mane colors — a bear, a fox, or a bunny — and display them together on a shelf.