Banana Buoy Snuggle Toy Free Crochet Pattern: A Preppy Ocean-Blue Amigurumi
Banana Buoy Snuggle Toy Free Crochet Pattern: A Preppy Ocean-Blue Amigurumi
Introduction
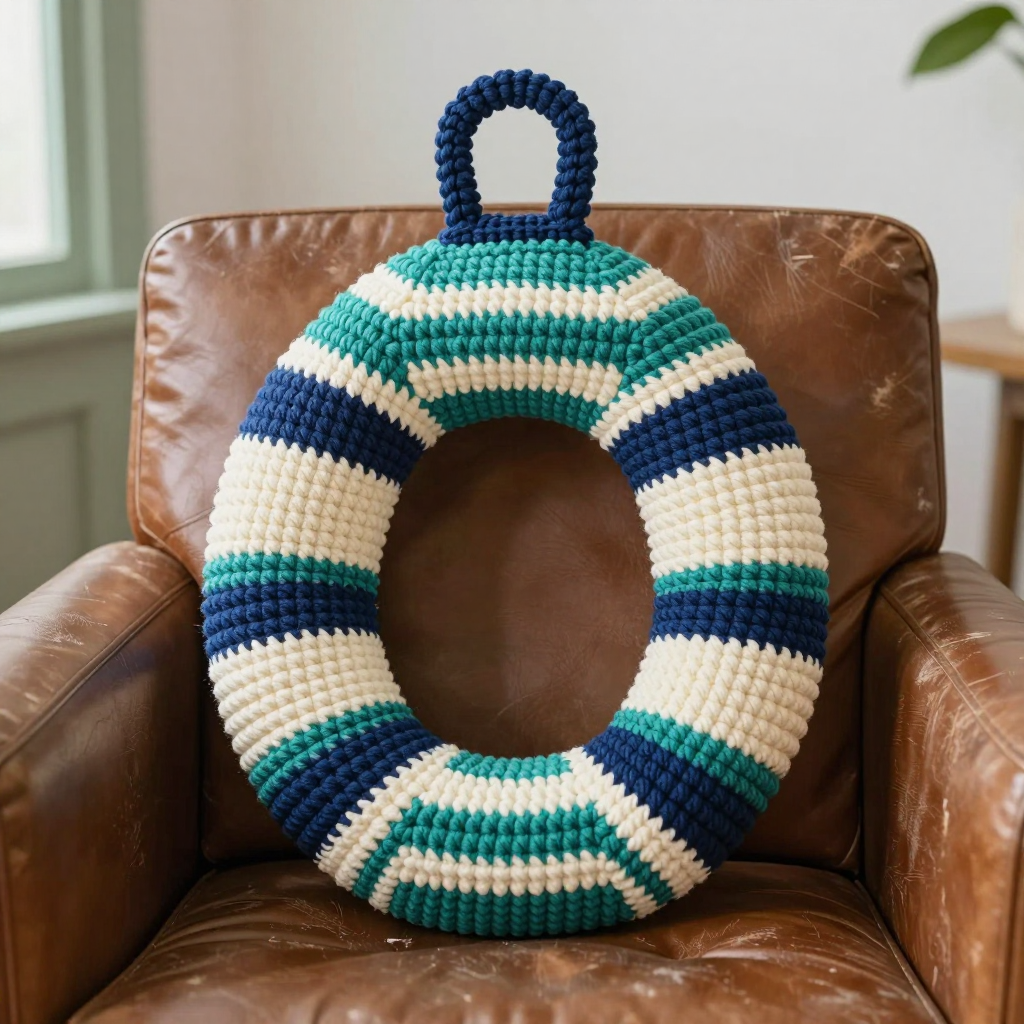
If you have ever looked at a crocheted toy and thought, "I could never do that," this Banana Buoy Snuggle Toy is here to prove you wrong. It is a tall, striped, ocean-inspired amigurumi worked almost entirely in one simple stitch, so it is perfect for a confident beginner who has just learned single crochet and wants a real project to show for it. The finished toy looks like a cheerful nautical buoy: a smooth cylinder with a gently rounded top, wrapped in repeating bands of teal, navy, and cream, and topped with a small crocheted loop handle. It feels dense, squishy, and satisfyingly firm in your hands, and at about 9 inches tall it is the perfect size to sit on a shelf, ride in a beach bag, or be squeezed by a little one. Best of all, there are no faces, no tiny limbs, and no complicated shaping, just calm, rhythmic rounds that you can finish in a weekend.
Materials Needed
- Yarn: DK weight (light worsted, CYC 3) cotton yarn in three colors:
- Teal (Color A): approximately 55 yd / 50 m
- Navy (Color B): approximately 35 yd / 32 m
- Cream (Color C): approximately 25 yd / 23 m
- Crochet hook: 3.0 mm hook (there is no US letter size for 3.0 mm, so look for the metric number on the hook; it sits between US size C-2 and D-3). Use whatever size gives you the gauge below.
- Stitch marker: at least one, to mark the first stitch of each round.
- Tapestry needle: a blunt-tipped yarn needle for sewing the handle and weaving in ends.
- Scissors for cutting yarn.
- Stuffing: a small amount of polyester fiberfill.
Finished size: Height (excluding handle) about 9 in / 23 cm. Body circumference about 6.5 in / 16.5 cm. Handle loop about 2 in / 5 cm tall and 1 in / 2.5 cm wide.
Abbreviations and Beginner Glossary
Every pattern is written in shorthand. Here is every abbreviation used in this pattern, explained as if you have never crocheted before. All terms are US crochet terms.
- ch – chain. Make a slip knot on your hook, wrap the yarn over the hook, and pull it through the loop on your hook. That is one chain.
- sc – single crochet. Insert your hook into the stitch, wrap the yarn over the hook, pull up a loop (you now have 2 loops on the hook), wrap the yarn over again, and pull through both loops. One single crochet made.
- sc2tog – single crochet 2 together. This is a decrease, meaning it turns two stitches into one. Insert your hook into the next stitch, pull up a loop, insert your hook into the following stitch, pull up a loop (3 loops on hook), wrap the yarn over, and pull through all 3 loops. One stitch is removed.
- sl st – slip stitch. Insert your hook into the stitch, wrap the yarn over, and pull it through both the stitch and the loop on your hook at the same time. It makes a flat, joining stitch.
- st / sts – stitch / stitches.
- rnd – round. One complete circle of stitches when you work in a spiral.
- BLO – back loop only. Every single crochet stitch has two loops at its top, a front one and a back one. "Back loop only" means you insert your hook under just the loop farthest from you.
- 2 sc in next st – work two single crochets into the same stitch. This is an increase, meaning it turns one stitch into two.
- magic ring – an adjustable loop of yarn you crochet into to start a round with no hole in the middle. If it feels tricky, you can chain 2 and work your first round into the second chain from the hook instead.
- [ ] – square brackets group stitches that are repeated. The number after the bracket tells you how many times to repeat everything inside it.
- fasten off – cut the yarn a few inches from your work, then pull the tail all the way through the last loop to lock it.
Gauge
Gauge: 24 single crochet stitches x 26 rounds = 4 in / 10 cm in continuous single crochet rounds.
Gauge simply means how big your stitches come out. If your stitches are bigger than the pattern expects, your toy will be too tall and wide; if they are smaller, it will come out tiny. Because this toy is a simple cylinder, gauge mostly affects the final size, but it is still worth checking.
How to make a gauge swatch: With your teal yarn and 3.0 mm hook, make a magic ring, work 6 sc into it, then work plain single crochet rounds (no increasing) until your swatch is at least 4 in / 10 cm across. Lay it flat and measure 4 in / 10 cm across the middle, counting stitches, and 4 in / 10 cm up, counting rounds. If you have more stitches than 24, your stitches are too small, so try a larger hook. If you have fewer, try a smaller hook. Change hook size and swatch again until it matches.
Beginner Tips Before You Start
- Use a stitch marker every single round. Because you work in a continuous spiral, there is no seam to tell you where a round begins. Place a marker in the first stitch of each round and move it up as you go. Without it, you will lose your place.
- Do not pull your yarn too tight. Tension is the number one beginner struggle. Hold the yarn gently; if your hook squeaks or fights you, you are pulling too hard. Loose, even stitches make smooth stripes.
- Change colors on the last yarn-over of the round. When the new color begins on the next round, work the final stitch of the old color but pull the new color through on the very last yarn-over. This keeps the color change crisp.
- Count your stitches at the end of every increase and decrease round. The stitch count in parentheses is your safety net. If it does not match, rip back that round and try again; it is much easier to fix now than later.
- Stuff as you go, not all at once. The pattern tells you exactly when to stuff. Add small handfuls and shape the cylinder with your fingers as you fill it.
- Keep your color-change tails inside the toy. Leave a 4 in / 10 cm tail each time you switch colors and let it hang inside the body. You will weave them in at the end.
Step-by-Step Instructions
Notes Before You Begin
Work in continuous single crochet rounds; do not join or turn unless instructed. Place a stitch marker in the first stitch of each round and move it up as you work. The body is worked from the bottom up. Change colors on the last yarn-over of the final stitch of the round before the new color begins, leaving a 4 in / 10 cm tail to weave in later. Stuff firmly but not overstuffed so the stripes stay smooth.
Color Sequence (Body)
Follow this sequence as you work Rounds 11–40. Each color block is three rounds long.
- Rnds 1–3: A (teal)
- Rnds 4–6: B (navy)
- Rnds 7–9: C (cream)
- Rnds 10–12: A (teal)
- Rnds 13–15: B (navy)
- Rnds 16–18: C (cream)
- Rnds 19–21: A (teal)
- Rnds 22–24: B (navy)
- Rnds 25–27: C (cream)
- Rnds 28–30: A (teal)
- Rnds 31–33: B (navy)
- Rnds 34–36: C (cream)
- Rnds 37–39: A (teal)
- Rnd 40: B (navy)
- Rnd 41: A (teal)
Body
With A, make a magic ring.
Rnd 1: 6 sc into ring. (6 sts)
Rnd 2: 2 sc in each st around. (12 sts)
Rnd 3: [Sc in next st, 2 sc in next st] 6 times. (18 sts)
Rnd 4: [Sc in next 2 sts, 2 sc in next st] 6 times. (24 sts)
Rnd 5: [Sc in next 3 sts, 2 sc in next st] 6 times. (30 sts)
Rnd 6: [Sc in next 4 sts, 2 sc in next st] 6 times. (36 sts)
Rnd 7: [Sc in next 5 sts, 2 sc in next st] 6 times. (42 sts)
Rnd 8: [Sc in next 6 sts, 2 sc in next st] 6 times. (48 sts)
Rnd 9: [Sc in next 7 sts, 2 sc in next st] 6 times. (54 sts)
Rnd 10: [Sc in next 8 sts, 2 sc in next st] 6 times. (60 sts)
Rnds 11–40: Sc in each st around, following the color sequence above. (60 sts per round)
Rnd 41: [Sc in next 8 sts, sc2tog] 6 times. (54 sts)
Rnd 42: [Sc in next 7 sts, sc2tog] 6 times. (48 sts)
Rnd 43: [Sc in next 6 sts, sc2tog] 6 times. (42 sts)
Rnd 44: [Sc in next 5 sts, sc2tog] 6 times. (36 sts)
Rnd 45: [Sc in next 4 sts, sc2tog] 6 times. (30 sts)
Rnd 46: [Sc in next 3 sts, sc2tog] 6 times. (24 sts)
Rnd 47: [Sc in next 2 sts, sc2tog] 6 times. (18 sts)
Stuff the body firmly through the opening, shaping it into a tall cylinder with a rounded top.
Rnd 48: [Sc in next st, sc2tog] 6 times. (12 sts)
Rnd 49: [Sc2tog] 6 times. (6 sts)
Fasten off, leaving a 6 in / 15 cm tail. Thread the tail through the front loops of the last 6 sts and pull tight to close. Weave in the end.
Handle Loop
With B, leave a 6 in / 15 cm starting tail. Ch 18. Being careful not to twist the chain, sl st into the first ch to form a ring.
Rnd 1: Ch 1, sc in each ch around. (18 sts)
Rnd 2: Sc in each st around. (18 sts)
Rnd 3: Sc in each st around. (18 sts)
Fasten off, leaving a 6 in / 15 cm tail. The loop should measure about 2 in / 5 cm tall and 1 in / 2.5 cm wide.
Assembly and Finishing
- Sew on the handle loop. Position the loop at the top center of the banana buoy. Thread the starting tail onto your tapestry needle and sew the base of the loop securely to the top of the body, going through the fabric several times for strength. Repeat with the ending tail on the opposite side of the loop base. Pull gently so the loop stands upright but the stitches do not pucker.
- Weave in all yarn ends. Thread each tail onto the tapestry needle, poke it through to the inside of the body, and run it back and forth through a few stitches inside before trimming. Do this especially at every color change so the stripes stay neat on the outside.
- Even out the stuffing. Gently roll the body between your palms to even out the fiberfill and smooth the stripes. If the body feels underfilled, add a small amount of extra stuffing through the top before the final closure.
- Block lightly (optional). Cotton toys do not need aggressive blocking. Mist the surface lightly with cool water, pat the cylinder into a straight shape with your hands, and let it air dry away from direct heat. This helps the stripes lie flat and the handle hold its curve.
Pro Tips and Variations
- Change the color story. Swap the teal, navy, and cream for any three colors you love. Try a sunset buoy in coral, mustard, and blush, or a classic red, white, and navy. Keep the three-round block rhythm so the stripes stay balanced.
- Adjust the size. To make a taller buoy, simply add more plain single crochet rounds in the middle (Rounds 11–40) before you begin the decreases. Every extra 26 rounds adds about 4 in / 10 cm of height. To make it shorter, work fewer plain rounds. The decrease section stays exactly the same.
- Substitute the yarn. Any DK weight cotton works beautifully. If you only have worsted weight, go down one hook size and check your gauge again, since thicker yarn makes a bigger toy. Avoid fuzzy or slippery yarns for your first try, as they make counting stitches harder.
- Add a hanging loop or keyring. Work the handle loop in a contrasting color, or thread a small keyring through the finished loop to turn your buoy into a bag charm.
Care: Hand wash in cool water with mild soap. Squeeze gently, do not wring. Reshape and air dry away from direct heat.