Sage Laurel Crochet Resistance Band Wrap – Free Pattern
Sage Laurel Crochet Resistance Band Wrap – Free Pattern
Introduction
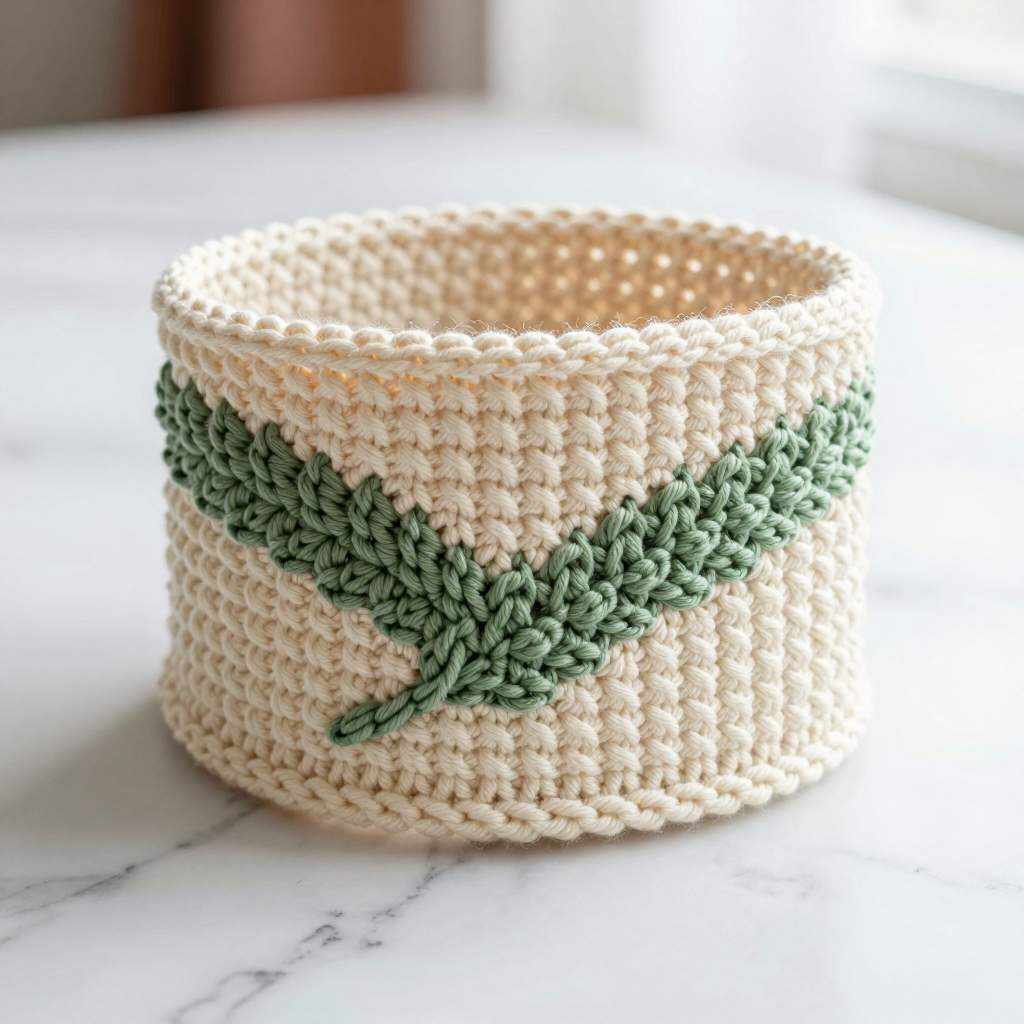
If you have never held a crochet hook before, this is the perfect very first project to make something genuinely useful. The Sage Laurel Resistance Band Wrap is a tiny, satisfying tube of cream wool-blend yarn with a diagonal band of sage green "laurel leaves" running across the middle, and it slips neatly over a folded resistance band so your gym bag stays tidy. Because it is worked in corner-to-corner (C2C) blocks, you only ever learn one simple stitch, and the whole thing grows in minutes. The finished wrap is about the size of a small wallet: soft, matte, slightly woolly, and sturdy enough to live in a gym bag for years. By the end you will have learned chaining, double crochet, colour changes, and seaming — a whole beginner's toolkit in one afternoon.
Materials Needed
- Yarn: Aran-weight wool blend (approx. 20% wool, 80% acrylic), 100 g / 170 m per skein. You need approx. 25 g Cream (MC) and 10 g Sage Green (CC). The sample used Paintbox Yarns Wool Mix Aran in 'Vanilla Cream' and 'Sage Green'.
- Crochet hook: 5.0 mm (US H/8), or the size needed to match gauge.
- Stitch markers: 2–3, to mark your first block and your colour changes.
- Tapestry needle: a blunt needle with a large eye, for seaming and weaving in ends.
- Scissors.
- Finished size: Flat strip before seaming is 9 cm wide x 11 cm tall (3.5 in x 4.3 in) — about 4 blocks wide x 5 blocks tall. Once seamed into a tube it measures approx. 9 cm wide x 5.5 cm deep (3.5 in x 2.2 in) and fits a resistance band folded to about 8 cm wide.
Abbreviations and Beginner Glossary
- ch – chain. Make a loop of yarn on your hook, wrap yarn over the hook, and pull it through the loop. That is one chain. Chains look like tiny V shapes.
- sl st – slip stitch. Insert your hook into the stitch, wrap yarn over, and pull it straight through both the stitch and the loop on your hook in one motion. It makes a nearly invisible joining stitch.
- dc – double crochet (US term). Wrap yarn over the hook, insert the hook into the stitch or space, wrap yarn over and pull up a loop (3 loops on hook), wrap yarn over and pull through 2 loops, wrap yarn over and pull through the last 2 loops. One dc made.
- C2C block – corner-to-corner block. A small square made of 3 dc worked into a 3-ch space, followed by a ch 3 to start the next block. Blocks are joined diagonally, corner to corner.
- ch-3 sp – chain-3 space. The little gap made by the ch 3 at the end of each block; you work your next block into it.
- MC – main colour (Cream).
- CC – contrasting colour (Sage Green).
- turn – flip your work over so you can work back along it.
- fasten off – cut the yarn leaving a tail, then pull the tail all the way through the last loop to lock it.
- whipstitch – a simple seaming stitch: pass the needle over the edge of both pieces and back through, over and over, like a spiral of small stitches.
- sc – single crochet. Insert hook into stitch, wrap yarn over and pull up a loop (2 loops on hook), wrap yarn over and pull through both loops. Used only for the optional edging.
Gauge
Gauge: 1 C2C block = 2.5 cm x 2.5 cm (1 in x 1 in), measured over 3 dc + 3 ch.
Gauge means how big your stitches turn out. If your blocks are bigger than 2.5 cm, your wrap will be too large for the band; if smaller, it will be too tight. To check, crochet Rows 1–4 of the pattern (a small 4-block triangle), lay it flat, and measure one block from corner to corner. If it is larger than 2.5 cm, try a smaller hook (4.5 mm); if smaller, try a larger hook (5.5 mm). Always make the swatch — it takes five minutes and saves the whole project.
Beginner Tips Before You Start
- Count your blocks out loud. Each block is 3 dc plus a ch 3. Say "one, two, three, chain" as you go so you never lose your place.
- Use a stitch marker in the very first block of each row so you always know where the row begins.
- Do not pull the yarn too tight. Keep your chains relaxed — tight chains make the blocks shrink and the tube stiff.
- Carry the sage yarn loosely up the side. When you switch back to cream, leave a small relaxed loop of sage along the edge rather than cutting it. Too-tight carries pucker the edge.
- Change colour on the last pull-through of the final dc of a block: pull the new colour through the last 2 loops so the next block starts cleanly in the new colour.
- Work in good light and stop when tired. C2C is easy to miscount, and one extra block changes the whole shape.
Step-by-Step Instructions
All instructions use US terms. The colour chart below is read diagonally, from bottom-right to top-left. The sage blocks form the diagonal laurel-leaf band across the centre.
Colour Chart (blocks per row, in order)
- Row 1 (1 block): MC
- Row 2 (2 blocks): MC, MC
- Row 3 (3 blocks): MC, CC, MC
- Row 4 (4 blocks): MC, CC, CC, MC
- Row 5 (4 blocks): MC, MC, CC, MC
- Row 6 (4 blocks): MC, MC, MC, MC
- Row 7 (3 blocks): MC, MC, MC
- Row 8 (2 blocks): MC, MC
- Row 9 (1 block): MC
Set-Up and Body
Set-up: With MC, ch 6.
Row 1 (increase row, 1 block): Dc in the 4th ch from hook, dc in each of the next 2 ch, ch 3, turn. (1 block)
Row 2 (increase row, 2 blocks): 3 dc in the ch-3 sp, ch 3, 3 dc in the same ch-3 sp, ch 3, turn. (2 blocks)
Row 3 (increase row, 3 blocks): 3 dc in the first ch-3 sp, ch 3, 3 dc in the next ch-3 sp, ch 3, 3 dc in the same ch-3 sp, ch 3, turn. Change to CC for the middle block as charted. (3 blocks)
Row 4 (increase row, 4 blocks): Work 4 blocks across following the chart — MC, CC, CC, MC. Ch 3, turn. (4 blocks)
Row 5 (straight row, 4 blocks): Sl st across the first block, then work 3 blocks in the order MC, MC, CC, MC as charted. Ch 3, turn. (4 blocks)
Row 6 (straight row, 4 blocks): Sl st across the first block, work 4 blocks all in MC. Ch 3, turn. (4 blocks)
Row 7 (decrease row, 3 blocks): Sl st across the first block, work 3 blocks in MC. Ch 3, turn. (3 blocks)
Row 8 (decrease row, 2 blocks): Sl st across the first block, work 2 blocks in MC. Ch 3, turn. (2 blocks)
Row 9 (decrease row, 1 block): Sl st across the first block, work 1 block in MC. Fasten off, leaving a 30 cm tail for seaming. (1 block)
Total: 9 rows, 4 blocks wide at the widest point, 5 blocks tall. The strip should measure about 9 cm x 11 cm.
Optional Edging
Work this only if you want a neat, finished edge at both openings (recommended).
Round 1: Join MC with a sl st at one opening, work sc evenly around the opening (about 1 sc per stitch along the edges and 1 sc per block along the sides), join with a sl st to the first sc. Fasten off and weave in. Repeat around the second opening.
Assembly and Finishing
- Weave in all ends except the long 30 cm seaming tail. Thread each short end onto the tapestry needle, run it through the back of several stitches, and trim close.
- Block lightly. Pin the strip flat to 9 cm x 11 cm on a towel or blocking mat, mist with water, and leave to dry completely. This relaxes the wool and evens out the blocks.
- Fold into a tube. Fold the strip in half with right sides together so the two short ends meet, forming a tube.
- Seam the short ends. Thread the long MC tail onto the tapestry needle and whipstitch the two short ends together: pass the needle over the edge of both pieces and back through, over and over, keeping the stitches small and even. Fasten off and weave in the tail.
- Turn right side out. The sage laurel-leaf band should now sit centred on the front of the wrap.
- Final check. Gently shape the tube with your hands, give it a light press under a damp cloth if needed, and your wrap is ready.
Pro Tips and Variations
- Change the colours. Swap sage for mustard, rust, or dusty pink for an autumn palette — the diagonal band reads beautifully in any contrast colour.
- Adjust the size. To fit a wider band, add one more increase row (Row 5 becomes 5 blocks) and one more decrease row at the end; each extra block adds 2.5 cm to the width.
- Substitute the yarn. Any aran-weight yarn works — cotton gives a crisper, washable wrap; a pure wool gives a softer, warmer one. Always re-check your gauge.
- Make a set. Work the same pattern in three colourways for a matching set of wraps, or add a small crocheted loop and button to the seam for a closure.