Free Pattern: Woven Path Bicolor Knit Shorts in Seed Stitch
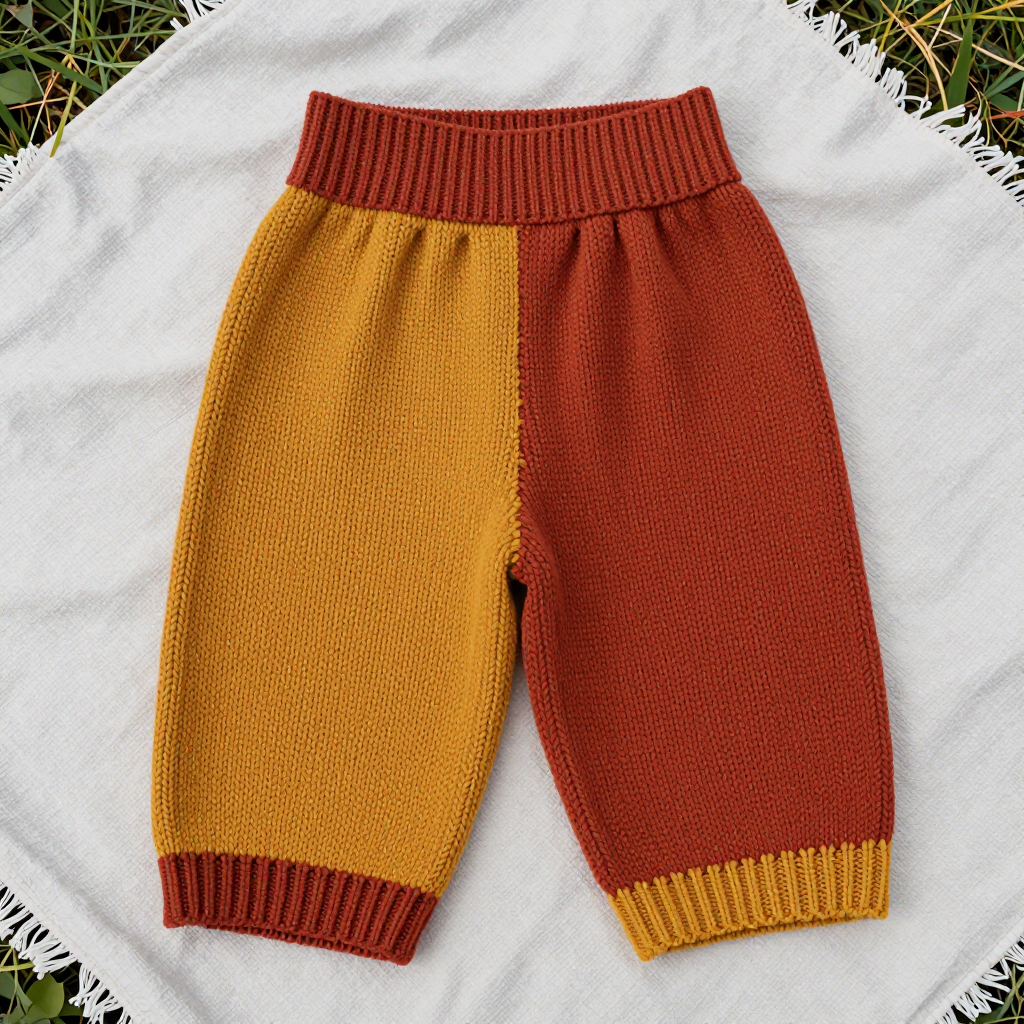
Woven Path Bicolor Knit Shorts in Seed Stitch
Introduction
These folk-art inspired shorts are the perfect first "real" garment for a knitter who has mastered knit and purl and wants to make something they will actually wear. The Woven Path shorts are built from two simple tubes — one leg in warm mustard, the other in terracotta — joined at the crotch and finished with a wide ribbed waistband, so there are no short rows, no complicated shaping, and no scary techniques. The seed stitch gives the fabric a beautiful, bumpy, hand-woven texture that looks far more advanced than it is, and the contrast cuffs add a playful pop of color at the hem. The finished shorts are relaxed and straight with a slightly flared cuff, soft and cozy in DK merino, and they feel like a warm hug on a cool evening. If you can knit in the round, you can make these.
Materials Needed
- Yarn: DK weight merino wool (approx. 246 yd / 225 m per 100 g skein). For sizes S–M: 2 skeins terracotta (approx. 400 yd / 366 m) and 2 skeins mustard (approx. 350 yd / 320 m). For sizes L–XL: add 1 skein of each color.
- Main needles: US 6 (4.0 mm) — one 16" circular needle and a set of 4 double-pointed needles (or a 32" circular needle if you prefer the magic loop method).
- Waistband needle: US 5 (3.75 mm) — one 16" circular needle.
- Stitch markers: at least 3 (one for the beginning of round, two for the side seams).
- Stitch holders or waste yarn: to hold the stitches of the first leg while you knit the second.
- Tapestry needle: a blunt-tipped needle with a large eye for weaving in ends and seaming.
- Scissors.
- Optional: 1/4" (6 mm) elastic for the waistband casing, and a 4.0 mm crochet hook if you want a drawstring.
- Finished measurements: Hip circumference 36 (40, 44, 48)" / 91 (102, 112, 122) cm. Inseam 9 (9, 10, 10)" / 23 (23, 25, 25) cm. Waist (unstretched) 28 (32, 36, 40)" / 71 (81, 91, 102) cm. Sample shown in size M.
Abbreviations and Beginner Glossary
- st / sts — stitch / stitches. One "stitch" is one loop on your needle.
- K — knit. Insert the right needle into the front of the stitch from left to right, wrap the yarn around, and pull the loop through.
- P — purl. Insert the right needle into the front of the stitch from right to left, wrap the yarn around the front, and pull the loop through.
- K1, p1 — knit one stitch, then purl one stitch.
- K2, p2 — knit two stitches, then purl two stitches.
- RS — right side. The "public" side of the fabric that faces out when worn.
- Rnd / Rnds — round / rounds. One complete pass around a circular or double-pointed needle when knitting in a tube.
- Rep — repeat. Do the instruction again.
- Beg — beginning.
- Seed stitch — a textured fabric made by alternating knit and purl stitches and then swapping them on the next row or round, so bumps and dips alternate. It looks like tiny woven seeds.
- 2x2 rib — a stretchy fabric of two knits then two purls, repeated. It pulls in and grips gently.
- Cast on — the very first step: creating the first row of loops on your needle.
- Bind off — the final step: closing the live loops so the edge cannot unravel.
- Join to work in the round — after casting on, bring the two ends of the needle together so the stitches form a circle, then knit into the first stitch. Be careful not to twist the cast-on edge.
- Magic loop — a way of knitting small tubes using one long circular needle instead of double-pointed needles.
- Whipstitch — a simple sewing stitch where the needle goes over the edge and back through, used here to sew the waistband casing closed.
Gauge
22 sts and 30 rows = 4" (10 cm) in seed stitch on US 6 (4.0 mm) needles, after blocking. 24 sts and 32 rows = 4" (10 cm) in 2x2 rib on US 5 (3.75 mm) needles.
Gauge matters because it is how we make sure your shorts come out the size you planned. If your stitches are bigger than the pattern's, the shorts will be too big; if they are smaller, the shorts will be too tight. To make a swatch: cast on about 30 stitches on your US 6 needles, work in seed stitch for about 4" (10 cm), bind off, and gently wash and dry it flat. Lay a ruler across the middle and count how many stitches fit in 4". If you have more than 22, go up a needle size; if you have fewer, go down a needle size. Then knit the shorts with the needle that gave you the right number.
Beginner Tips Before You Start
- Use stitch markers to track your rounds. Place one marker at the beginning of the round and move it up as you go. It is the easiest way to know where you are.
- Do not pull your yarn too tight. Tension is the number one beginner issue. Let the yarn flow and keep your stitches relaxed and even.
- Count your stitches at the end of every few rounds. If you have lost or gained a stitch, fix it right away rather than discovering it 20 rounds later.
- Try the leg on as you go. Because the legs are simple tubes, you can slip the live stitches onto waste yarn and try the leg on to check the length before joining.
- Keep both legs identical. Write down the number of rounds you worked on Leg 1 so Leg 2 matches exactly.
- Trust the seed stitch. It looks messy and bumpy while you are knitting — that is exactly what it is supposed to look like. It will even out beautifully after blocking.
Step-by-Step Instructions
Stitch Guide
Seed Stitch (flat, even number of sts): Row 1 (RS): *K1, p1; rep from * to end. Row 2: *P1, k1; rep from * to end. Rep Rows 1–2.
Seed Stitch (in the round, even number of sts): Rnd 1: *K1, p1; rep from * around. Rnd 2: *P1, k1; rep from * around. Rep Rnds 1–2.
2x2 Rib (in the round, multiple of 4 sts): *K2, p2; rep from * around.
Construction Note
The shorts are worked as two separate tubes (legs), each begun at the cuff and worked upward to the crotch. The two legs are then joined onto one circular needle and the upper section is worked in the round to the waistband. This is the simplest two-tube construction and requires no short rows.
Leg 1 — Terracotta Leg with Mustard Cuff
Cuff (mustard yarn, US 5 needles): Cast on 96 (104, 116, 128) sts. Join to work in the round, being careful not to twist. Place marker for beg of rnd.
Rnds 1–8: Work in 2x2 rib. (96 [104, 116, 128] sts) — approx. 1" / 2.5 cm.
Change to US 6 needles and mustard yarn.
Rnds 9–14: Work in Seed Stitch in the round (6 rnds, approx. 3/4" / 2 cm) for the contrast seed-stitch cuff band. (96 [104, 116, 128] sts)
Change to terracotta yarn. Continue in Seed Stitch in the round until leg measures 9 (9, 10, 10)" / 23 (23, 25, 25) cm from cast-on edge, ending after a Rnd 2. Place all sts on a stitch holder or waste yarn. Cut yarn, leaving a 6" tail.
Leg 2 — Mustard Leg with Terracotta Cuff
Work exactly as for Leg 1, but reverse the colors: work the ribbed cuff in terracotta, the 6-rnd seed-stitch cuff band in terracotta, then change to mustard yarn and work the leg in Seed Stitch in the round to the same length. Do not cut yarn; leave sts on the needle.
Joining the Legs
Arrange both legs on the US 6 circular needle: with RS facing, knit across the 96 (104, 116, 128) sts of Leg 2 (mustard), place a marker (this is the new beg of rnd at the right side seam), then knit across the 96 (104, 116, 128) held sts of Leg 1 (terracotta). You now have 192 (208, 232, 256) sts on the needle. Place a second marker after the first 96 (104, 116, 128) sts to mark the left side seam. Join to work in the round. (The center front and center back of the shorts fall at the two side markers; the color change runs down the center front and center back.)
Upper Section
Continue working in Seed Stitch in the round, maintaining the color division: work the mustard sts in mustard and the terracotta sts in terracotta, changing colors at each side marker.
Work even for 4 (4, 5, 5)" / 10 (10, 12.5, 12.5) cm, or until piece measures approx. 2 (2, 2.5, 2.5)" / 5 (5, 6, 6) cm below the intended waistband. End after a Rnd 2. (192 [208, 232, 256] sts)
Waistband (terracotta, US 5 needles)
Change to US 5 needles and terracotta yarn.
Rnds 1–12: Work in 2x2 Rib in the round. (192 [208, 232, 256] sts) — approx. 1 1/2" / 4 cm.
Bind off all sts loosely in rib pattern.
Assembly and Finishing
Weave in all ends. Thread each yarn tail onto the tapestry needle and weave it back and forth through the wrong side of the fabric for about 2" (5 cm), then trim close to the fabric. Do not knot the tails — weaving hides them securely.
Block lightly to measurements. Soak the shorts in cool water for about 15 minutes, gently squeeze out the water (do not wring), roll them in a towel to remove excess moisture, then lay them flat and pin the cuffs flat. Steam the seed stitch gently with an iron held just above the fabric (never press the iron directly onto the wool) so the texture lies even. Let dry completely.
Make the waistband casing. Fold the waistband in half to the inside and stitch the bound-off edge to the inside of the shorts with a whipstitch, leaving a 1" / 2.5 cm opening. To whipstitch: bring the needle from the inside out through both layers, then over the edge and back through, repeating along the edge.
Insert the elastic. Thread a length of 1/4" / 6 mm elastic (cut to your waist measurement minus 2" / 5 cm) through the casing, overlap the ends and sew them securely, then close the opening. Alternatively, leave the waistband unfolded and wear it as a wide ribbed band.
Optional drawstring: With terracotta yarn, crochet a 40" / 102 cm chain (ch 130) using a 4.0 mm hook and thread it through the waistband casing before closing, knotting the ends.
Pro Tips and Variations
- Change the colors. Try navy and cream, olive and rust, or any two colors you love. Keep one leg in each color and swap the cuff colors for contrast.
- Adjust the length. To make the shorts longer or shorter, add or subtract rounds before joining the legs, keeping both legs identical. Remember that every 30 rounds adds about 4" (10 cm) at this gauge.
- Adjust the width. To make the shorts wider or narrower, add or subtract stitches in multiples of 4 (to keep the 2x2 rib and seed stitch even) on both legs equally.
- Substitute the yarn. Any DK weight yarn will work, but choose one with good stitch definition so the seed stitch texture shows. Avoid fuzzy yarns like mohair, which hide the pattern.