Meteor Shower Striped Finger Cone Free Pattern: Pastel Candy Crochet Finger Puppet
Meteor Shower Striped Finger Cone: A Pastel Candy Finger Puppet
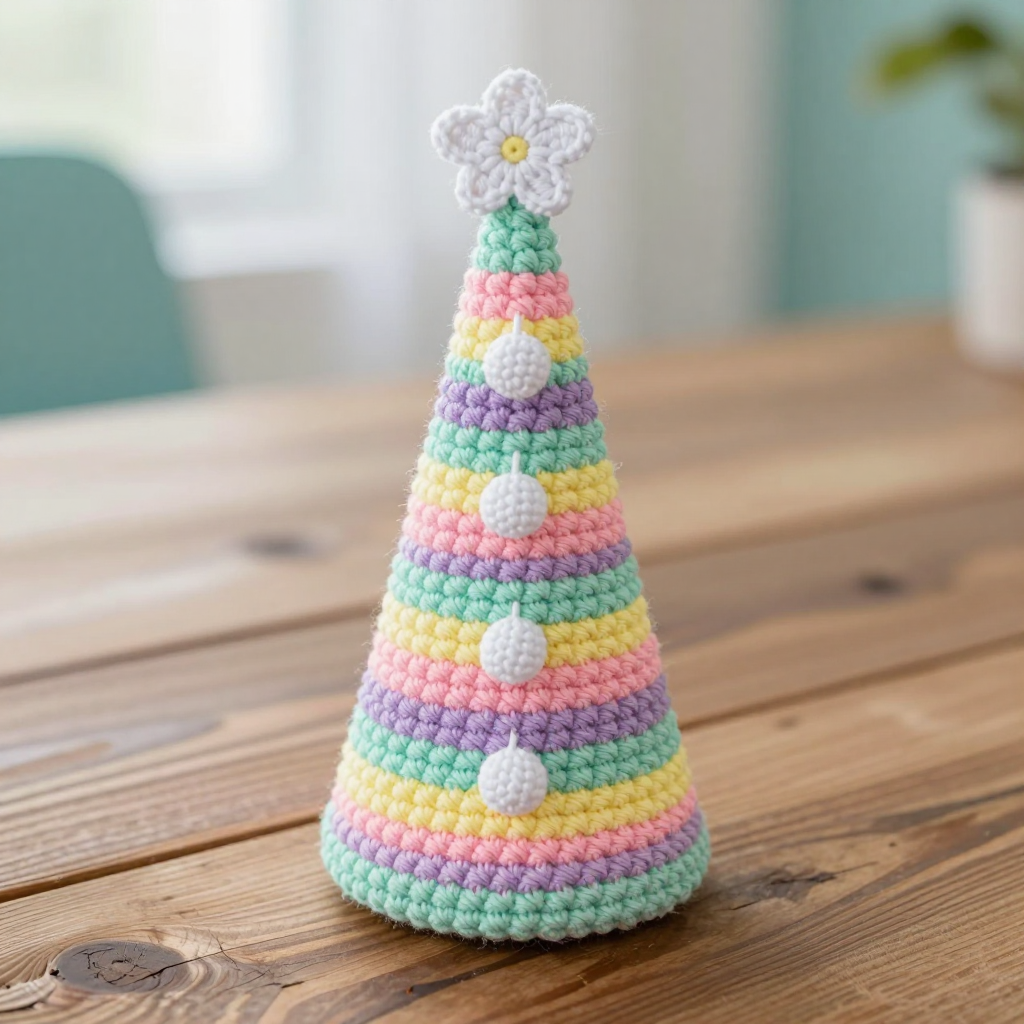
If you have ever wanted to make a tiny, adorable toy but felt nervous about complicated shaping, this is the project for you. The Meteor Shower Striped Finger Cone is a snug little crocheted hat for your finger, worked in cheerful candy stripes of pastel pink, mint, lavender, and butter yellow. It is perfect for complete beginners who have just learned the single crochet stitch and want a real, finished project to show for it. The finished cone is about 2.75 inches tall, soft and squishy in sport weight cotton, with three tiny white bobbles trailing down one side like a meteor shower and a little cherry blossom star sitting right at the tip. It fits a child or adult index finger snugly and makes a sweet, pocket-sized gift or a playful storytelling prop.
Materials Needed
- Yarn: Sport weight cotton yarn (approx. 125 yds / 50 g per ball). You need small amounts of Color A (pastel pink), Color B (pale mint), Color C (soft lavender), and Color D (butter yellow), plus a few yards of Color E (white) for the blossom and bobbles. Total yarn used is under 30 yards, so one ball of each color is plenty.
- Crochet hook: 2.75 mm (US C-2), or the size needed to match gauge.
- Stitch marker: At least one, to mark the first stitch of each round.
- Tapestry needle: A blunt-tipped needle with a large eye for weaving in ends and sewing on the bobbles and blossom.
- Scissors: Sharp small scissors for cutting yarn.
- Small scrap of yarn or cotton: For lightly stuffing the bobbles.
- Finished size: Finger cone approx. 2 in (5 cm) circumference at the base and 2.75 in (7 cm) tall. Blossom appliqué approx. 0.75 in (2 cm) across. Each bobble approx. 0.25 in (6 mm).
Abbreviations and Beginner Glossary
- sc – single crochet. Insert your hook into the stitch, yarn over (wrap the yarn around the hook), pull up a loop (you now have 2 loops on the hook), yarn over again, and pull through both loops. One single crochet made.
- ch – chain. Yarn over and pull through the loop on your hook. This makes one chain stitch.
- sl st – slip stitch. Insert your hook into the stitch, yarn over, and pull the yarn through both the stitch and the loop on your hook at the same time. It joins without adding height.
- hdc – half double crochet. Yarn over, insert hook into the stitch, yarn over and pull up a loop (3 loops on hook), yarn over and pull through all 3 loops at once.
- dc – double crochet. Yarn over, insert hook into the stitch, yarn over and pull up a loop (3 loops on hook), yarn over and pull through 2 loops, yarn over and pull through the last 2 loops.
- sc2tog – single crochet two stitches together (a decrease). Insert hook into the first stitch, yarn over and pull up a loop, insert hook into the next stitch, yarn over and pull up a loop (3 loops on hook), yarn over and pull through all 3 loops. This turns 2 stitches into 1.
- 2 sc in next st – work two single crochets into the same stitch. This is an increase and adds one stitch.
- magic ring – an adjustable loop. Wrap the yarn around your fingers to make a loop, then work your stitches into that loop and pull the tail tight to close the center hole.
- st(s) – stitch or stitches.
- round – one complete circle of stitches worked in the round (spiraling, not joined).
- fasten off – cut the yarn, pull the tail through the last loop, and tighten to secure.
- weave in ends – thread the yarn tail onto a tapestry needle and sew it back and forth through the inside of the work to hide it.
Gauge
24 sc x 26 rounds = 4 in (10 cm) in single crochet worked in the round.
Gauge means how many stitches and rounds fit into a set measurement. It matters because it controls the finished size: if your stitches are looser than the gauge, your cone will be too big and slide off the finger; if tighter, it will be too small. To check, crochet a small flat swatch of about 20 single crochets worked back and forth in rows, then measure a 4-inch section in the middle with a ruler. Count the stitches across and the rows up. If you have more stitches than 24, try a larger hook; if fewer, try a smaller hook. Because this project is worked in the round, you can also simply begin the cone and measure after Round 6 — if the circle is about 1 inch across, you are on track.
Beginner Tips Before You Start
- Use a stitch marker. Because you work in a continuous spiral, there is no seam to tell you where a round begins. Place a marker in the first stitch of each round and move it up as you go.
- Do not pull your yarn too tight. Tension should be relaxed and even. Tight stitches make a stiff cone that is hard to work into on the next round.
- Change colors cleanly. Change color on the last yarn-over of the final stitch of a round, so the new color begins at the start of the next round. Carry the unused color loosely up the inside — do not cut after every stripe.
- Count every round. The stitch count stays at 18 for most of the cone. If you drift, the stripes will slant and the fit will suffer.
- Keep the inside tidy. Lay carried yarn strands flat against the inside as you go so they do not peek through the front.
- Make the small pieces last. Crochet the cone first, then the bobbles and blossom, so you can match their placement to the finished cone.
Step-by-Step Instructions
Stripe Sequence
Work 3 rounds of each color in this order, repeating: A, B, C, D. Begin with Color A at the tip.
Finger Cone
With Color A, make a magic ring.
Round 1: 6 sc into the ring. Pull the ring closed. (6 sts)
Round 2: 2 sc in each st around. (12 sts)
Round 3: [Sc in next st, 2 sc in next st] around. (18 sts)
Rounds 4–6: Sc in each st around, changing to Color B on the last stitch of Round 6. (18 sts)
Rounds 7–9: With Color B, sc in each st around, changing to Color C on the last stitch of Round 9. (18 sts)
Rounds 10–12: With Color C, sc in each st around, changing to Color D on the last stitch of Round 12. (18 sts)
Rounds 13–15: With Color D, sc in each st around, changing to Color A on the last stitch of Round 15. (18 sts)
Rounds 16–18: With Color A, sc in each st around, changing to Color B on the last stitch of Round 18. (18 sts)
Rounds 19–21: With Color B, sc in each st around, changing to Color C on the last stitch of Round 21. (18 sts)
Rounds 22–24: With Color C, sc in each st around. Do not change color at the end of Round 24. (18 sts)
Fasten off Color C, leaving a 6 in (15 cm) tail. Weave the tail through the final round of stitches and draw the base opening closed slightly, then secure and weave in the end. The cone should measure approx. 2.75 in (7 cm) from tip to base.
Bobbles (make 3)
With Color E, make a magic ring.
Round 1: 6 sc into the ring. Pull the ring closed. (6 sts)
Round 2: [Sc in next st, sc2tog] around. (4 sts)
Stuff each bobble very lightly with a tiny scrap of yarn or cotton, then weave the tail through the remaining 4 stitches and pull tight to close. Leave a 6 in (15 cm) tail for sewing. Make 3 bobbles total.
Cherry Blossom Star Appliqué
With Color E, make a magic ring.
Round 1: [Ch 3, sl st into the ring] 5 times. Pull the ring closed gently. (5 petals)
Round 2: Sl st into the first ch-3 space, then in each ch-3 space around work [sc, hdc, dc, hdc, sc]. Sl st to the first sc to join. Fasten off, leaving a 6 in (15 cm) tail. The blossom should measure approx. 0.75 in (2 cm) across.
Assembly and Finishing
- Sew on the bobbles. Thread a bobble tail onto your tapestry needle. Sew the three bobbles down one side of the cone, spacing them evenly in a vertical line along the same side: the first approx. 0.5 in (1.25 cm) below the tip, the second approx. 1.25 in (3 cm) below the tip, and the third approx. 2 in (5 cm) below the tip. Take a few small stitches through the cone and back through the bobble to anchor each one firmly, then knot on the inside.
- Sew on the blossom. Using the blossom's tail, sew the cherry blossom appliqué to the tip of the cone, centering it over the magic ring. Stitch around each petal edge with tiny stitches so it lies flat.
- Weave in all ends. Thread each remaining tail onto the tapestry needle and run it back and forth through the inside of the cone for about an inch, then trim close. Never knot bulky ends on the outside.
- Shape and block. Gently steam the cone and blossom with an iron held a few inches away (never touch the iron to the cotton), or spritz lightly with water and finger-shape. Do not press flat — you want to keep the rounded, tapered cone shape. Let it dry fully before wearing.
Pro Tips and Variations
- Change the palette. Swap the pastel candy stripes for bold jewel tones, or work the whole cone in one color and let the white bobbles and blossom be the only contrast.
- Adjust the size. For a smaller child's finger, stop the cone after Round 21 and close the base. For a larger adult finger, add 3 more rounds of any color before finishing.
- Substitute yarn. Any sport weight cotton works; a cotton-blend gives a little more stretch. Always re-check gauge with a new yarn so the fit stays snug.
- Add more meteors. Make five or six bobbles instead of three and trail them in a scattered diagonal for a fuller "shower" effect.