Inkwell Hexagon Crochet Thread Earrings Free Pattern
Inkwell Hexagon Crochet Thread Earrings — Free Beginner Pattern
Introduction
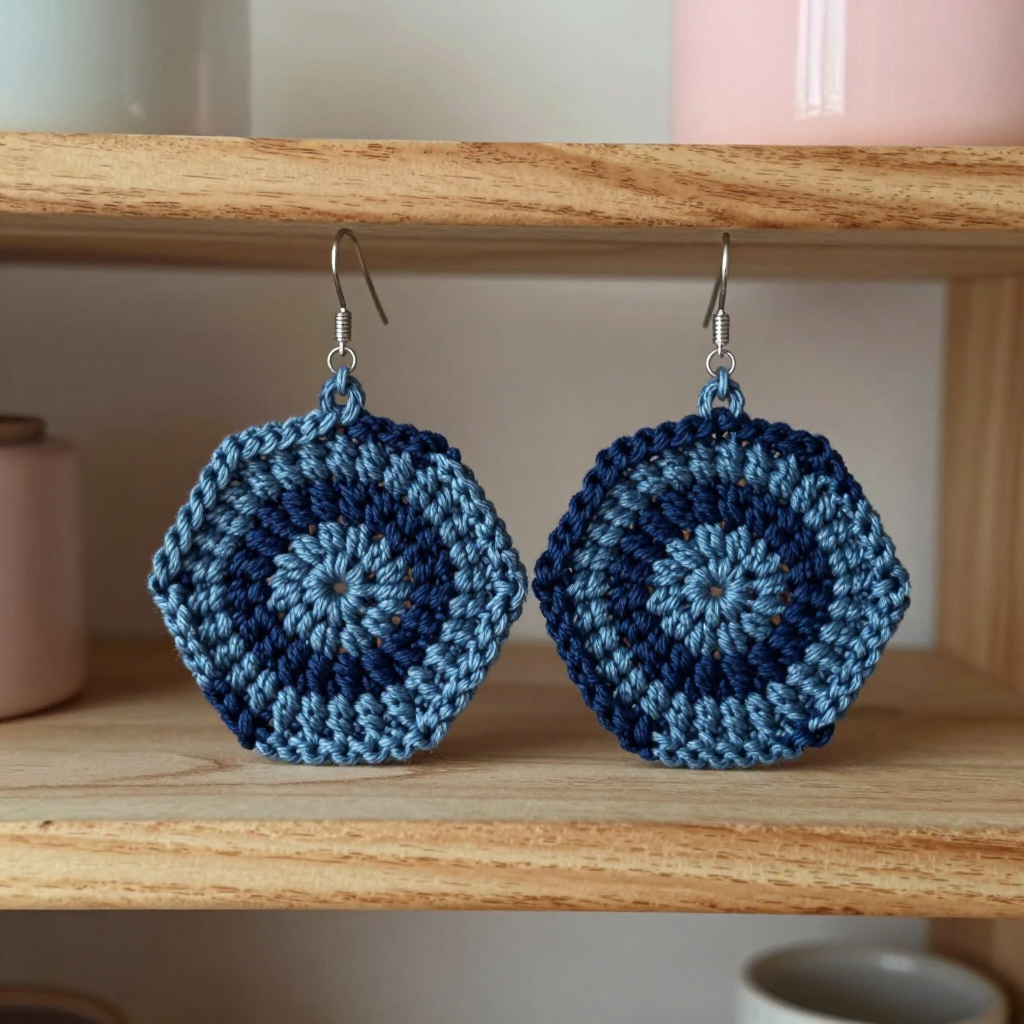
If you have never held a crochet hook before, these tiny Inkwell Hexagon earrings are the perfect first project. Each earring is a small six-sided medallion worked in the round — meaning you start in the very center and spiral outward — in deep midnight blue with a slate-blue outer edge. Because they are so small, you will finish your first one in about ten minutes, and you will get to practice every basic skill (holding the hook, making a ring, single crochet, and joining) without committing to a big project. The finished earrings are crisp, flat, one-inch hexagons with a soft cotton sheen and a little yarn loop at the top for your ear wire. They feel light as a feather and look like tiny pieces of dark-academia jewelry — like a little inkwell or a piece of sea glass you can wear.
Materials Needed
- Yarn: Lace weight (category 0) crochet thread, 100% mercerized cotton, size 10. You need less than 5 yards (4.5 m) per earring. Sample uses Aunt Lydia's Classic Crochet Thread size 10 in Midnight Blue (Color A) and Slate Blue (Color B).
- Hook: 1.5 mm steel crochet hook (US size 8).
- Stitch marker: 1 (optional but helpful — see Tips).
- Tapestry needle: a blunt-tipped needle with a large eye for weaving in ends.
- Scissors: small, sharp embroidery scissors work best.
- Optional findings: two ear wires or fishhook earring findings, plus two small jump rings if you have them.
- Optional: fabric stiffener or clear craft glue for a firmer finish.
Finished size: approx. 1 inch (2.5 cm) point to point, not counting the hanging loop. You will make 2 identical earrings.
Abbreviations and Beginner Glossary
- ch — chain. Make a loop of yarn over the hook and pull it through the loop already on your hook. This creates a small "chain" link. It is the simplest stitch.
- sc — single crochet. Insert your hook into the stitch, wrap yarn over the hook, pull up a loop (you now have 2 loops on the hook), wrap yarn over again, and pull through both loops. One single crochet made.
- sl st — slip stitch. Insert hook into the stitch, wrap yarn over, and pull that loop straight through both the stitch and the loop on your hook in one motion. It makes a nearly invisible joining stitch.
- st / sts — stitch / stitches.
- sp — space (the little gap between stitches).
- beg — beginning.
- magic ring — an adjustable ring. You loop the yarn into a circle, work your stitches into the circle, then pull the short tail to close the hole tight. It gives a neat, gap-free center.
- 2 sc in next st — work two single crochets into the same stitch. This is an increase: it adds one stitch and makes the piece wider.
- join with sl st to first sc — after working all the way around, make a slip stitch into the very first single crochet of that round to close the circle.
- fasten off — cut the yarn a few inches from the work, then pull the tail all the way through the last loop to lock it.
- weave in ends — thread a tail onto the tapestry needle and sew it back and forth through the back of the work so it disappears.
- US terms — this pattern uses American stitch names. (A US single crochet is called a "double crochet" in UK patterns.)
Gauge
Gauge: Round 1 (6 sc in a magic ring) measures approx. 3/16 inch (5 mm) across. The finished hexagon measures approx. 1 inch (2.5 cm) point to point.
Why gauge matters here: gauge is how big your stitches come out. For earrings, gauge is not critical — nobody will notice if yours is a millimeter bigger. What matters is that your tension is tight and even, so the medallion lies flat and looks crisp. If your stitches are loose, the hexagon will cup (curl up like a bowl) instead of lying flat.
How to check: work Rounds 1–4 once as a practice swatch. Lay it on the table. If it lies flat and measures about 1 inch across, you are perfect. If it cups, try a smaller hook or pull your yarn a little firmer. If it ruffles and waves, loosen up slightly or go up one hook size.
Beginner Tips Before You Start
- Keep the magic ring tight. After Round 1, pull the short starting tail firmly so the center hole closes completely. A gap in the middle is the most common beginner problem.
- Do not pull your yarn too tight. "Tight and even" means consistent, not strangling. If the hook squeaks or you can barely insert it, you are pulling too hard.
- Use a stitch marker. Place a marker in the first stitch of each round so you always know where to join. Move it up each round.
- Count out loud. Every round ends with a specific stitch count in parentheses. Count your stitches before joining — it takes five seconds and saves you from a lopsided hexagon.
- Work the increases in the six "spokes." A hexagon is made by adding exactly 6 stitches per round, one in each of six evenly spaced spots. Keep them evenly spaced and your shape will be a perfect six-sided medallion.
- Keep your tension consistent when you change color. Pull the new color through on the final slip stitch of the round so the change is neat and hidden.
Step-by-Step Instructions
Make 2 earrings, identical. Each earring has four rounds plus a hanging loop. Every round begins with a ch 1 (this does not count as a stitch) and ends with a sl st into the first sc of that round.
Part 1: The Medallion (Rounds 1–4)
Round 1 (Color A — Midnight Blue): Make a magic ring. Ch 1. Work 6 sc into the ring. Join with sl st to first sc. (6 sc) Pull the starting tail firmly to close the ring.
Round 2 (Color A): Ch 1. Work 2 sc in each st around. Join with sl st to first sc. (12 sc)
Round 3 (Color A): Ch 1. *Sc in next st, 2 sc in next st; repeat from * around. Join with sl st to first sc. (18 sc)
Round 4 (Color B — Slate Blue): Change to Color B by pulling the new color through on the final sl st of Round 3. Ch 1. *Sc in next 2 sts, 2 sc in next st; repeat from * around. Join with sl st to first sc. (24 sc) Fasten off Color B and weave in the ends.
How the math works: each round adds exactly 6 stitches (6 → 12 → 18 → 24), which is what makes the six-sided hexagon shape. Do not add extra stitches — the count in parentheses is your check.
Part 2: The Hanging Loop
Loop (Color A): With Color A, join yarn to any stitch on the outer edge of the hexagon with a sl st. Ch 8, then sl st back into the same stitch to form a small loop. Fasten off and weave in the tail securely on the back of the medallion.
Part 3: Second Earring
Repeat Parts 1 and 2 exactly for the second earring so the pair matches.
Assembly and Finishing
- Weave in all ends. Thread each tail onto the tapestry needle and sew it back and forth through the back of the medallion for about half an inch, then trim. Do not cut the starting tail too short — use it to snug the center closed first.
- Block lightly. Mist the medallions with water and pin them flat on a foam blocking mat, shaping the six points evenly with your fingers. Let them dry completely. This is what makes the edges crisp and the points sharp.
- Optional stiffening. For a stiffer, more durable earring, apply a thin coat of fabric stiffener or clear craft glue to the back and let it dry flat.
- Attach the ear wires. Open a jump ring (twist, don't pull), thread it through the hanging loop and the ear wire loop, then close it. If you have no jump rings, thread the ear wire directly through the yarn loop.
Pro Tips and Variations
- Change the colors. Try a cream center with a gold outer round for a vintage look, or all one color for a minimalist pair. Any two lace-weight cotton colors work.
- Make a matching set. Work the same hexagon in a heavier yarn (size 3 cotton with a 2.5 mm hook) for a matching pendant or a set of coasters.
- Adjust the size. Add a fifth round (sc in next 3 sts, 2 sc in next st around = 30 sc) for a larger 1¼-inch medallion, or stop after Round 3 for a tiny stud-sized hexagon.
- Substitute yarn. Any size 10 crochet thread works. Avoid fuzzy or stretchy yarns — smooth mercerized cotton gives the crispest, most jewelry-like finish.