Free Pattern: Fair Isle Mermaid Pillow Pal Knit Toy
Free Pattern: Fair Isle Mermaid Pillow Pal Knit Toy
Introduction
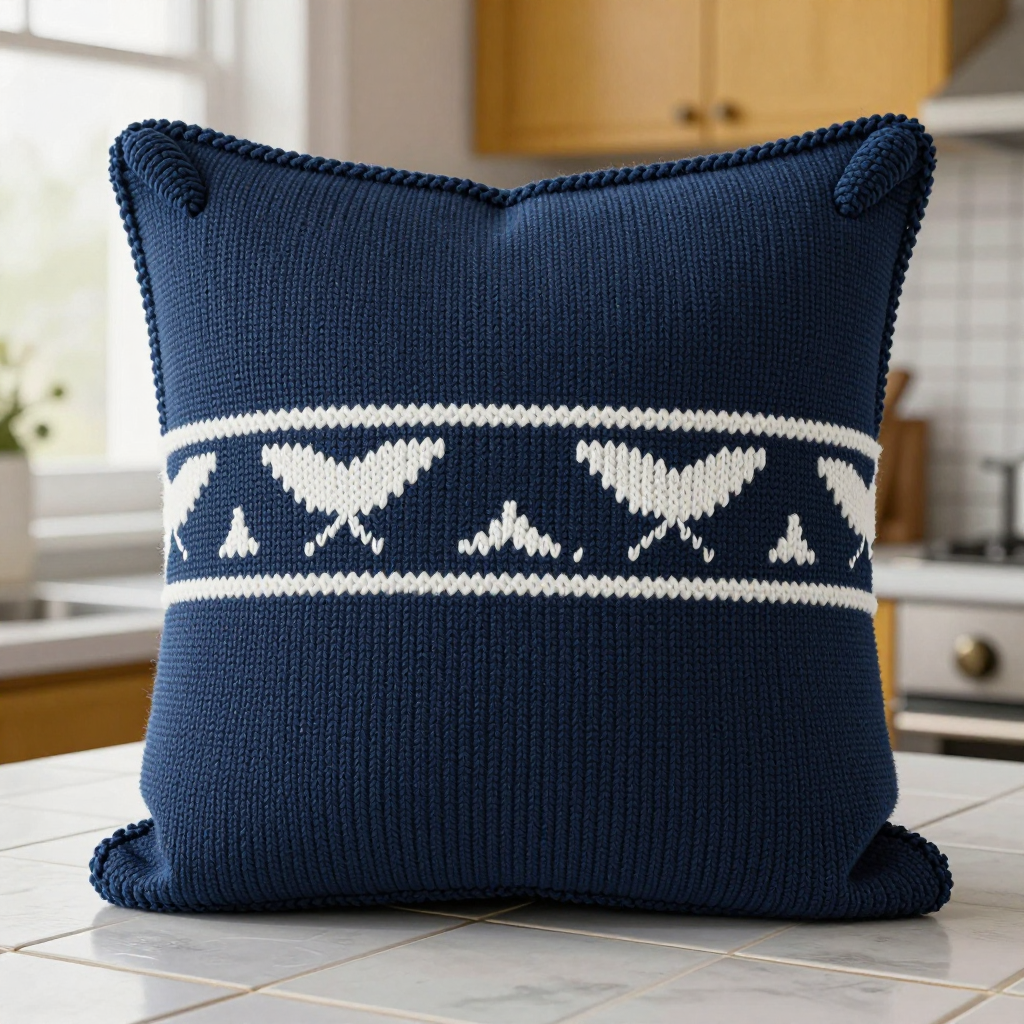
If you have ever wanted to try colorwork but felt a little nervous, this Fair Isle Mermaid Pillow Pal is the perfect first project for you. It is a plump, squishy little pillow toy — about 8 inches wide and 6 inches tall — knit in soft worsted-weight acrylic with a navy-and-white mermaid band running across the front. The finished pal has crisp V-shaped stitches, ridged garter-stitch edges at the top and bottom, and two tiny knitted fin appliqués sewn onto the top corners, angled outward like a mermaid's tail. It is small enough to finish in a weekend, forgiving enough that a beginner can succeed, and soft enough to become someone's favorite cuddle buddy. You only need knit and purl stitches plus a simple color change — no shaping, no complicated charts to memorize, and no previous colorwork experience required.
Materials Needed
- Yarn: Worsted-weight acrylic yarn, approximately 120 yds / 110 m total — 1 skein navy (approx. 80 yds) and 1 skein white (approx. 40 yds). A smooth, soft acrylic makes the colorwork read crisply.
- Knitting needles: US 7 (4.5 mm) straight knitting needles.
- Spare needle: A second US 7 (4.5 mm) needle or a stitch holder (used to hold stitches while you work the fin appliqués).
- Tapestry needle: A blunt-tipped needle with a large eye, for seaming and weaving in ends.
- Scissors: Any small pair for cutting yarn.
- Stitch markers: A few removable markers help you track the colorwork band and the edges.
- Stuffing: A small amount of polyester fiberfill.
- Finished size: Approximately 8 in wide x 6 in tall (20 cm x 15 cm), about 2 in thick when stuffed.
Abbreviations and Beginner Glossary
- k – knit. Insert the right needle into the front of the stitch from left to right, wrap the yarn around, and pull a loop through. This creates a flat "V" on the front.
- p – purl. Insert the right needle into the front of the stitch from right to left, wrap the yarn around the front, and pull a loop through. This creates a bump on the front.
- st(s) – stitch(es). One loop on your needle.
- RS – right side. The front, public face of your knitting (the side you want to show).
- WS – wrong side. The back, hidden face of your knitting.
- MC – main color. Here, navy.
- CC – contrast color. Here, white.
- k2tog – knit two stitches together. Insert the needle into the next two stitches at once and knit them as one. This decreases your stitch count by one.
- p2tog – purl two stitches together. Purl the next two stitches as one. This also decreases by one.
- Garter stitch – knitting every row. It makes a stretchy, ridged fabric.
- Stockinette stitch – knit on RS rows, purl on WS rows. It makes a smooth fabric with V shapes on the front.
- Fair isle / stranded colorwork – using two colors in the same row. You knit with one color while carrying the other loosely across the back (wrong side).
- Float – the strand of unused color carried across the back of the work.
- Bind off – finishing the live stitches so they don't unravel (knit two, lift the first over the second, repeat).
- Cast on – creating your very first row of loops on the needle.
Gauge
18 sts and 24 rows = 4 in / 10 cm in stockinette stitch, blocked.
Gauge matters because it tells you whether your finished pillow will match the 8 x 6 inch size. If your stitches are bigger than the pattern's, the pillow will come out larger; if smaller, it will shrink. To check, cast on about 24 stitches, work in stockinette for about 4 inches, bind off, and lay the swatch flat. Place a ruler across the middle and count how many stitches fit in 4 inches. If you have more than 18, go up a needle size; if fewer, go down. Always measure the middle of the swatch, never the curled edges.
Beginner Tips Before You Start
- Keep your floats loose. When you carry the unused color across the back, leave it relaxed — if it pulls tight, the front of your pillow will pucker. Stretch the fabric gently every few stitches.
- Catch your floats every 3–4 stitches. On long stretches of one color, twist the two yarns around each other on the wrong side so the carried strand doesn't dangle.
- Use stitch markers. Place a marker after every 8 stitches in the colorwork band so you always know where you are in the chart.
- Don't pull the yarn too tight at color changes. Tension is the number-one beginner issue — aim for even, relaxed stitches.
- Count your stitches at the end of every row. You should always have 36 stitches on the main panel until the fin appliqués.
- Work the fins last. They are small and quick, and doing them after the main panel keeps your momentum going.
Step-by-Step Instructions
Main Pillow Panel (make 1)
Cast on 36 sts with MC (navy).
Rows 1–4: Knit every row (garter stitch) for a firm bottom edge. (36 sts)
Row 5 (RS): Knit in MC. (36 sts)
Row 6 (WS): Purl in MC. (36 sts)
Fair Isle Mermaid Band (Rows 7–22)
Work in stockinette stitch (knit on RS rows, purl on WS rows), changing colors as written. Read RS rows right to left and WS rows left to right. Key: N = navy (MC), W = white (CC). Each row totals 36 stitches.
Row 7 (RS): N x8, W x2, N x16, W x2, N x8. (36 sts)
Row 8 (WS): N x8, W x2, N x16, W x2, N x8. (36 sts)
Row 9 (RS): N x7, W x4, N x14, W x4, N x7. (36 sts)
Row 10 (WS): N x7, W x4, N x14, W x4, N x7. (36 sts)
Row 11 (RS): N x6, W x6, N x12, W x6, N x6. (36 sts)
Row 12 (WS): N x6, W x6, N x12, W x6, N x6. (36 sts)
Row 13 (RS): N x5, W x8, N x10, W x8, N x5. (36 sts)
Row 14 (WS): N x5, W x8, N x10, W x8, N x5. (36 sts)
Row 15 (RS): N x4, W x10, N x8, W x10, N x4. (36 sts)
Row 16 (WS): N x4, W x10, N x8, W x10, N x4. (36 sts)
Row 17 (RS): N x5, W x8, N x10, W x8, N x5. (36 sts)
Row 18 (WS): N x5, W x8, N x10, W x8, N x5. (36 sts)
Row 19 (RS): N x6, W x6, N x12, W x6, N x6. (36 sts)
Row 20 (WS): N x6, W x6, N x12, W x6, N x6. (36 sts)
Row 21 (RS): N x7, W x4, N x14, W x4, N x7. (36 sts)
Row 22 (WS): N x7, W x4, N x14, W x4, N x7. (36 sts)
This creates two mirrored white mermaid-tail shapes on a navy ground across the front.
Upper Panel
Rows 23–34: Work in stockinette stitch in MC only (knit RS rows, purl WS rows). (36 sts)
Rows 35–38: Knit every row (garter stitch) for the top edge. (36 sts)
Bind off all 36 sts loosely.
Fin Appliqués (make 2)
With MC, cast on 10 sts.
Row 1 (RS): Knit. (10 sts)
Row 2 (WS): Purl. (10 sts)
Row 3: K1, k2tog, k4, k2tog, k1. (8 sts)
Row 4: Purl. (8 sts)
Row 5: K1, k2tog, k2, k2tog, k1. (6 sts)
Row 6: Purl. (6 sts)
Row 7: K1, k2tog, k2tog, k1. (4 sts)
Row 8: Purl. (4 sts)
Row 9: K2tog twice. (2 sts)
Row 10: P2tog. (1 st)
Cut the yarn and pull it through the last stitch to secure. Make a second fin the same way.
Assembly and Finishing
- Block the main panel. Pin it to 8 in x 6 in on a towel, mist lightly with water, and let it dry flat. This smooths the colorwork and sets the size.
- Fold and seam. With the RS facing out, fold the panel in half with WS together. Using MC and your tapestry needle, whipstitch (small stitches over the edge) or mattress-stitch (side-by-side stitches that pull the edges together invisibly) the side and bottom edges, leaving the top edge open.
- Stuff. Fill firmly but evenly with polyester fiberfill, pushing filling into the corners so the pillow is plump and smooth.
- Close the top. Seam the top edge closed the same way you seamed the sides.
- Attach the fins. Sew one fin appliqué to each top corner, pointing outward, using MC and small invisible stitches so the thread doesn't show on the front.
- Weave in ends. Thread each tail onto the tapestry needle and run it through the back of several stitches, then trim. Lightly steam the seams and fins to settle the stitches.
Pro Tips and Variations
- Change the colors. Try teal and cream, or pink and white, for a different mermaid palette. Keep one dark and one light color so the pattern reads clearly.
- Adjust the size. Cast on in multiples of 4 stitches to make a wider pillow, and add or remove stockinette rows in the upper panel to change the height. Keep the colorwork band centered.
- Substitute yarn. Any worsted-weight yarn works — cotton gives a crisper look, while a soft wool blend feels extra squishy. Always check your gauge first.
- Add a hanging loop. Before seaming the top closed, knit a small 6-stitch i-cord and sew it into the top center for a hanging toy.