Bubblegum Kisses Baby Blanket Free Pattern – Knit a Cloud-Soft Textured Heirloom

Bubblegum Kisses Baby Blanket Free Pattern – Knit a Cloud-Soft Textured Heirloom
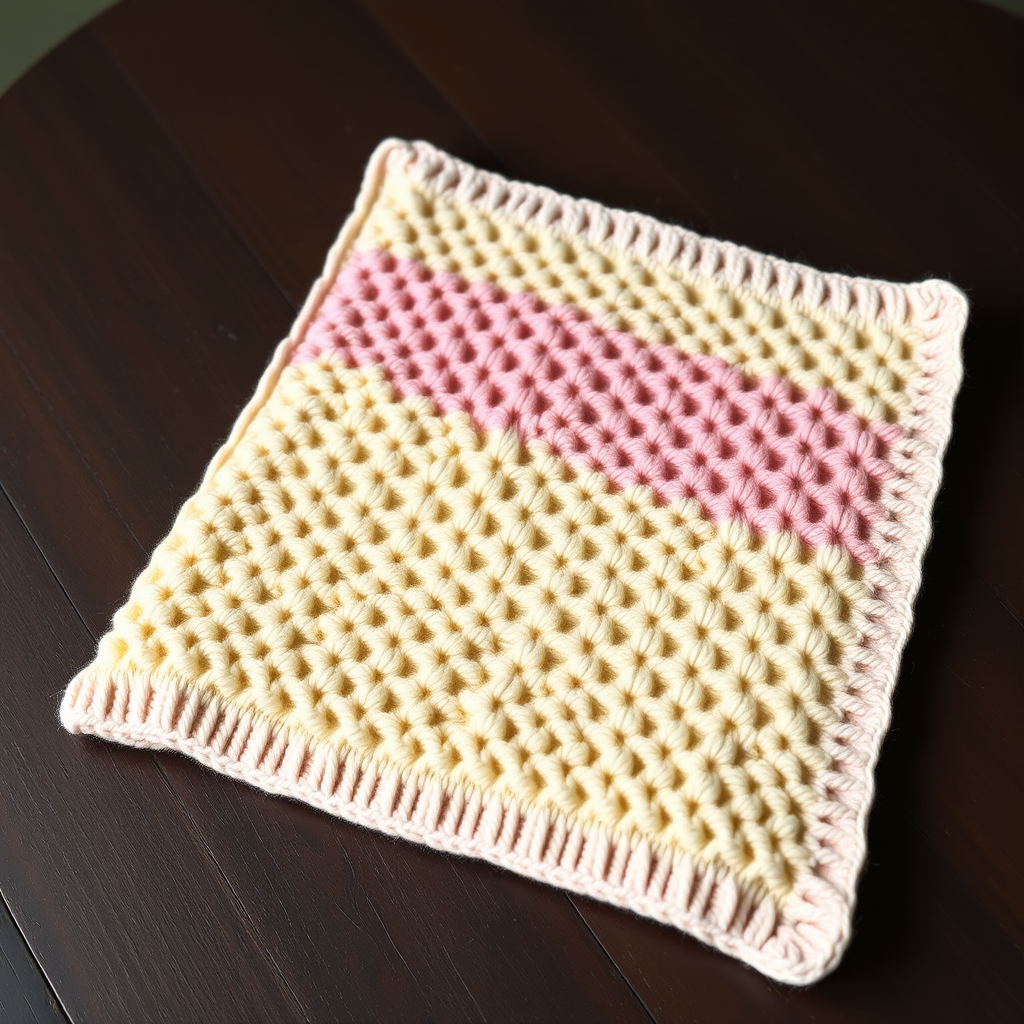
Wrap your little one in a dreamy, cloud-soft blanket with a unique bubble-and-kiss stitch pattern that feels as sweet as it looks. This heirloom-quality knit uses a delicate pastel palette and a plush, squishy texture that's perfect for snuggles. The Bubblegum Kisses Baby Blanket is an heirloom piece designed to be passed down, featuring a dimensional honeycomb-like effect created by alternating elongated "bubble" stitches and smooth "kiss" stitches. The result is a cloud-like, cozy, and utterly irresistible blanket that any new parent would treasure.
This pattern is perfect for intermediate knitters looking to expand their skills, but with clear instructions and detailed explanations, even a confident beginner can tackle this rewarding project. The blanket is worked flat in one piece, with a garter-stitch border knit first, followed by a mesmerizing two-row repeat with gentle color changes. The final result is a 36" x 42" rectangular masterpiece that showcases a beautiful interplay of blush pink, powder blue, mint cream, and butter yellow.
Materials Needed
Before you begin your knitting journey, gather the following materials. Having everything prepared will make your crafting experience smooth and enjoyable.
Yarn
- Weight: Worsted weight (Category 4) superwash merino or merino blend
- Total Yardage: Approximately 1200 yards
- Color Distribution:
- Main Color (MC) 'Blush Pink': 400 yards
- Contrast Color A 'Powder Blue': 300 yards
- Contrast Color B 'Mint Cream': 300 yards
- Contrast Color C 'Butter Yellow': 200 yards
Needles & Notions
- Knitting Needle: US Size 7 (4.5 mm) circular knitting needle, 32-inch cable (or size needed to obtain gauge)
- Stitch Markers (optional but helpful)
- Tapestry Needle for weaving in ends
Gauge
- Stockinette Stitch: 20 stitches and 28 rows = 4 inches, after blocking
- Pattern Repeat: 1 pattern repeat (16 stitches) = 3.25 inches wide
Note: Always knit a gauge swatch before starting to ensure your finished blanket matches the intended dimensions. Blocking is essential to achieve the correct gauge and to open up the beautiful bubble texture.
Step-by-Step Instructions
Follow these detailed instructions carefully, and you'll be amazed at how quickly this beautiful blanket comes together. The pattern is divided into clear sections for easy navigation.
Finished Size
Approximately 36 inches wide x 42 inches long (adjustable by adding repeats).
Special Stitches
Master these three special stitches before you begin. They are the heart of the Bubblegum Kisses pattern.
- K1B (Knit 1 Below): Insert your needle into the stitch directly below the next stitch on the left needle, knit it, then drop the stitch above. This creates an elongated, bubbly stitch that forms the "bubble" part of the pattern.
- K2tog: Knit two stitches together. (Not used in this pattern, but listed for reference.)
- SSK: Slip, slip, knit. Slip two stitches knitwise one at a time, then knit them together through the back loops. (Not used in this pattern, but listed for reference.)
- YO: Yarn over. (Not used in this pattern, but listed for reference.)
Pattern Notes
- The blanket is worked flat in one piece. The border is knit first, then the main body is worked in a two-row repeat with color changes.
- Use a slipped-stitch edge for a neat, braided look. This is achieved by always slipping the first and last stitch of every row purlwise with the yarn in front.
- The color sequence is always: MC, Color A, MC, Color B, MC, Color C, then repeat.
Border (Bottom)
With MC (Blush Pink), cast on 180 stitches.
Row 1 (RS): Slip 1 purlwise with yarn in front, knit to last stitch, slip 1 purlwise with yarn in front.
Row 2 (WS): Slip 1 purlwise with yarn in front, purl to last stitch, slip 1 purlwise with yarn in front.
Repeat these 2 rows until the border measures 3 inches from the cast-on edge, ending with a WS row. You will have a garter-stitch border with beautiful slipped edges that create a braided trim.
Main Body
Now we begin the magical bubble-and-kiss pattern. Pay close attention to the alternating K1B placement and the color changes.
Row 1 (RS): With MC, slip 1 purlwise, knit 3 (edge stitches), *K1B, k1, repeat from * until 4 stitches remain, knit 4 (edge stitches).
Row 2 (WS): With MC, slip 1 purlwise, purl to last stitch, slip 1 purlwise.
Row 3 (RS): Change to Color A (Powder Blue). Slip 1 purlwise, knit 3, *k1, K1B, repeat from * until 4 stitches remain, knit 4.
Row 4 (WS): With Color A, slip 1 purlwise, purl to last stitch, slip 1 purlwise.
Row 5 (RS): Change to MC. Slip 1 purlwise, knit 3, *K1B, k1, repeat from * until 4 stitches remain, knit 4.
Row 6 (WS): With MC, slip 1 purlwise, purl to last stitch, slip 1 purlwise.
Row 7 (RS): Change to Color B (Mint Cream). Slip 1 purlwise, knit 3, *k1, K1B, repeat from * until 4 stitches remain, knit 4.
Row 8 (WS): With Color B, slip 1 purlwise, purl to last stitch, slip 1 purlwise.
Row 9 (RS): Change to MC. Slip 1 purlwise, knit 3, *K1B, k1, repeat from * until 4 stitches remain, knit 4.
Row 10 (WS): With MC, slip 1 purlwise, purl to last stitch, slip 1 purlwise.
Row 11 (RS): Change to Color C (Butter Yellow). Slip 1 purlwise, knit 3, *k1, K1B, repeat from * until 4 stitches remain, knit 4.
Row 12 (WS): With Color C, slip 1 purlwise, purl to last stitch, slip 1 purlwise.
Repeat Rows 1-12 for the pattern, maintaining the color sequence (MC, A, MC, B, MC, C) and the alternating K1B placement. Continue until the main body measures approximately 36 inches from the border, ending with a WS row after a MC row.
Border (Top)
With MC, repeat the border rows (slip 1, knit to last, slip 1) for 3 inches, ending with a WS row.
Bind off loosely in pattern (knitwise on RS). This loose bind-off ensures the edge remains stretchy and matches the flexibility of the cast-on edge.
Finishing
Weave in all ends with a tapestry needle. Take your time with this step—secure ends will ensure your blanket lasts for generations.
Block gently to size, pinning edges to open up the bubble texture. This is a crucial step that transforms your knitting from good to spectacular. Allow to dry completely. The blanket will be squishy and soft, with a beautiful dimensional bubble-and-kiss pattern.
Tips for Success
To ensure your Bubblegum Kisses blanket turns out perfectly, keep these expert tips in mind:
- Count your stitches after each pattern repeat, especially when changing colors. The edge stitches (4 on each side) should always remain consistent.
- Don't pull your color changes too tight when switching yarns. This prevents puckering and keeps the fabric even.
- Use a lifeline if you're new to K1B stitches. Thread a contrasting piece of yarn through your stitches after a completed row—if you make a mistake, you can easily rip back to the lifeline without losing your work.
- Block generously. The bubble texture really comes alive after a good soak and pinning. Don't skip this step!
Customization Ideas
While the Bubblegum Kisses pattern is stunning as written, feel free to make it your own:
- Size Adjustments: To make a larger or smaller blanket, add or subtract multiples of 16 stitches (one full pattern repeat). Each repeat adds approximately 3.25 inches in width.
- Color Variations: Experiment with different pastel palettes—lavender, peach, and sage would be gorgeous. Or create a monochromatic version using shades of a single color for a more subtle effect.
- Yarn Substitutions: While superwash merino is recommended for its softness and durability, any worsted weight yarn with good stitch definition will work beautifully.
This heirloom-quality blanket is more than just a baby gift—it's a labor of love that will be cherished for years to come. The unique bubble-and-kiss texture is both visually stunning and wonderfully tactile, making it perfect for little hands to explore. Whether you're knitting for your own little one or as a gift for someone special, the Bubblegum Kisses Baby Blanket is sure to become a treasured keepsake.
Happy knitting, and enjoy watching your blanket come to life, one bubble at a time!