The Celestial Cascade Scarf Free Pattern – Knit a Starry Night Lace Wrap
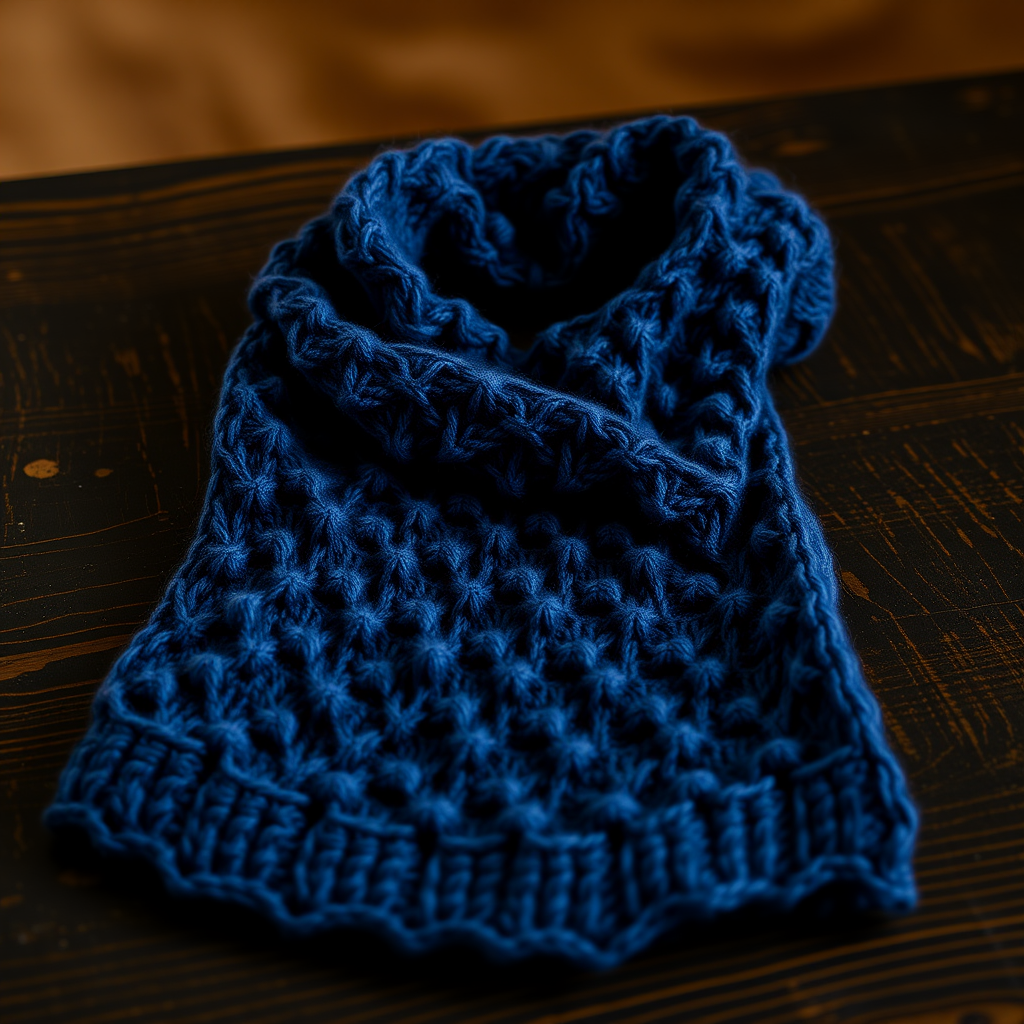
The Celestial Cascade Scarf: Knit a Starry Night Lace Wrap
Wrap yourself in a galaxy of soft, hand-knit lace with this celestial scarf, featuring a cascade of star-shaped motifs and a delicate, airy texture. Perfect for adding a touch of cosmic elegance to any outfit, this pattern is a dream to knit and a joy to wear. The deep navy blue yarn evokes a clear night sky, while the dimensional star stitches twinkle like celestial bodies scattered across the fabric. This beginner-friendly pattern introduces you to lace techniques in a manageable, repetitive format that builds confidence with every row.
Whether you're looking for a thoughtful handmade gift or a luxurious treat for yourself, the Celestial Cascade Scarf delivers both beauty and warmth. The garter stitch borders keep the edges neat and structured, while the openwork body drapes elegantly around your neck or shoulders. Let's dive into this cosmic knitting adventure!
Materials Needed
Before you begin, gather the following supplies to ensure a smooth knitting experience:
- Yarn: Worsted weight yarn in deep navy blue (e.g., Lion Brand Heartland in 'Mount Rainier') – 2 skeins (approx. 400 yards). The rich color is essential to the starry night effect, but feel free to substitute any worsted weight yarn in a color that inspires you.
- Needles: US 7 (4.5 mm) knitting needles. Straight needles work perfectly for this rectangular scarf, though circular needles can also be used if you prefer.
- Gauge: 18 stitches and 24 rows = 4 inches in stockinette stitch (after blocking). Achieving the correct gauge ensures your scarf matches the finished measurements, though slight variations will still produce a beautiful result.
- Extras: Tapestry needle for weaving in ends, blocking mats and pins (optional but recommended for best results), scissors.
Finished Measurements & Special Stitches
Finished Measurements: Approximately 12 inches wide x 70 inches long (after blocking). The lace pattern opens up beautifully with blocking, so don't skip this step!
Special Stitches You'll Need
- Yo (Yarn Over): Bring the yarn to the front of the work, then over the right needle to the back. This creates an intentional hole in the fabric, forming the lace pattern.
- K2tog (Knit Two Together): Insert the right needle into two stitches on the left needle as if to knit, then knit them together as one. This decreases the stitch count by one and leans to the right.
- Ssk (Slip, Slip, Knit): Slip two stitches knitwise, one at a time, from the left needle to the right needle. Insert the left needle into the front of both slipped stitches and knit them together through the back loop. This decreases by one and leans to the left, creating a balanced lace pattern.
- P2tog (Purl Two Together): Insert the right needle into two stitches as if to purl, then purl them together as one. This decreases by one on the wrong side rows.
- Star Stitch (worked over 3 stitches): Insert the right needle into the next 3 stitches as if to knit, yarn over, pull through a loop (you'll have 3 loops on the right needle), then knit the 3 stitches together through the back loop. This creates a small bobble-like star that adds delightful texture to your scarf.
Step-by-Step Instructions
Follow these detailed instructions carefully, and you'll be amazed at how quickly the celestial pattern emerges. Remember to take your time, especially with the star stitch, and enjoy the rhythmic flow of the lace.
Cast On
Loosely cast on 54 stitches. A loose cast-on is essential for a stretchy edge that matches the lace body. If you tend to cast on tightly, use a larger needle (US 8 or 9) just for the cast-on row, then switch to your US 7 needles.
Border Rows (Rows 1-4)
Knit all stitches for 4 rows. This creates a garter stitch border that frames the scarf beautifully and prevents curling. The border adds structure and a clean, finished look to both ends of the scarf.
Body Pattern
Now we begin the lace pattern. The pattern is worked over a multiple of 12 stitches, plus 6 stitches for the borders (3 on each side). With 54 stitches, you'll have 4 full pattern repeats plus the border stitches.
Row 1 (Right Side): K3, *yo, k2tog, k1, ssk, yo, k1, star stitch, k1, yo, ssk, k1, k2tog, yo, k1; repeat from * to last 3 stitches, k3.
Let's break this down: Knit the first 3 border stitches. Then begin the pattern repeat: yarn over, knit two together (decrease), knit 1, slip-slip-knit (decrease), yarn over, knit 1, work the star stitch over the next 3 stitches, knit 1, yarn over, slip-slip-knit, knit 1, knit two together, yarn over, knit 1. This completes one full pattern repeat. Repeat this sequence 4 times total, then knit the last 3 border stitches.
Row 2 (Wrong Side): K3, purl across to last 3 stitches, k3.
Breakdown: Knit the first 3 border stitches, then purl every stitch until you have 3 stitches left on the left needle, then knit those last 3 stitches. This maintains the garter stitch borders while creating the stockinette background for the lace.
Row 3: K3, *k1, yo, ssk, k1, k2tog, yo, k1, star stitch, k1, yo, ssk, k1, k2tog, yo; repeat from * to last 3 stitches, k3.
Breakdown: Knit 3 border stitches. Then: knit 1, yarn over, slip-slip-knit, knit 1, knit two together, yarn over, knit 1, work star stitch over next 3 stitches, knit 1, yarn over, slip-slip-knit, knit 1, knit two together, yarn over. Repeat this pattern 4 times, then knit the last 3 border stitches.
Row 4: Repeat Row 2 (K3, purl to last 3 stitches, k3).
Row 5: K3, *k2, yo, ssk, k1, k2tog, yo, k1, star stitch, k1, yo, ssk, k1, k2tog, yo, k1; repeat from * to last 3 stitches, k3.
Breakdown: Knit 3 border stitches. Then: knit 2, yarn over, slip-slip-knit, knit 1, knit two together, yarn over, knit 1, star stitch over next 3 stitches, knit 1, yarn over, slip-slip-knit, knit 1, knit two together, yarn over, knit 1. Repeat 4 times, then knit last 3 border stitches.
Row 6: Repeat Row 2.
Row 7: K3, *k1, yo, ssk, k1, k2tog, yo, k1, star stitch, k1, yo, ssk, k1, k2tog, yo, k1; repeat from * to last 3 stitches, k3.
Breakdown: Knit 3 border stitches. Then: knit 1, yarn over, slip-slip-knit, knit 1, knit two together, yarn over, knit 1, star stitch over next 3 stitches, knit 1, yarn over, slip-slip-knit, knit 1, knit two together, yarn over, knit 1. Repeat 4 times, then knit last 3 border stitches.
Row 8: Repeat Row 2.
Repeat Rows 1-8 until the scarf measures approximately 68 inches from the cast-on edge, ending with a Row 8 (a wrong-side row). This ensures you finish at a clean point in the pattern before adding the final border.
Final Border Rows
Knit all stitches for 4 rows, matching the border at the beginning of the scarf. This creates a symmetrical, polished look on both ends.
Bind Off
Loosely bind off all stitches in knit. To ensure a stretchy bind-off that matches the lace's flexibility, use a larger needle (US 8 or 9) for the bind-off row, or use the following method: knit the first stitch, *knit the next stitch, then pass the first stitch over the second stitch and off the needle. Repeat from * until one stitch remains, then cut the yarn and pull through the last loop.
Finishing Touches
Weave in all ends using a tapestry needle, being careful to follow the path of the yarn to keep the ends invisible. Trim any excess yarn.
Blocking: This step is crucial for lace knitting! Soak the scarf in lukewarm water with a gentle wool wash for 15-20 minutes. Gently squeeze out excess water (never wring or twist). Lay the scarf flat on blocking mats and gently stretch it to the desired measurements (12 inches wide x 70 inches long). Use pins to secure the edges, especially along the lace points, to open up the star motifs and yarn-overs. Allow to dry completely before unpinning.
Once dry, your Celestial Cascade Scarf is ready to wear! The deep navy blue and twinkling star stitches will add a touch of cosmic magic to any outfit. This scarf also makes a thoughtful, handmade gift that any knitting enthusiast would treasure.
Happy knitting, and may your stars always shine bright!


