Free Pattern: Ribbed Ribbon Twisted Knit Tank Tee
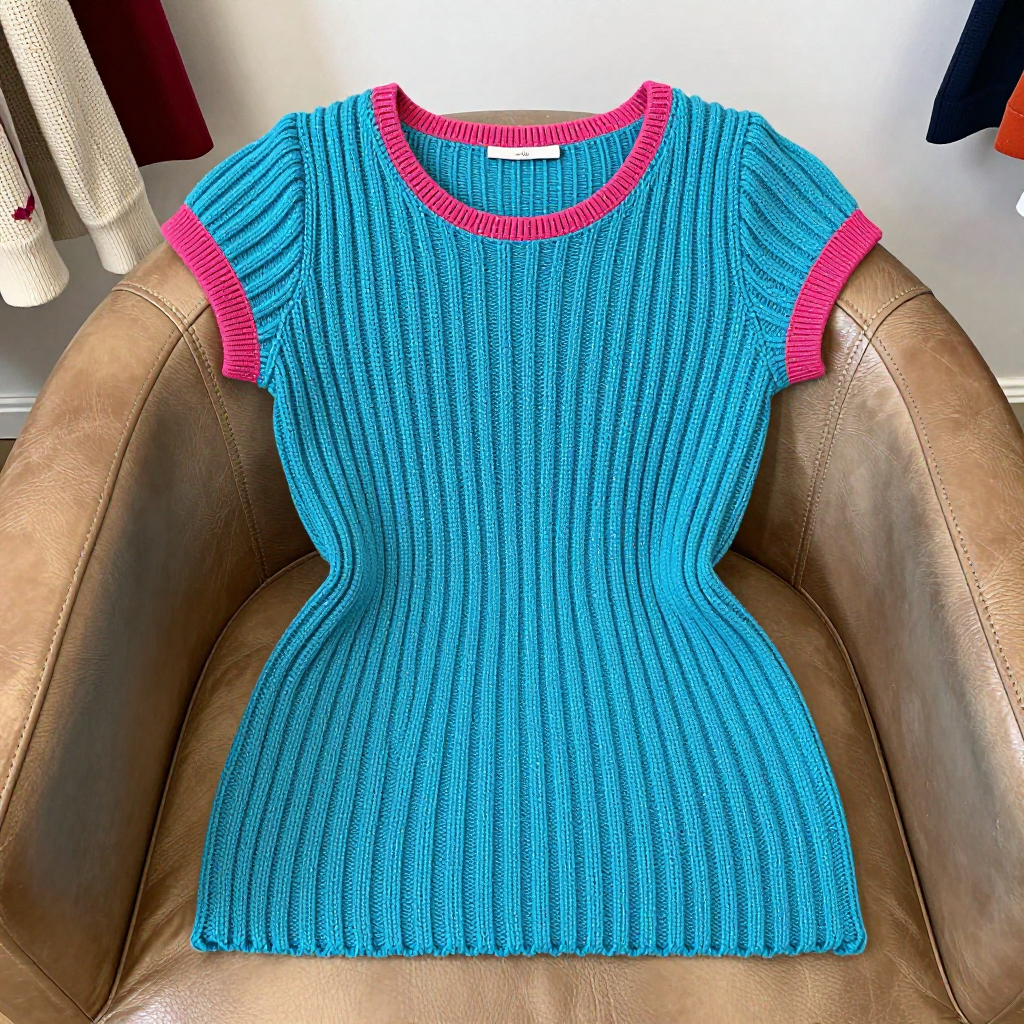
Free Pattern: Ribbed Ribbon Twisted Knit Tank Tee
If you have ever wanted to make a top that looks like it came straight out of a 1970s fashion magazine, this is the project for you. The Ribbed Ribbon Twisted Knit Tank Tee is a fitted, vintage-inspired tee worked flat in an allover 2x2 twisted rib, which creates a raised, vertical ribbon texture that looks far more complicated than it actually is. The electric cyan cotton body meets hot-pink ribbed cuffs for a bold neon pop that makes this top feel fresh and modern. It is perfect for a confident advanced beginner who has mastered knit and purl and is ready to learn one new skill: the twisted stitch. The finished tee is soft, breathable, gently stretchy, and fitted through the bust and waist, with a straight hem and a shallow scoop neck. You are going to love wearing it.
Materials Needed
- Yarn: Worsted weight 100% cotton, approximately 200–220 yards per 100g skein.
- Main Color (MC): Electric cyan, approximately 500 (550, 600, 650) yards.
- Contrast Color (CC): Hot pink, approximately 50 yards.
- Needles: US 7 (4.5 mm) straight or circular needles for the main fabric.
- Needles: US 6 (4.0 mm) straight or circular needles for the cuffs and neckband.
- Stitch markers: At least 4, to mark armhole decreases and side seams.
- Stitch holders: 2 (or spare yarn) to hold neck stitches.
- Tapestry needle: For seaming and weaving in ends.
- Scissors: For cutting yarn.
- Finished sizes: XS (S, M, L). Finished bust: 32 (36, 40, 44) inches. Length: 22 (23, 24, 25) inches.
Abbreviations and Beginner Glossary
- st / sts – stitch / stitches (one loop on your needle is one stitch).
- k – knit (insert the right needle into the front of the stitch, wrap yarn around, pull a loop through, slide the old stitch off).
- p – purl (insert the right needle into the front of the stitch from right to left, wrap yarn around, pull a loop through, slide the old stitch off).
- k1tbl – knit one through the back loop (insert the right needle into the back of the stitch instead of the front, then knit as usual; this twists the stitch and creates the raised ribbon texture).
- p1tbl – purl one through the back loop (insert the right needle into the back of the stitch, then purl as usual; this twists the stitch on the wrong side).
- RS – right side (the outside, public face of your fabric).
- WS – wrong side (the inside, hidden face of your fabric).
- rep – repeat (do the instruction again).
- beg – beginning.
- dec – decrease (make one fewer stitch; here you knit or purl two stitches together).
- inc – increase (make one extra stitch; here you work into the front and back of the same stitch).
- 2x2 rib – a pattern of knit 2, purl 2 repeated across the row, which makes a stretchy, ridged fabric.
- 2x2 twisted rib – the same idea, but the knit stitches are twisted (worked through the back loop) to create a raised, rope-like vertical texture.
- bind off – the way to finish an edge so stitches do not unravel (knit two stitches, lift the first over the second, and repeat).
- pick up stitches – use your needle to pull new loops through the edge of your finished fabric so you can knit a border.
- place on holder – slide live stitches onto a stitch holder or spare yarn and set them aside for later.
- work even – continue in the established pattern without increasing or decreasing.
Gauge
22 sts and 28 rows = 4 inches (10 cm) in 2x2 twisted rib, slightly stretched, on US 7 needles.
Gauge matters because it is how you make sure your finished tee actually fits the body you are knitting it for. If your stitches are too big, the top will come out wider and shorter; if they are too small, it will be tight and long. To check your gauge, cast on about 30 stitches with your US 7 needles and work in 2x2 twisted rib for about 4 inches. Bind off, lay the swatch flat, and gently stretch it just slightly. Place a ruler across the middle and count how many stitches fit in 4 inches. If you have more than 22, go up a needle size; if you have fewer, go down a needle size. Wash and dry your swatch the way you plan to wash the finished tee, because cotton can change after washing.
Beginner Tips Before You Start
- Use stitch markers to track your sides. Place a marker at the beginning of each row and at each armhole edge so you always know where your decreases belong.
- Do not pull your yarn too tight. Twisted stitches already pull the fabric in. Keep your tension relaxed so the ribbing stays stretchy and comfortable.
- Count your stitches at the end of every decrease row. The stitch counts in parentheses are your safety net. If the number is off, fix it before you keep going.
- Write down your size. Circle the numbers for your size on the pattern before you begin so you never mix up which count to follow.
- Keep the first stitch of every row neat. Slip the first stitch purlwise on wrong-side rows if you like a tidy edge for seaming.
- Trust the process on the texture. The first few rows of twisted rib can look messy. After about 2 inches, the vertical ribbon pattern appears and it becomes easy to read.
Step-by-Step Instructions
Back
With US 6 needles and MC, cast on 90 (102, 114, 126) sts. Work 1 inch in standard 2x2 rib (k2, p2). Change to US 7 needles.
Set up twisted rib:
Row 1 (RS): *K1tbl, p2; rep from * to last 2 sts, k1tbl, p1. (90 [102, 114, 126] sts)
Row 2 (WS): *P1tbl, k2; rep from * to last 2 sts, p1tbl, k1. (90 [102, 114, 126] sts)
Rows 3–end of body: Repeat Rows 1–2 for pattern. Work even until piece measures 14 (14.5, 15, 15.5) inches, ending with a WS row.
Armhole shaping:
Next row (RS): Bind off 4 (5, 6, 7) sts, work in pattern to end. (86 [97, 108, 119] sts)
Next row (WS): Bind off 4 (5, 6, 7) sts, work in pattern to end. (82 [92, 102, 112] sts)
Decrease row (RS): K1tbl, p1, k2tog, work in pattern to last 4 sts, ssk, p1, k1tbl. (80 [90, 100, 110] sts)
Next row (WS): Work even in pattern. (80 [90, 100, 110] sts)
Repeat the last 2 rows 3 (4, 5, 6) more times. (74 [82, 90, 98] sts remain)
Work even until armhole measures 7 (7.5, 8, 8.5) inches, ending with a WS row.
Shoulder and neck shaping:
Next row (RS): Bind off 6 (7, 8, 9) sts, work in pattern to end. (68 [75, 82, 89] sts)
Next row (WS): Bind off 6 (7, 8, 9) sts, work in pattern to end. (62 [68, 74, 80] sts)
Next row (RS): Bind off 6 (7, 8, 9) sts, work in pattern to end. (56 [61, 66, 71] sts)
Next row (WS): Bind off 6 (7, 8, 9) sts, work in pattern to end. (50 [54, 58, 62] sts)
Place remaining 50 (54, 58, 62) sts on a holder for the neck.
Front
Work exactly as for the Back until the armhole measures 4 (4.5, 5, 5.5) inches, ending with a WS row. You should have 74 (82, 90, 98) sts on your needle.
Neck shaping:
Next row (RS): Work 27 (30, 33, 36) sts in pattern, place the next 20 (22, 24, 26) sts on a holder for the center neck, join a second ball of yarn and work in pattern to end. (27 [30, 33, 36] sts each side)
Next row (WS): Work even in pattern on both sides. (27 [30, 33, 36] sts each side)
Decrease row (RS): On the right side, work in pattern to last 3 sts, k2tog, k1tbl; on the left side, k1tbl, ssk, work in pattern to end. (26 [29, 32, 35] sts each side)
Next row (WS): Work even in pattern. (26 [29, 32, 35] sts each side)
Repeat the last 2 rows 4 (5, 6, 7) more times. (22 [24, 26, 28] sts each side)
Work even until the armhole matches the Back, ending with a WS row.
Shoulder bind-off: Bind off 6 (7, 8, 9) sts at the beginning of the next 2 rows on each side, then bind off the remaining 4 (3, 2, 1) sts on each side. (0 sts each side)
Sleeves (make 2)
With US 6 needles and CC (hot pink), cast on 42 (46, 50, 54) sts. Work 1 inch in 2x2 rib. Change to US 7 needles and MC.
Row 1 (RS): Work in twisted rib as set for the Back. (42 [46, 50, 54] sts)
Row 2 (WS): Work in twisted rib as set. (42 [46, 50, 54] sts)
Increase row: K1tbl, p1, inc 1, work in pattern to last 3 sts, inc 1, p1, k1tbl. (44 [48, 52, 56] sts)
Work 5 rows even in pattern. (44 [48, 52, 56] sts)
Repeat the last 6 rows 3 more times. (50 [54, 58, 62] sts)
Work even until the sleeve measures 6 (6.5, 7, 7.5) inches. Bind off loosely in pattern.
Assembly and Finishing
1. Sew the shoulder seams. Thread your tapestry needle with MC. Hold the Front and Back with right sides facing each other. Using a simple whipstitch or mattress stitch, join the bound-off shoulder edges stitch for stitch. Work from the armhole edge toward the neck on each side, then repeat for the other shoulder.
2. Knit the neckband. With US 6 needles and MC, starting at the left shoulder seam, pick up 80 (88, 96, 104) sts evenly around the neck opening, including the stitches you placed on holders. Work 1 inch in 2x2 rib (k2, p2). Bind off loosely in pattern.
3. Sew the side seams. With right sides together, pin the Front and Back together along the sides from the underarm to the hem. Use mattress stitch to join them, matching the rib columns so the seam disappears into the texture. Repeat on the other side.
4. Set in the sleeves. Pin each sleeve into its armhole with right sides together, matching the center of the sleeve to the shoulder seam. Sew in place with a backstitch or mattress stitch. Then sew the short sleeve seam from the underarm to the cuff.
5. Weave in ends. Turn the tee inside out. Thread each yarn tail onto your tapestry needle and weave it through the back of several stitches, changing direction once, then trim close to the fabric.
6. Block lightly. Soak the tee in cool water for 15 minutes. Gently squeeze out the water without wringing. Roll it in a towel to remove excess moisture, then lay it flat on a towel or blocking mat and pat it to the finished measurements: bust 32 (36, 40, 44) inches and length 22 (23, 24, 25) inches. Let it dry completely away from direct heat.
Pro Tips and Variations
- Change the colorway. Swap the electric cyan for a soft sage or cream for a quieter vintage look, or keep the hot-pink cuffs as your only pop of color for a more subtle statement.
- Adjust the length. To make the tee longer or shorter, simply add or remove rows before the armhole shaping. Every 28 rows adds or removes about 4 inches, so add rows in multiples of 28 to keep the pattern balanced.
- Substitute the yarn. A cotton-blend or a smooth bamboo yarn will work beautifully. Just knit a gauge swatch first, because plant fibers behave differently from wool and can stretch after washing.
- Make it sleeveless. Skip the sleeves entirely and finish the armholes with a 1-inch 2x2 rib border in hot pink, picking up stitches around each armhole just as you did for the neck.