Free Pattern: Forest Frog Knit Christmas Stocking in Seed Stitch
Forest Frog Knit Christmas Stocking: A Cozy Beginner Heirloom
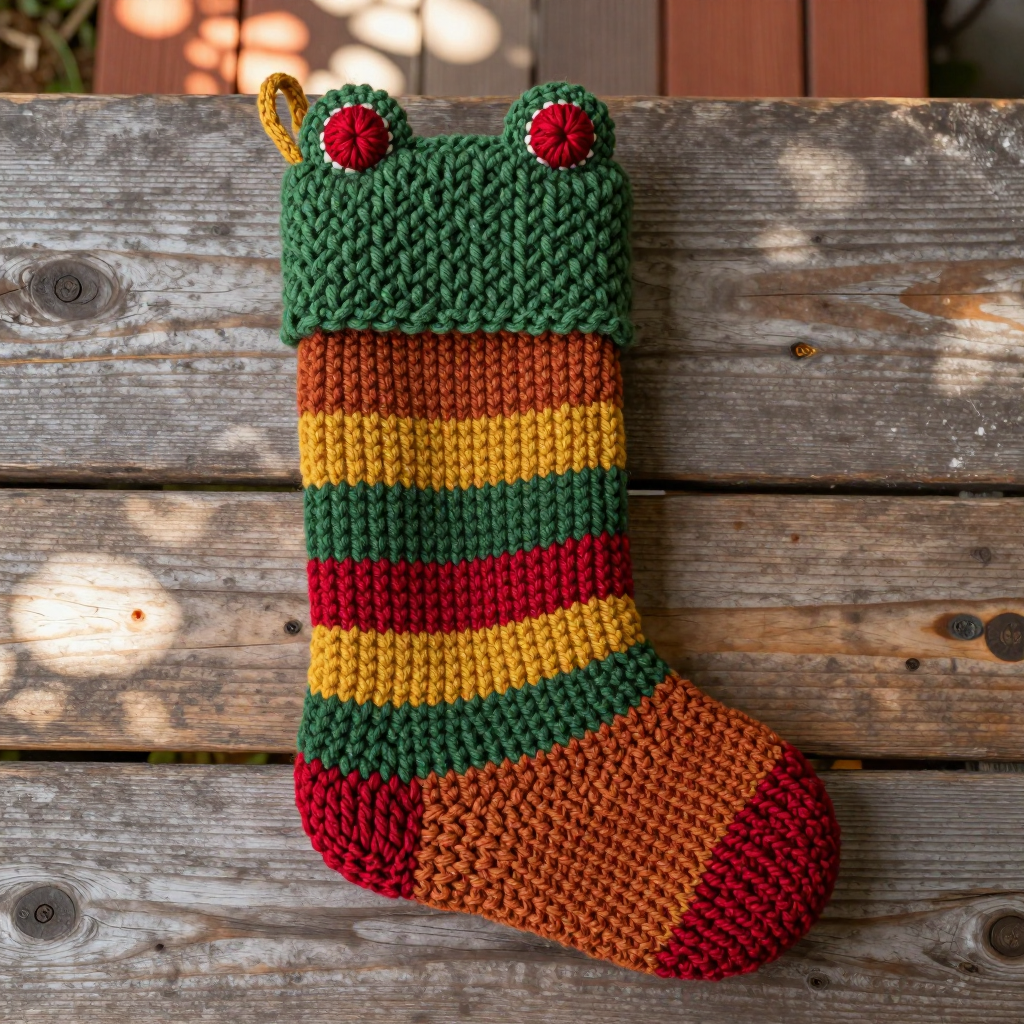
If you have never knitted a stitch in your life, this is the perfect first project to fall in love with. The Forest Frog Christmas Stocking is worked as one simple, flat rectangle of bumpy seed stitch, then folded and seamed into a stocking shape — no complicated shaping, no working in the round on the body, and no scary techniques. The finished piece is a soft, plush 9 by 17 inch stocking in warm spice-market tones of burnt sienna, mustard gold, moss green, and cranberry red, with a squishy little frog head and two bobble eyes peeking over the cuff. Made from bulky chenille yarn, it feels like a velvety toy in your hands and looks like something you bought at an artisan market. By the end you will have a handmade heirloom you will hang up every single December.
Materials Needed
- Yarn: Bulky (weight 5) chenille plush yarn, approx. 220 yd / 200 m total, divided as follows:
- Color A (burnt sienna): 120 yd / 110 m
- Color B (mustard gold): 50 yd / 46 m
- Color C (deep moss green): 30 yd / 27 m
- Color D (cranberry red): 20 yd / 18 m
- Main needles: US 10 (6.0 mm) straight knitting needles
- Small needles: US 8 (5.0 mm) double-pointed needles (DPNs) for the frog eyes
- Tapestry needle (a big blunt sewing needle with a large eye, for seaming and weaving in ends)
- Stitch markers (small plastic rings or clips that clip onto your needle to mark a spot)
- Scissors
- Small amount of polyester fiberfill (toy stuffing) for the frog head and eyes
Finished size: Stocking body 9 in / 23 cm wide x 17 in / 43 cm long (flat, before seaming). Foot opening approx. 9 in / 23 cm circumference when seamed. Cuff depth 3 in / 7.5 cm. Frog head approx. 4 in / 10 cm wide x 3 in / 7.5 cm tall. Eyes approx. 1 in / 2.5 cm across.
Abbreviations and Beginner Glossary
- st / sts — stitch / stitches. One loop of yarn on your needle is a stitch.
- K (knit) — insert the right needle into the front of the stitch from left to right, wrap yarn around, pull a loop through, and slide the old stitch off. This makes a smooth "V" shape.
- P (purl) — insert the right needle into the front of the stitch from right to left, wrap yarn around, pull a loop through the back, and slide the old stitch off. This makes a bump.
- RS — right side. The "public" side of the fabric that faces out when finished.
- Seed stitch — a textured pattern made by alternating knit and purl stitches and flipping them every row (knit the purls, purl the knits). It creates a bumpy, nubby surface.
- Cast on — the very first step: creating the starting row of loops on your needle.
- Long-tail cast on — a common, stretchy cast-on method using two strands of yarn (one long "tail" and one working strand).
- Bind off — the final step that locks your stitches so they don't unravel, like tying off.
- m1L (make one left) — an increase. Lift the bar of yarn between two stitches with your left needle from front to back and knit into the back of it, adding one new stitch.
- m1R (make one right) — an increase. Lift the bar between two stitches from back to front and knit into the front of it, adding one new stitch.
- k2tog (knit two together) — a decrease. Knit two stitches as if they were one, making the fabric narrower.
- ssk (slip, slip, knit) — a decrease. Slip two stitches one at a time to the right needle, then knit them together through the back loops.
- Kfb (knit front and back) — an increase. Knit into the front of a stitch, then knit into the back of the same stitch before sliding it off, making two stitches from one.
- DPN — double-pointed needle (a short needle with points on both ends, used for small tubes).
- Whipstitch — a simple sewing stitch where you pass the needle in and out over an edge to join two pieces.
- Weave in ends — threading loose yarn tails into the fabric so they disappear.
Gauge
Gauge: 12 sts and 16 rows = 4 in / 10 cm in seed stitch with US 10 needles, measured unstretched.
Gauge means how many stitches and rows fit into a square of fabric. It matters because it decides the final size of your stocking — if your stitches are too big, the stocking will be huge; too small, and it won't fit over a gift. To check: cast on about 20 stitches, work in seed stitch for about 20 rows, then lay it flat and measure a 4 inch square in the middle with a ruler. Count the stitches across and the rows up. If you have more than 12 stitches, go up a needle size; if fewer, go down. Always measure unstretched, because chenille yarn stretches.
Beginner Tips Before You Start
- Use stitch markers to track your color bands. Place a marker at the start of every new color band (every 3 or 11 rows) so you never lose your place in the long rectangle.
- Do not pull your yarn too tight. Chenille yarn is fluffy and easy to over-tighten. Keep your stitches relaxed and even, or the fabric will feel stiff and the seams will pucker.
- Count your stitches at the end of every row. You should always have 54 stitches on the body. If you gain or lose one, fix it right away.
- Change colors on the wrong side. When you switch colors, leave a 6 in tail and give it a gentle tug so the edge stays neat.
- Keep your tension even in seed stitch. The knit and purl stitches can look uneven at first — that is normal. Blocking at the end smooths everything out.
- Don't stuff the frog head too much. A walnut-sized pinch is plenty; overstuffing makes the seams bulge.
Step-by-Step Instructions
Stitch Guide: Seed Stitch (flat, even number of stitches)
Row 1 (RS): *K1, p1; repeat from * to end.
Row 2: *P1, k1; repeat from * to end.
Repeat Rows 1–2 for the pattern. (In plain English: knit the purls and purl the knits every row.)
Body (worked flat as one rectangle)
With US 10 needles and Color A, cast on 54 sts using the long-tail method.
Rows 1–2: Work in seed stitch. (54 sts)
Row 3 (RS): Change to Color B. Work in seed stitch. (54 sts)
Rows 4–6: Continue seed stitch in Color B (3 rows total B). (54 sts)
Row 7: Change to Color A. Work seed stitch. (54 sts)
Rows 8–14: Continue seed stitch in Color A (7 rows total A). (54 sts)
Row 15: Change to Color C. Work seed stitch. (54 sts)
Rows 16–18: Continue seed stitch in Color C (3 rows total C). (54 sts)
Row 19: Change to Color A. Work seed stitch. (54 sts)
Rows 20–30: Continue seed stitch in Color A (11 rows total A). (54 sts)
Row 31: Change to Color D. Work seed stitch. (54 sts)
Rows 32–34: Continue seed stitch in Color D (3 rows total D). (54 sts)
Row 35: Change to Color A. Work seed stitch. (54 sts)
Rows 36–46: Continue seed stitch in Color A (11 rows total A). (54 sts)
Row 47: Change to Color B. Work seed stitch. (54 sts)
Rows 48–50: Continue seed stitch in Color B (3 rows total B). (54 sts)
Row 51: Change to Color A. Work seed stitch. (54 sts)
Rows 52–62: Continue seed stitch in Color A (11 rows total A). (54 sts)
Row 63: Change to Color C. Work seed stitch. (54 sts)
Rows 64–66: Continue seed stitch in Color C (3 rows total C). (54 sts)
Row 67: Change to Color A. Work seed stitch. (54 sts)
Rows 68–78: Continue seed stitch in Color A (11 rows total A). (54 sts)
Row 79: Change to Color B. Work seed stitch. (54 sts)
Rows 80–82: Continue seed stitch in Color B (3 rows total B). (54 sts)
Row 83: Change to Color A. Work seed stitch. (54 sts)
Rows 84–94: Continue seed stitch in Color A (11 rows total A). (54 sts)
Row 95: Change to Color C. Work seed stitch. (54 sts)
Rows 96–98: Continue seed stitch in Color C (3 rows total C). (54 sts)
Row 99: Change to Color A. Work seed stitch. (54 sts)
Rows 100–110: Continue seed stitch in Color A (11 rows total A). (54 sts)
Row 111: Change to Color B. Work seed stitch. (54 sts)
Rows 112–114: Continue seed stitch in Color B (3 rows total B). (54 sts)
Row 115: Change to Color A. Work seed stitch. (54 sts)
Rows 116–126: Continue seed stitch in Color A (11 rows total A). (54 sts)
Row 127: Change to Color D. Work seed stitch. (54 sts)
Rows 128–130: Continue seed stitch in Color D (3 rows total D). (54 sts)
Row 131: Change to Color A. Work seed stitch. (54 sts)
Rows 132–142: Continue seed stitch in Color A (11 rows total A). (54 sts)
Row 143: Change to Color C. Work seed stitch. (54 sts)
Rows 144–146: Continue seed stitch in Color C (3 rows total C). (54 sts)
Row 147: Change to Color A. Work seed stitch. (54 sts)
Rows 148–158: Continue seed stitch in Color A (11 rows total A). (54 sts)
Row 159: Change to Color B. Work seed stitch. (54 sts)
Rows 160–162: Continue seed stitch in Color B (3 rows total B). (54 sts)
Row 163: Change to Color A. Work seed stitch. (54 sts)
Rows 164–170: Continue seed stitch in Color A (7 rows total A). (54 sts)
Bind off all 54 sts loosely in seed stitch using Color A. Do not cut the yarn tail; leave a 24 in / 60 cm tail for seaming.
Seaming
Fold the rectangle in half with right sides together, matching the cast-on and bound-off edges. Using the long tail and a tapestry needle, whipstitch the side edges together from the cast-on edge up to the bound-off edge, leaving the top 3 in / 7.5 cm open at the cuff for the frog head placement. Turn right side out. The stocking now measures approx. 9 in / 23 cm wide x 17 in / 43 cm long with a 3 in / 7.5 cm open cuff.
Frog Head (worked flat on US 10 needles)
With Color C, cast on 18 sts.
Row 1 (RS): K1, *p1, k1; repeat from * to end (seed stitch). (18 sts)
Row 2: P1, *k1, p1; repeat from * to end. (18 sts)
Rows 3–4: Work in seed stitch as established. (18 sts)
Row 5 (increase row): K1, m1L, work in seed stitch to last st, m1R, k1. (20 sts)
Rows 6–8: Work in seed stitch. (20 sts)
Row 9 (increase row): K1, m1L, work in seed stitch to last st, m1R, k1. (22 sts)
Rows 10–14: Work in seed stitch. (22 sts)
Row 15 (decrease row): K1, k2tog, work in seed stitch to last 3 sts, ssk, k1. (20 sts)
Rows 16–17: Work in seed stitch. (20 sts)
Row 18 (decrease row): K1, k2tog, work in seed stitch to last 3 sts, ssk, k1. (18 sts)
Rows 19–20: Work in seed stitch. (18 sts)
Bind off all sts in seed stitch. Leave a 20 in / 50 cm tail. Lightly stuff the head with a small amount of polyester fiberfill (about a walnut-sized piece), shaping it into a rounded oval. With the tapestry needle, whipstitch the cast-on and bound-off edges together to form a rounded head, then stitch the head to the center front of the open cuff using the tail, positioning the bottom of the head 1 in / 2.5 cm above the cuff edge. Secure firmly.
Frog Eyes (make 2, worked in the round on US 8 DPNs)
With Color D, cast on 6 sts onto one DPN. Divide sts across 3 DPNs (2 sts per needle). Join to work in the round, being careful not to twist.
Round 1: Kfb in each st around. (12 sts)
Round 2: Knit. (12 sts)
Round 3: *K1, kfb; repeat from * around. (18 sts)
Rounds 4–6: Knit. (18 sts)
Round 7: *K1, k2tog; repeat from * around. (12 sts)
Round 8: Knit. (12 sts)
Stuff each eye lightly with a tiny pinch of polyester fiberfill.
Round 9: K2tog around. (6 sts)
Cut yarn, leaving a 6 in / 15 cm tail. Thread tail through remaining 6 sts and pull tight to close. Weave in end.
Attach Eyes
Using the Color D tail, stitch one eye to each side of the top of the frog head, positioning them approx. 1 in / 2.5 cm apart and 0.5 in / 1.25 cm down from the top edge. Secure firmly with several small stitches.
Hanging Loop
With US 10 needles and Color B, cast on 8 sts. Work in seed stitch for 4 in / 10 cm. Bind off. Fold the strip in half and stitch the ends securely to the inside back of the cuff at the top center. This creates a 2 in / 5 cm hanging loop.
Assembly and Finishing
Seam the body: With right sides together, use the 24 in tail and a tapestry needle to whipstitch the two long side edges together, working from the cast-on edge up to the bound-off edge. Leave the top 3 in / 7.5 cm open for the cuff. Turn right side out and gently push out the corners with your fingers.
Attach the frog head: Position the stuffed head centered on the front of the open cuff, bottom edge 1 in / 2.5 cm above the cuff edge. Stitch all the way around the base of the head with small, firm whipstitches so it sits flat and secure.
Attach the eyes: Sew one eye to each side of the top of the head, 1 in / 2.5 cm apart and 0.5 in / 1.25 cm down from the top edge. Use several small stitches so they stay put.
Attach the hanging loop: Fold the seed-stitch strip in half and stitch both ends to the inside back of the cuff at the top center.
Weave in ends: Thread each loose yarn tail onto the tapestry needle and run it through the back of several stitches, then trim close to the fabric. Do this for every tail.
Block: Gently steam-block the stocking by holding a steam iron 2 in / 5 cm above the surface — do not press. Shape the frog head and eyes with your fingers. Allow to dry completely before hanging.
Pro Tips and Variations
- Change the color story: Swap the spice-market palette for classic red and white, or a cool winter blue and silver, by simply replacing Colors A–D. Keep the same yardage amounts so the size stays the same.
- Adjust the size: To make a smaller stocking, cast on 42 sts and work fewer rows (about 130 total). To make a larger one, cast on 66 sts and add rows in multiples of 14. Keep the gauge the same so the proportions stay right.
- Substitute yarn: Any bulky (weight 5) yarn works — try a smooth acrylic or a wool blend if you prefer a less fluffy finish. Just check your gauge again, since different yarns knit up at different sizes.
- Add a Nordic touch: Work a simple two-color band by knitting one row in Color B and one row in Color A alternately for 3 rows, or add a small snowflake motif with duplicate stitch after finishing.