Charmed Cottage Crochet Cat Bandana Free Pattern: Moss & Lichen Evil Eye Scarf
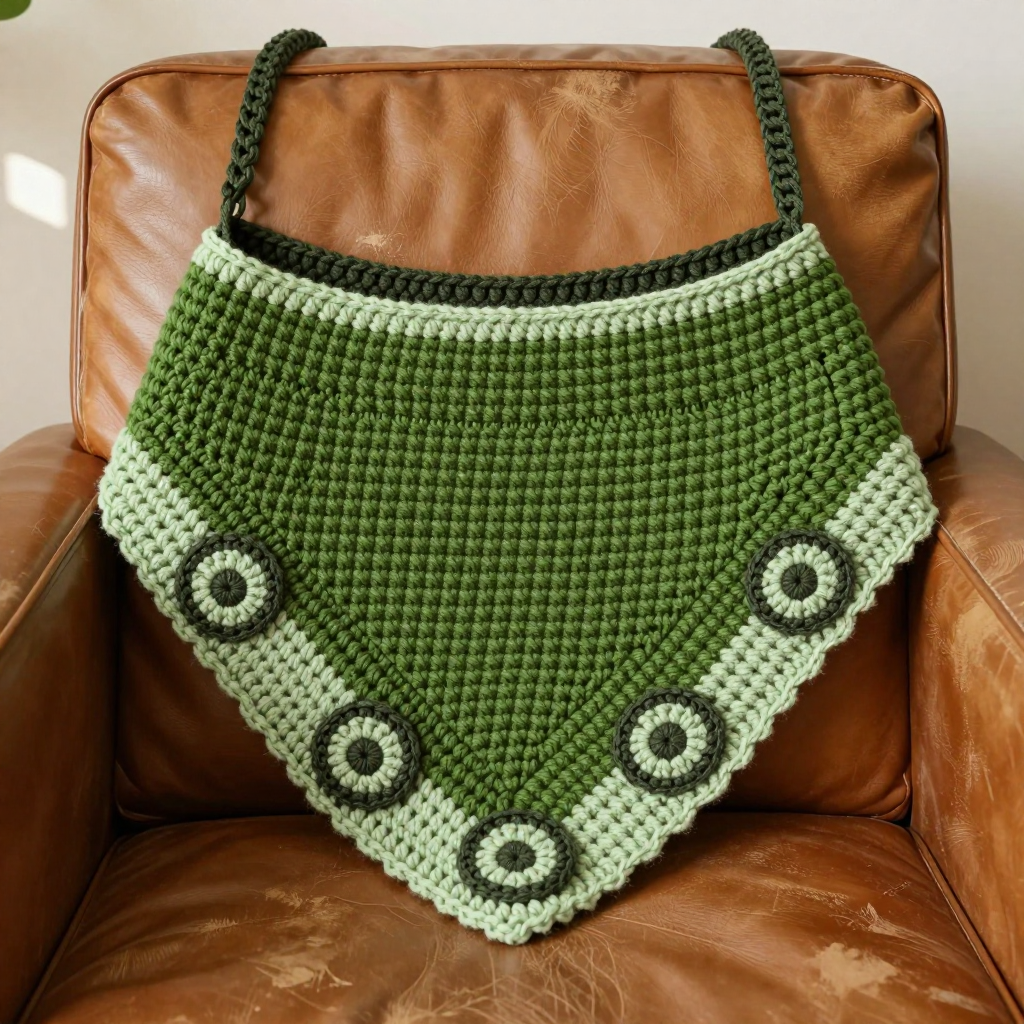
Charmed Cottage Crochet Cat Bandana: Moss & Lichen Evil Eye Scarf
Introduction
If you have never held a crochet hook before, this is the perfect first "real" project for you. This little cat bandana is worked as a simple flat rectangle in single crochet, folded in half, and sewn along one edge to make a triangle. That means no shaping, no complicated counting in the round, and no scary techniques. The finished piece is a soft, slightly stiff cotton neck scarf in deep moss green with a lichen-sage border, finished with five raised puff-stitch "evil eye" motifs that give it a quiet dark-academia, cottage-core feel. It measures about 9 inches across the neck edge and 5 inches deep at the point, sized for an average cat neck of 8–10 inches. It looks handmade in the best way, feels sturdy enough to stay put, and takes only a few evenings to finish.
Materials Needed
- Yarn: Worsted weight (Category 4) cotton yarn, approx. 90–110 yds total:
- Moss green (MC): approx. 60 yds (1 skein)
- Lichen/sage green (CC1): approx. 25 yds
- Deep olive/charcoal (CC2): approx. 15 yds (for eye centers and ties)
- Hook: Size 4.5 mm (US 7) crochet hook, or the size you need to match gauge.
- Tapestry needle: A blunt-tipped needle with a large eye, for seaming and weaving in ends.
- Stitch markers: At least 5, to mark the center point and the eye motif positions.
- Scissors: Small sharp scissors for cutting yarn.
- Finished size: Flat rectangle before folding approx. 9 in (23 cm) wide x 6 in (15 cm) tall. Folded and seamed triangular bandana approx. 9 in (23 cm) across the top neck edge and 5 in (13 cm) deep at the center point.
Abbreviations and Beginner Glossary
- ch – chain. Make a loop of yarn on your hook, then pull the yarn through the loop. Each one is a "chain."
- sc – single crochet. Insert your hook into the stitch, yarn over (wrap yarn around the hook), pull up a loop (2 loops on hook), yarn over again, pull through both loops. One sc made.
- sl st – slip stitch. Insert hook into the stitch, yarn over, pull the yarn through both the stitch and the loop on your hook in one motion. It makes a flat, tight join.
- st / sts – stitch / stitches. One completed unit of crochet.
- puff – puff stitch. Yarn over, insert hook in the indicated stitch, yarn over, pull up a loop (3 loops on hook). [Yarn over, insert hook in the same stitch, yarn over, pull up a loop] 2 more times (7 loops on hook). Yarn over and pull through all 7 loops, then ch 1 to close. The ch-1 does not count as a stitch.
- MC – main color (moss green).
- CC1 – contrast color 1 (lichen/sage green).
- CC2 – contrast color 2 (deep olive/charcoal).
- turn – flip your work over so you can work back across the row you just made.
- fasten off – cut the yarn a few inches from your work, then pull the tail through the last loop to lock it.
- whipstitch – a simple seaming stitch: bring the needle up through both layers, wrap the yarn over the edge, and go back down through both layers, repeating in small even stitches.
- right side – the "good" side of the fabric that faces out when the project is finished.
Gauge
16 sc x 18 rows = 4 in (10 cm) in single crochet. Each puff-stitch eye motif measures approx. 1 in (2.5 cm) across.
Gauge matters because it controls the finished size. If your stitches are too big, the bandana will be too large for a cat's neck; too small, and it will not fit at all. To check: chain 22, then work single crochet rows until your swatch is about 4 in tall. Lay a ruler across the middle and count how many stitches fit in 4 inches, and how many rows fit in 4 inches. If you have more than 16 stitches, try a larger hook; if you have fewer, try a smaller hook. Always make the swatch before you start the real piece.
Beginner Tips Before You Start
- Count every row. Single crochet rows all look alike, so keep a tally on paper or use a row counter app. Losing your place is the number one beginner mistake.
- Do not pull the yarn too tight. Keep your tension relaxed so the hook slides easily. Tight stitches make the fabric stiff and hard to seam.
- Use stitch markers. Place one in the first stitch of each row so you always know where the row begins, and use the others to mark the center point and the five eye positions.
- Work the chain loosely. The starting chain should be soft and stretchy, not tight, or the bottom edge will pucker.
- Keep your tails long. Leave at least 6 in (15 cm) whenever you fasten off, and 24 in (60 cm) on the main rectangle for seaming.
- Try the bandana on your cat before the final border. Cats are wiggly; a quick fit check saves you from redoing the ties.
Step-by-Step Instructions
Section 1 — Main Rectangle (worked flat in MC)
Row 1: With MC, ch 37. Sc in the 2nd ch from hook and in each ch across. (36 sc)
Row 2: Ch 1, turn. Sc in each st across. (36 sc)
Rows 3–27: Repeat Row 2. (36 sc; 27 rows total, approx. 9 in wide x 6 in tall)
Fasten off MC, leaving a 24 in (60 cm) tail for seaming.
Section 2 — Folding and Seaming into the Bandana
Step 1: Lay the rectangle flat with the right side facing up. Bring the bottom-left corner up to meet the top-right corner, folding the rectangle diagonally in half to form a triangle with the long fold along the top.
Step 2: Thread the 24 in tail onto the tapestry needle. Whipstitch the two short open edges together along the diagonal, working from the folded point toward the center, using small even stitches and matching MC.
Step 3: Turn the bandana right side out. Gently shape the point. The top folded edge is the neck edge.
Section 3 — Neck Ties (worked in CC2)
Tie 1: Join CC2 with a sl st at one end of the top folded edge. Ch 30, then sl st back along the chain (or work 30 sc for a firmer tie). Fasten off.
Tie 2: Join CC2 at the opposite end of the top folded edge. Ch 30, then sl st back along the chain. Fasten off. Weave in ends.
Section 4 — Puff-Stitch Evil Eye Border (worked in CC1 and CC2)
Note: Work along the two lower diagonal edges of the triangle, spacing 5 eye motifs evenly, approx. 1.5 in (4 cm) apart.
Round 1 (CC1): Join CC1 with a sl st at the left end of the top neck edge. Work sc evenly along the left diagonal edge to the center point (approx. 14 sc), then sc evenly up the right diagonal edge to the right end of the neck edge (approx. 14 sc). Ch 1, turn. (approx. 28 sc)
Round 2 (CC1): Ch 1, sc in each sc around the V, working 3 sc in the center point stitch to turn the corner cleanly. Ch 1, turn. (approx. 30 sc)
Eye Motif (make 5, worked directly onto Round 2): For each motif, centered on the border: with CC1, work 1 puff in the border stitch, ch 1, then with CC2 work 1 puff in the same stitch (the dark pupil), ch 1, then with CC1 work 1 puff in the same stitch again. Sl st into the next border stitch to anchor. Space motifs evenly: skip 4 border stitches between each eye motif.
Round 3 (CC1): After all 5 motifs are placed, join CC1 at the left neck edge and sc evenly around the entire V border, working 1 sc in each border stitch and 1 sc in each ch-1 space between puffs, with 3 sc at the center point. Fasten off and weave in ends.
Assembly and Finishing
Seaming: If you have not already done so in Section 2, thread the long MC tail onto the tapestry needle and whipstitch the diagonal opening closed. Work from the folded point toward the center with small, even stitches, catching both layers each time. Pull gently but firmly so the seam lies flat and does not pucker.
Weaving in ends: Thread each tail onto the tapestry needle and run it through the back of several stitches (about 1 in of fabric), then change direction and run it back through a few more stitches to lock it. Trim close to the fabric.
Blocking: Mist the bandana lightly with water and pin it to shape on a towel or blocking mat. Do not press it flat with an iron, or the puff stitches will lose their texture. Let it dry completely, then remove the pins. Check that the neck edge lies flat and the ties are securely attached.
Pro Tips and Variations
- Color changes: Swap the moss green for dusty rose or oatmeal for a softer look, and use a contrasting border in charcoal for a bolder evil eye. Keep CC2 dark so the pupils read clearly.
- Size adjustments: For a larger cat or small dog, add 6 chains to the starting chain (42 sc) and work 3 extra rows. For a tiny kitten, subtract 6 chains and 3 rows. Keep the eye motifs spaced the same distance apart.
- Yarn substitutions: Cotton gives the crisp, slightly stiff look shown here. A cotton-acrylic blend will be softer and drape more; avoid pure acrylic if you want the bandana to hold its shape.
- Firmer ties: Work the ties in single crochet instead of slip stitch for a stronger, less stretchy tie that stays knotted on a wiggly cat.