Celestial Mane Hooded Cowl Free Pattern – Knit a Starry Unicorn Snuggle
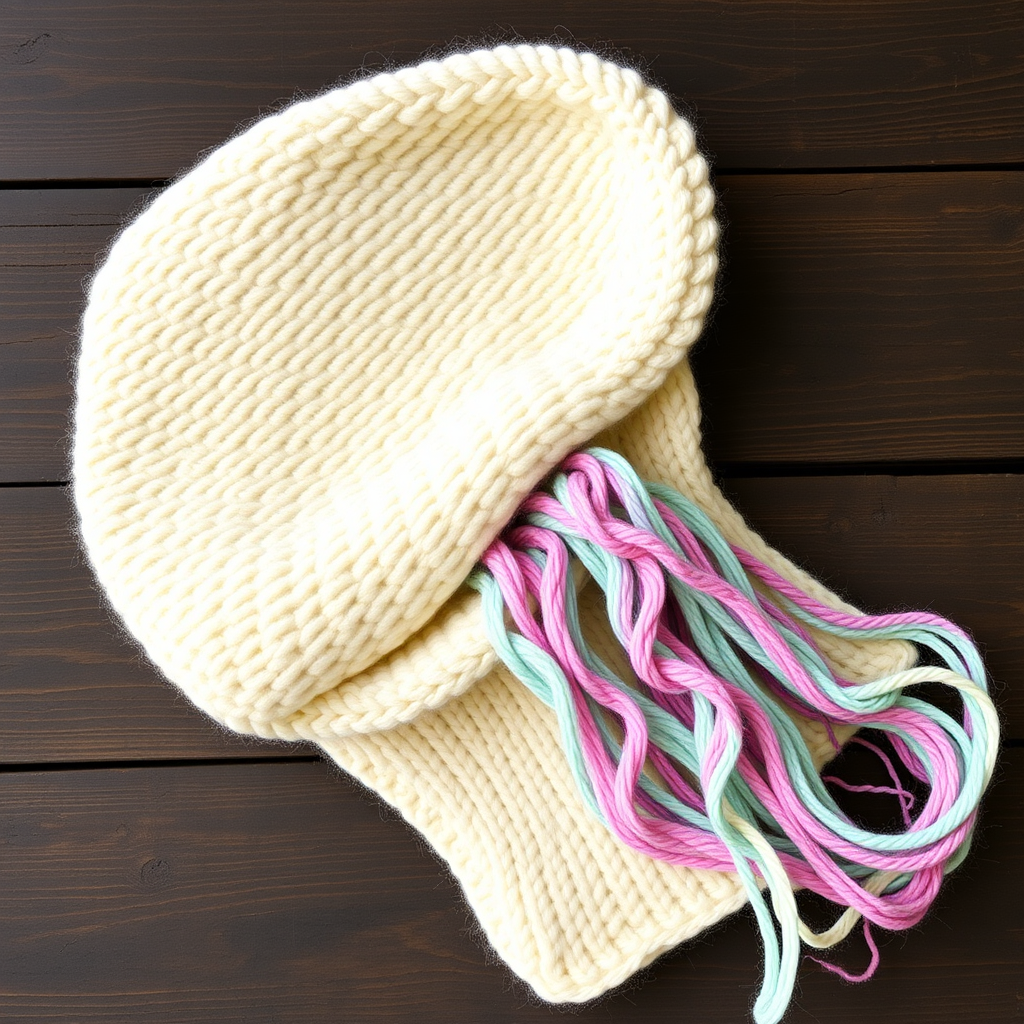
Celestial Mane Hooded Cowl: A Starry Unicorn Knit
Imagine wrapping yourself in a cloud of soft cream yarn, a hood framing your face, and a cascade of pastel rainbow strands flowing down your back. This is the Celestial Mane Hooded Cowl—a dreamy, star-speckled accessory that combines the practicality of a cozy cowl with the whimsy of a unicorn's mane. It's a magical, handmade piece that's perfect for chilly evenings, fantasy enthusiasts, or anyone who wants to add a touch of enchantment to their wardrobe. Best of all, this pattern is beginner-friendly, using simple knit and purl stitches to create something truly spectacular.
This pattern is designed to be your guide through every step, from casting on to weaving in the final ends. We'll build the hood flat, seam it, pick up stitches for a seamless cowl, and create the flowing mane from knitted strips. By the end, you'll have a one-of-a-kind, handcrafted treasure that's as cozy as it is captivating.
Materials Needed: Gathering Your Stardust
Before you begin your magical knitting journey, gather these materials. The quality of your yarn will greatly affect the final drape and feel of your cowl, so choose a soft, plush worsted weight yarn you love.
Yarn
- Main Color (MC): Soft cream – approximately 400 grams. This forms the base of the hood and cowl.
- Mane Colors (M1-M4): You will need approximately 100 grams of each of the following colors:
- M1: Blush Pink
- M2: Lavender
- M3: Baby Blue
- M4: Mint Green
Needles & Notions
- Circular Needles: US Size 8 (5mm) in two lengths:
- 16-inch (40 cm) for the cowl
- 32-inch (80 cm) or longer for the hood (to accommodate the large number of stitches)
- Stitch Markers: At least one, to mark the beginning of the round.
- Tapestry Needle: For seaming and weaving in ends.
- Scissors
Gauge
Getting the right gauge is crucial for the perfect fit. In stockinette stitch (knit on the right side, purl on the wrong side), your gauge should be:
18 stitches and 24 rows = 4 inches (10 cm).
Always knit a swatch first to ensure your tension matches. If you have more stitches per inch, try a larger needle. If you have fewer, try a smaller needle.
Step-by-Step Instructions: Knitting Your Unicorn Dream
This pattern is broken down into three main parts: the Hood, the Cowl, and the Mane. Follow each step carefully, and you'll be amazed at what you create.
Part 1: The Hood (Worked Flat, Then Seamed)
We'll start with the hood, which is knitted back and forth in rows before being seamed at the top.
Cast On: With your Main Color (MC) yarn and your long circular needle, cast on 80 stitches.
Knit the Main Body:
- Row 1 (Right Side): Knit all stitches.
- Row 2 (Wrong Side): Purl all stitches.
Repeat Rows 1 and 2 until your piece measures 12 inches (30 cm) from the cast-on edge. It's important to end with a Wrong Side row (a purl row) so that you are ready to work the right side next.
Shape the Top of the Hood:
Now we will decrease stitches to create the rounded crown of the hood.
- Decrease Row 1 (Right Side): K2tog (knit two stitches together), knit to the last 2 stitches, K2tog. (You will have 78 stitches).
- Decrease Row 2 (Wrong Side): Purl all stitches.
Repeat these two rows (Decrease Row 1 and Decrease Row 2) until you have 40 stitches remaining on your needle. Bind off all stitches loosely.
Seam the Hood:
Fold your knitted hood piece in half with the Right Sides together. The bound-off edge is the top of the hood. Using your tapestry needle and a length of MC yarn, sew the top seam (the bound-off edge) closed to form the crown of the hood. Turn the hood Right Side out.
Part 2: The Cowl (Worked in the Round)
Now we'll create the cozy, seamless cowl that wraps around your neck. We'll pick up stitches from the bottom of the hood.
Pick Up Stitches: With your Right Side facing you and using your shorter 16-inch circular needle and MC yarn, pick up and knit 80 stitches along the bottom edge of the hood (the cast-on edge). Place a stitch marker to mark the beginning of the round, and join in the round, being careful not to twist your stitches.
Knit the Cowl Body:
We will now work in the round, knitting every round. We'll also decrease stitches in a few places to shape the cowl so it tapers slightly and fits snugly around the shoulders.
- Rounds 1-10: Knit all stitches.
- Round 11 (Decrease Round): *K8, K2tog*; repeat from * to * to the end of the round. (You will have 72 stitches).
- Rounds 12-20: Knit all stitches.
- Round 21 (Decrease Round): *K7, K2tog*; repeat from * to * to the end of the round. (You will have 64 stitches).
- Rounds 22-30: Knit all stitches.
- Round 31 (Decrease Round): *K6, K2tog*; repeat from * to * to the end of the round. (You will have 56 stitches).
- Rounds 32-40: Knit all stitches.
Bind off all stitches loosely. Weave in the yarn end securely.
Part 3: The Unicorn Mane (Knitted Strips)
The mane is made from simple, long knitted strips in your pastel colors. This is where the magic really comes to life!
Make the Strips: You will make a total of 6 strips. You can make 2 strips in each of the four colors (M1, M2, M3, M4), or you can mix and match to create your own unique rainbow. For a balanced look, we recommend 2 strips of each color.
For each strip, follow these instructions:
- Cast On: With your chosen mane color, cast on 10 stitches.
- Row 1 (Right Side): Knit all stitches.
- Row 2 (Wrong Side): Purl all stitches.
Repeat Rows 1 and 2 until the strip measures 18 inches (46 cm) long. Bind off all stitches. Make a total of 6 strips.
Part 4: Attaching the Mane
This is the final, most exciting step—transforming your hooded cowl into a unicorn!
Position the Strips: Lay your hooded cowl flat on a table with the crown seam at the top and the cowl at the bottom. Starting at the crown, you will sew the strips along the center back of the hood, letting them cascade down the back of the cowl.
Sew the Strips: Using your tapestry needle and a matching yarn color, securely sew each strip to the center back. Start with the first strip at the very top (the crown). Then, attach the next strip slightly below, overlapping the first one a little. Continue attaching all 6 strips, alternating colors for a beautiful rainbow effect. Make sure they are sewn on securely so they don't come loose.
Finishing Touches
You're almost done! Now for the final details.
Weave in Ends: Carefully weave in all remaining yarn ends from your knitting and seaming using your tapestry needle. This will give your project a clean, professional finish.
Optional Pom-Pom: For an extra touch of magic, you can create a fluffy pom-pom and attach it to the crown of the hood. You can make it using only MC yarn, or mix in some of the mane colors for a truly celestial look. Use a pom-pom maker or your fingers to create a 3-4 inch pom-pom, and sew it securely to the top of the hood.
Congratulations! You've just completed your very own Celestial Mane Hooded Cowl. Wrap it around your shoulders, feel the soft yarn and the whimsical mane, and enjoy the magical, handcrafted warmth you've created. This piece is sure to be a conversation starter and a beloved addition to your wardrobe.


