Aurora Dune Mosaic Wrap Free Pattern – Knit a Desert Sunset Shawl
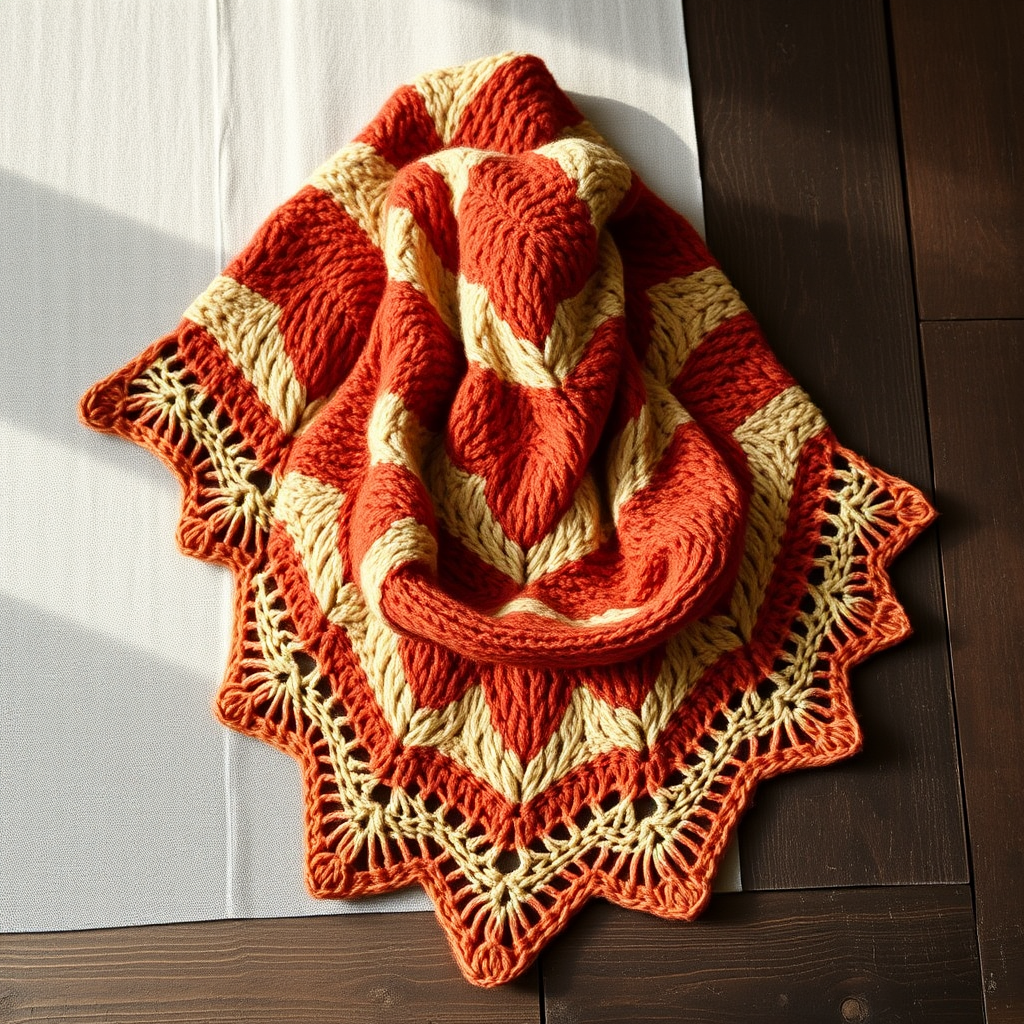
Aurora Dune Mosaic Wrap Free Pattern – Knit a Desert Sunset Shawl
Wrap yourself in the warm hues of a desert sunset with this stunning mosaic knit shawl. The geometric diamond pattern and soft color transitions create a modern, artistic accessory that's both cozy and eye-catching. This free knitting pattern is surprisingly beginner-friendly, thanks to the clever mosaic technique that uses only one color per row—no stranding or carrying yarn across rows required! The result is a rich, textured fabric that looks far more complex than it actually is.
Whether you're looking for a statement piece for cool evenings or a thoughtful handmade gift, the Aurora Dune Mosaic Wrap delivers. Its triangular shape drapes beautifully over the shoulders, and the slipped-stitch pattern creates a woven, dimensional effect that shifts and layers like the dunes at dusk. Let's dive into this rewarding project!
Materials Needed
Before you begin, gather the following supplies. This pattern calls for worsted weight yarn in three complementary colors that evoke a desert landscape:
- Yarn: Worsted weight yarn in 3 colors:
- Color A (terracotta) – approximately 150g
- Color B (sand) – approximately 150g
- Color C (deep rust) – approximately 100g
- Needle: US 8 (5mm) circular knitting needle, 32 inches or longer (to accommodate the growing number of stitches).
- Other: Stitch markers (optional, for tracking pattern repeats), tapestry needle for weaving in ends, blocking mats and pins.
Gauge: 18 stitches and 24 rows = 4 inches in stockinette stitch (blocked). Gauge is important for achieving the correct drape and size, so take a moment to knit a swatch!
Step-by-Step Instructions
This shawl is worked flat from the top down, increasing at the edges to form a triangle. The mosaic pattern is created by slipping stitches and working with two colors per row, but only one color is used per row, making it easier than it looks. Follow along carefully, and you'll be amazed at the beautiful pattern that emerges.
Abbreviations
- k = knit
- p = purl
- sl = slip stitch purlwise (as if to purl, with yarn in back on RS rows, yarn in front on WS rows)
- yo = yarn over
- k2tog = knit two together
- RS = right side
- WS = wrong side
Getting Started: The Foundation
Cast on: With Color A, cast on 3 stitches.
Row 1 (RS): k1, yo, k1, yo, k1 (5 stitches)
Row 2 (WS): k1, p to last stitch, k1
Row 3 (RS): k1, yo, k to last stitch, yo, k1 (7 stitches)
Row 4 (WS): k1, p to last stitch, k1
Repeat Rows 3 and 4 until you have 15 stitches, ending with a WS row. This creates the simple triangular base that will support the mosaic pattern.
The Mosaic Pattern
Now the fun begins! The mosaic pattern is worked in 24-row repeats. Each row uses only one color, and you'll alternate between colors to create the geometric diamonds. Remember to always keep the first and last stitch as k1, and do a yo after the first k1 and before the last k1 on RS rows to maintain the increases.
Row 1 (RS, Color B): k1, yo, *k1, sl1*, repeat from * to * until 2 stitches remain, k1, yo, k1 (17 stitches)
Row 2 (WS, Color B): k1, *sl1, p1*, repeat from * to * until 2 stitches remain, sl1, k1
Row 3 (RS, Color A): k1, yo, *sl1, k1*, repeat from * to * until 2 stitches remain, sl1, yo, k1 (19 stitches)
Row 4 (WS, Color A): k1, *p1, sl1*, repeat from * to * until 2 stitches remain, p1, k1
Row 5 (RS, Color C): k1, yo, *k3, sl1*, repeat from * to * until 2 stitches remain, k1, yo, k1 (21 stitches)
Row 6 (WS, Color C): k1, *sl1, p3*, repeat from * to * until 2 stitches remain, sl1, k1
Row 7 (RS, Color B): k1, yo, *sl1, k3*, repeat from * to * until 2 stitches remain, sl1, yo, k1 (23 stitches)
Row 8 (WS, Color B): k1, *p3, sl1*, repeat from * to * until 2 stitches remain, p3, k1
Row 9 (RS, Color A): k1, yo, *k1, sl1, k1*, repeat from * to * until 2 stitches remain, k1, yo, k1 (25 stitches)
Row 10 (WS, Color A): k1, *p1, sl1, p1*, repeat from * to * until 2 stitches remain, p1, k1
Row 11 (RS, Color C): k1, yo, *sl1, k1, sl1*, repeat from * to * until 2 stitches remain, sl1, yo, k1 (27 stitches)
Row 12 (WS, Color C): k1, *p1, sl1, p1*, repeat from * to * until 2 stitches remain, p1, k1
Row 13 (RS, Color B): k1, yo, *k5, sl1*, repeat from * to * until 2 stitches remain, k1, yo, k1 (29 stitches)
Row 14 (WS, Color B): k1, *sl1, p5*, repeat from * to * until 2 stitches remain, sl1, k1
Row 15 (RS, Color A): k1, yo, *sl1, k5*, repeat from * to * until 2 stitches remain, sl1, yo, k1 (31 stitches)
Row 16 (WS, Color A): k1, *p5, sl1*, repeat from * to * until 2 stitches remain, p5, k1
Row 17 (RS, Color C): k1, yo, *k1, sl1, k1, sl1, k1*, repeat from * to * until 2 stitches remain, k1, yo, k1 (33 stitches)
Row 18 (WS, Color C): k1, *p1, sl1, p1, sl1, p1*, repeat from * to * until 2 stitches remain, p1, k1
Row 19 (RS, Color B): k1, yo, *sl1, k1, sl1, k1, sl1*, repeat from * to * until 2 stitches remain, sl1, yo, k1 (35 stitches)
Row 20 (WS, Color B): k1, *p1, sl1, p1, sl1, p1*, repeat from * to * until 2 stitches remain, p1, k1
Row 21 (RS, Color A): k1, yo, *k7, sl1*, repeat from * to * until 2 stitches remain, k1, yo, k1 (37 stitches)
Row 22 (WS, Color A): k1, *sl1, p7*, repeat from * to * until 2 stitches remain, sl1, k1
Row 23 (RS, Color C): k1, yo, *sl1, k7*, repeat from * to * until 2 stitches remain, sl1, yo, k1 (39 stitches)
Row 24 (WS, Color C): k1, *p7, sl1*, repeat from * to * until 2 stitches remain, p7, k1
Continuing the Pattern
Continue in this manner: Repeat Rows 1-24, but each time you repeat, the pattern will shift and grow. To increase, always keep the first and last stitch as k1, and do a yo after the first k1 and before the last k1 on RS rows. The mosaic pattern will naturally expand as you add more stitches.
Continue until the shawl measures approximately 60 inches across the top edge, or desired length, ending with a WS row. Don't worry if the stitch count seems large—the circular needle will hold them all comfortably.
Edging
The delicate scalloped edging adds the perfect finishing touch. Work these final rows with Color A:
Row 1 (RS, Color A): k1, yo, *k2tog, yo*, repeat from * to * until 2 stitches remain, k1, yo, k1
Row 2 (WS, Color A): k1, p to last stitch, k1
Row 3 (RS, Color A): k1, yo, *k1, yo, k2tog*, repeat from * to * until 2 stitches remain, k1, yo, k1
Row 4 (WS, Color A): k1, p to last stitch, k1
Bind off loosely: k1, *k2tog, pass first stitch over*, repeat from * to * until all stitches are bound off. Cut yarn and weave in ends.
Blocking
Blocking is essential for this shawl to open up the mosaic pattern and achieve the proper drape. Soak the shawl in lukewarm water with a drop of mild soap for 20 minutes. Gently squeeze out excess water (never wring!), then lay flat on a towel. Shape to dimensions, stretching the points of the diamonds. Allow to dry completely.
Once dry, your Aurora Dune Mosaic Wrap is ready to wear! The interplay of terracotta, sand, and deep rust will evoke the beauty of a desert sunset every time you wrap it around your shoulders. Enjoy your handmade masterpiece!


