Art Deco Fan Bunting Cocoon Free Pattern: Sunset Ombre Crochet Baby Cocoon
Art Deco Fan Bunting Cocoon: Sunset Ombre Crochet Baby Cocoon
Introduction
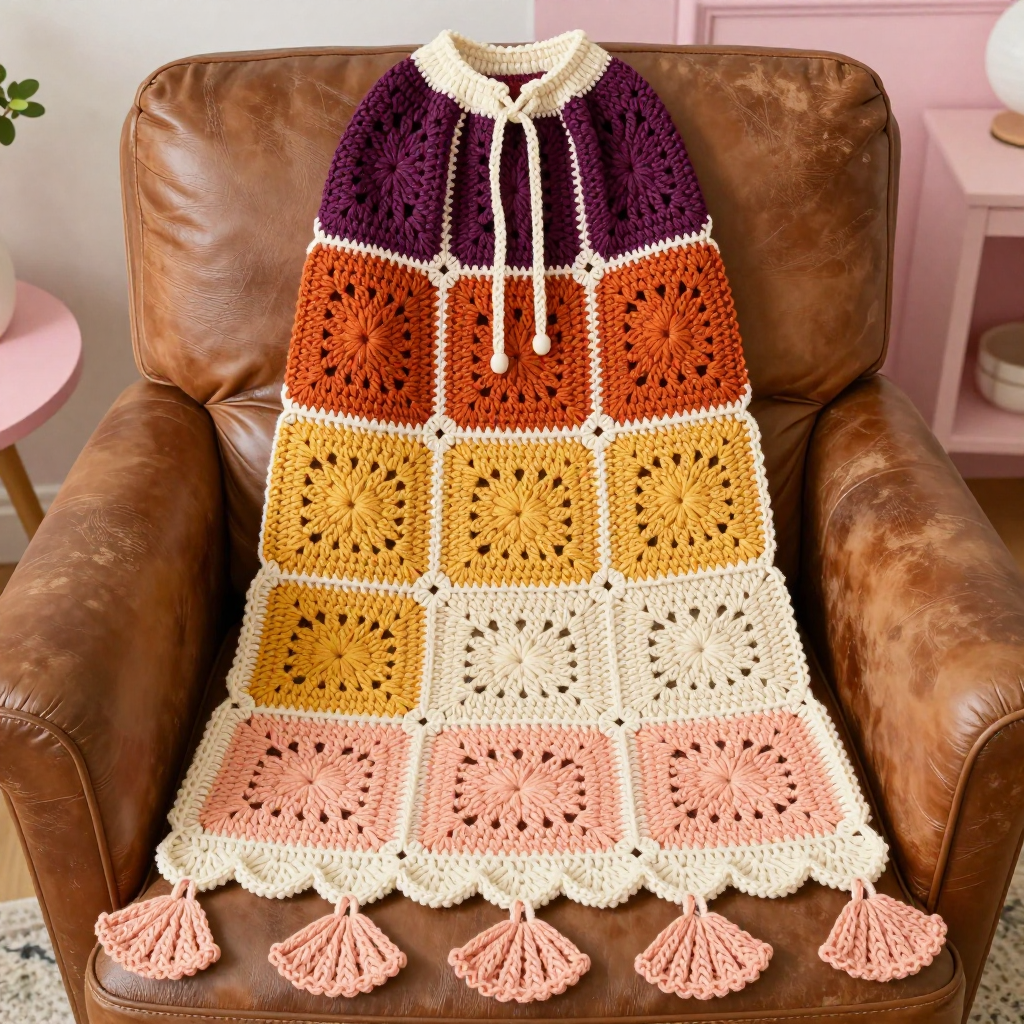
If you have never held a crochet hook before, this is the project that will make you fall in love with the craft. The Art Deco Fan Bunting Cocoon is a snuggly baby photo prop built from 24 simple, identical granny squares, so you only ever have to learn one small square and then repeat it. The finished cocoon looks like a little sunset: deep plum at the top, melting through burnt orange, golden yellow, and soft peach, down to a cream fan-scalloped bunting hem with five dangling fan motifs. It feels soft, light, and slightly stretchy, perfect for tucking a newborn in for pumpkin-season photos. Because the body is a straight tube with no shaping, no increasing, and no decreasing, it is one of the friendliest "first real project" patterns you can make.
Materials Needed
- Yarn: Baby-soft acrylic, DK weight (also called light worsted / category 3). Total approximately 300–350 yards: 1 skein each in 5 sunset ombre shades — deep plum (A), burnt orange (B), golden yellow (C), soft peach (D), and cream (E).
- Hook: 4.0 mm (US G-6) crochet hook.
- Stitch markers (at least 8) — small clips or safety pins work fine.
- Tapestry needle (a big blunt needle with a large eye) for seaming and weaving in ends.
- Scissors.
- 2 small buttons (optional, for the drawstring ends).
- Measuring tape for checking your square size and gauge.
Finished size: Approximately 20 in (51 cm) long from the top opening to the hem, 14 in (36 cm) wide across the body, plus a 3 in (7.5 cm) fan bunting hem. Fits 0–6 months. The body is a straight tube with no tapering.
Abbreviations and Beginner Glossary
- ch – chain. Wrap the yarn over your hook and pull it through the loop already on your hook. This makes a small link; a row of chains is your starting line.
- sl st – slip stitch. Insert your hook into the stitch, wrap yarn over, and pull it through both the stitch and the loop on your hook at once. It makes an almost invisible join.
- sc – single crochet. Insert hook into stitch, wrap yarn over, pull up a loop (2 loops on hook), wrap yarn over, pull through both loops. (1 loop left.)
- dc – double crochet. Wrap yarn over hook first, insert hook into stitch, wrap yarn over, pull up a loop (3 loops on hook), wrap yarn over, pull through 2 loops, wrap yarn over, pull through last 2 loops.
- tr – treble crochet. Wrap yarn over hook twice, insert hook, pull up a loop (4 loops), then pull through 2 loops three times. (Not used in this pattern, but listed so you recognize it.)
- st / sts – stitch / stitches.
- sp – space. The little gap made by chains in the row below.
- ch-2 sp – chain-2 space. The gap created by two chains, used at each corner of the granny square.
- beg – beginning.
- rep – repeat. Do the instructions between the asterisks again.
- ring – a loop made by joining a few chains with a slip stitch; you work your first stitches into the hole in the middle.
- fasten off – cut the yarn leaving a tail, then pull the tail all the way through the last loop to lock it.
- whipstitch – a simple sewing stitch: bring the needle up through both layers, over the edge, and down again, repeating in small even stitches.
Gauge
Gauge: 1 solid granny square = 3.5 in (9 cm) square. Also: 4 dc = 1 in (2.5 cm) and 4 dc rows = 1 in (2.5 cm).
Why gauge matters: Gauge is simply how big your stitches come out. If your square is bigger than 3.5 in, your finished cocoon will be too wide and long; if it is smaller, the cocoon will be too snug. Because this pattern is built from a fixed grid of squares, your square size controls the entire finished size.
How to make a gauge swatch: Crochet one complete solid granny square exactly as written below. Lay it flat and measure straight across from edge to edge (not corner to corner). If it measures 3.5 in (9 cm), you are perfect. If it is larger, try a 3.5 mm hook; if smaller, try a 4.5 mm hook. One test square is all you need.
Beginner Tips Before You Start
- Make one practice square first. Crochet a single square, measure it, and only then make the other 23. This saves you from remaking a whole cocoon.
- Use stitch markers to track rounds. Place a marker in the first stitch of each round so you always know where to join. Move it up each round.
- Do not pull your yarn too tight. New crocheters tend to choke the hook. Keep your loops relaxed so the hook slides in easily; tight stitches make stiff, small squares.
- Count your corner spaces. Every square must have exactly 4 chain-2 corner spaces. If you have 3 or 5, something went wrong — undo that round.
- Keep all 24 squares the same size. Lay them in a stack as you finish and compare. If one is noticeably bigger, it will ripple when seamed.
- Weave in ends as you go. Each square has 2 yarn tails. Thread them in with the tapestry needle right after fastening off — 48 loose tails at the end is no fun.
Step-by-Step Instructions
Part 1: Solid Granny Square (make 24)
Round 1: With your first color, ch 4, join with sl st to form a ring. Ch 3 (this counts as your first dc), 2 dc in ring, ch 2, [3 dc in ring, ch 2] 3 times, join with sl st to top of beg ch-3. (12 dc, 4 ch-2 sps)
Round 2: Ch 3, dc in each of next 2 dc, *(2 dc, ch 2, 2 dc) in next ch-2 sp, dc in each of next 3 dc; rep from * around, join with sl st to top of beg ch-3. (28 dc, 4 ch-2 sps)
Round 3: Ch 3, dc in each dc to next ch-2 sp, *(2 dc, ch 2, 2 dc) in ch-2 sp, dc in each dc to next ch-2 sp; rep from * around, join with sl st to top of beg ch-3. (44 dc, 4 ch-2 sps)
Round 4: Ch 3, dc in each dc to next ch-2 sp, *(2 dc, ch 2, 2 dc) in ch-2 sp, dc in each dc to next ch-2 sp; rep from * around, join with sl st to top of beg ch-3. (60 dc, 4 ch-2 sps)
Fasten off. Square measures approximately 3.5 in (9 cm).
Part 2: Color Sequence for the 24 Squares
- 6 squares: A (deep plum) for Rounds 1–2, B (burnt orange) for Rounds 3–4.
- 6 squares: B (burnt orange) for Rounds 1–2, C (golden yellow) for Rounds 3–4.
- 6 squares: C (golden yellow) for Rounds 1–2, D (soft peach) for Rounds 3–4.
- 6 squares: D (soft peach) for Rounds 1–2, E (cream) for Rounds 3–4.
To change color, finish the last stitch of Round 2, cut the old yarn, and pull the new color through the final loop before joining. Work Rounds 3–4 in the new shade.
Part 3: Assembly — Cocoon Body
Arrange all 24 squares in a 4 squares wide × 6 squares tall grid, following the ombre sequence from plum at the top to cream at the bottom (each color group of 6 squares fills one and a half rows; simply keep the colors flowing in order so the top is darkest and the bottom is lightest).
Join the squares with sl st seams through both loops: hold two squares with right sides facing out, insert your hook through the matching corner stitches of both squares, and work a slip stitch into each stitch along the edge. Work all vertical seams first, then all horizontal seams. You now have a flat panel 4 squares wide and 6 squares tall (approx. 14 in × 21 in / 36 cm × 53 cm).
Form the tube: Bring the two short ends of the panel together, matching squares, and sl st seam them together the same way. You now have a tube approximately 14 in (36 cm) wide and 21 in (53 cm) tall.
Part 4: Top Drawstring Channel
Round 1: With E (cream), join yarn at the top edge of the tube. Ch 1, sc evenly around the top opening (approx. 60 sc), join with sl st to first sc. (60 sc)
Rounds 2–4: Ch 1, sc in each sc around, join with sl st to first sc. (60 sc) Fasten off after Round 4.
Fold the top 3 rounds to the inside and whipstitch in place to form a channel, leaving a 1 in (2.5 cm) opening unsewn. Thread a 24 in (61 cm) length of E through the channel, and add a button to each end if desired.
Part 5: Fan Bunting Hem (worked along the bottom edge)
Row 1: With E (cream), join yarn at the bottom edge of the tube. Ch 1, sc evenly around the bottom opening (approx. 60 sc), join with sl st to first sc. (60 sc)
Row 2: Ch 1, sc in each sc around, join with sl st to first sc. (60 sc)
Row 3 (fan base): Ch 1, sc in first sc, *skip 2 sc, 5 dc in next sc, skip 2 sc, sc in next sc; rep from * around, join with sl st to first sc. (10 fans)
Row 4: Ch 1, sc in first sc, *dc in each of next 5 dc, sc in next sc; rep from * around, join with sl st to first sc. (10 fans)
Row 5: Ch 1, sc in first sc, *dc in next dc, (2 dc, ch 1, 2 dc) in next dc, dc in next dc, sc in next sc; rep from * around, join with sl st to first sc. Fasten off. (10 fans)
Part 6: Hanging Fan Motifs (make 5)
Round 1: With D (soft peach), ch 6, join with sl st to form ring. Ch 3, 2 dc in ring, ch 2, [3 dc in ring, ch 2] 3 times, join with sl st to top of beg ch-3. (12 dc, 4 ch-2 sps)
Round 2: Ch 3, dc in each of next 2 dc, *(2 dc, ch 2, 2 dc) in next ch-2 sp, dc in each of next 3 dc; rep from * around, join with sl st to top of beg ch-3. (28 dc, 4 ch-2 sps)
Round 3: Ch 1, sc in each dc around, join with sl st to first sc. Fasten off, leaving a 6 in (15 cm) tail. (28 sc)
Attach the motifs: Sew one fan motif to the center of every other fan along the hem (5 fans total), using the 6 in tail to sew the top edge of each motif to the bottom of a hem fan.
Assembly and Finishing
Weave in all ends. Thread each yarn tail onto the tapestry needle, turn the work to the wrong side, and pass the needle back and forth through a few stitches (about 1 inch) before trimming close to the fabric. Never knot; weaving hides the tail securely.
Blocking. Lightly mist the cocoon with cool water (or pin it flat on a towel and spritz it), gently pat the granny squares and fan motifs open with your fingers, and let it dry completely flat. This opens the squares, evens out the seams, and makes the fan hem lie flat and crisp.
Final check. Thread the drawstring through the top channel and tie a bow. Give the cocoon a gentle stretch to make sure all seams are secure, and trim any stray fibers. Your cocoon is ready for a 0–6 month baby photo prop.
Pro Tips and Variations
- Change the palette. Swap the sunset ombre for a single color plus cream, or use a pumpkin-orange and sage green scheme for a fall photo shoot. Keep the cream hem and channel for contrast.
- Adjust the size. For a larger cocoon, add one more row of squares (making it 4 × 7) and add 6 more squares; for a smaller prop, remove a row. Each square adds 3.5 in (9 cm) of length.
- Substitute yarn. Any DK-weight baby yarn works — cotton blends give a crisper square, while acrylic gives more stretch. Always re-check your gauge square after switching yarn.
- Make the hem fancier. Add a picot (ch 3, sl st in same stitch) to the tip of each hem fan, or attach a small button to the center of each hanging motif for extra Art Deco sparkle.