Whispering Vine Market Tote Free Pattern – A Knitted Botanical Carryall
Whispering Vine Market Tote Free Pattern – A Knitted Botanical Carryall
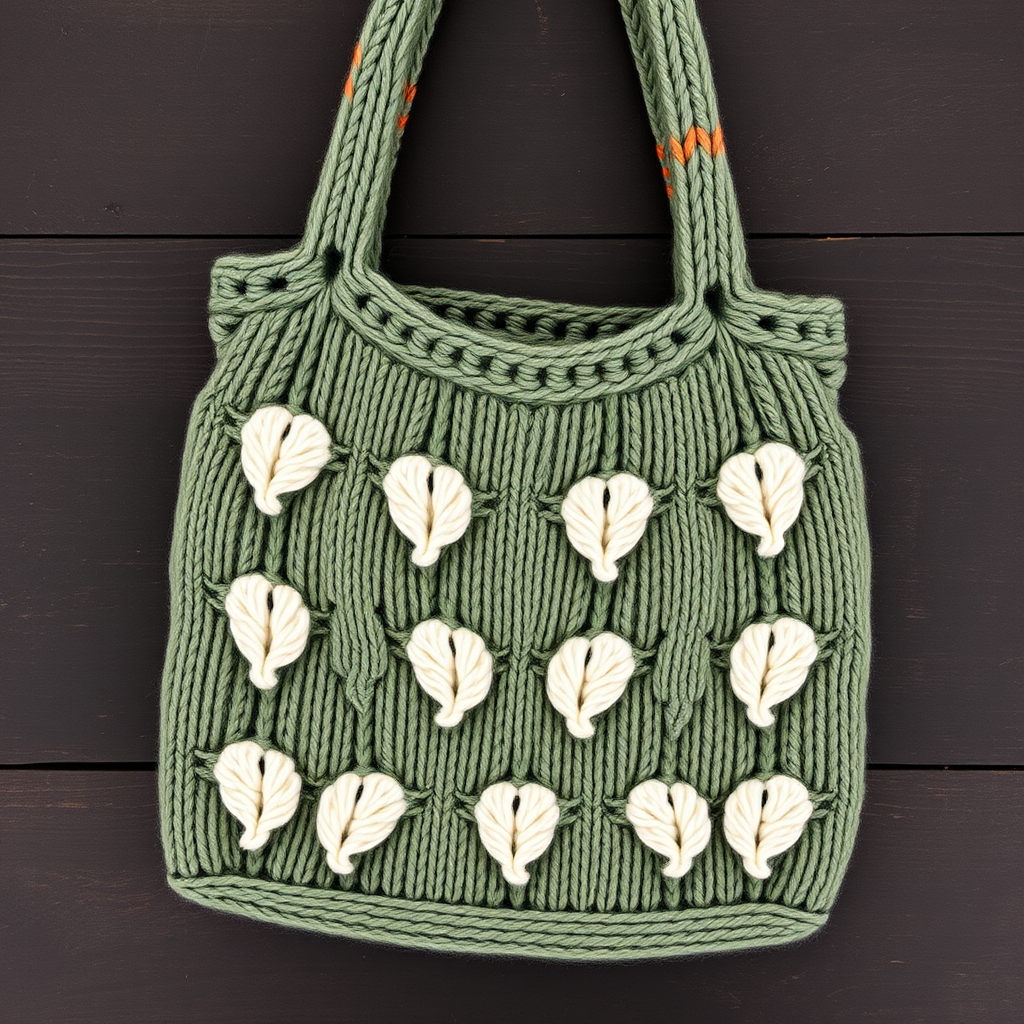
Imagine strolling through your local farmers' market with a bag that's as beautiful as the produce you're carrying. The Whispering Vine Market Tote is a lush, leafy knitted carryall that drapes like a woven garden basket, bringing a touch of botanical elegance to your everyday errands. This free knitting pattern features a textured leaf stitch pattern worked in stranded colorwork, creating a stunning visual effect that's surprisingly achievable for confident beginners and intermediate knitters alike.
With its earthy palette of sage green, cream, and optional terracotta accents, this eco-friendly tote is a standout accessory for any season. Whether you're heading to the farmer's market, the beach, or just around town, this handcrafted bag combines style with sustainability. Let's dive into this delightful project that will have you carrying your world in hand-knitted luxury.
Materials Needed
Before you begin your knitting journey, gather these essential supplies to ensure a smooth and enjoyable crafting experience:
Yarn
- Main Color (MC) – Sage Green: Approximately 250g of worsted weight cotton yarn (e.g., Lion Brand 24/7 Cotton)
- Contrast A – Cream: Approximately 100g of the same worsted weight cotton yarn
- Contrast B – Terracotta (optional): Approximately 50g for handle stripes or decorative accents
Tools & Notions
- Knitting Needles: US 7 (4.5 mm) knitting needles
- Tapestry Needle: For seaming and weaving in ends
- Stitch Markers: To help track pattern repeats
- Scissors: For cutting yarn
Gauge
20 stitches x 26 rows = 4 inches in stockinette stitch (after light felting, if desired, but the pattern works beautifully unfelted too). Always knit a gauge swatch to ensure your finished bag has the correct dimensions.
Step-by-Step Instructions
This tote is knitted flat in two identical panels and seamed together, with the leaf motif worked in stranded colorwork. The handles are knitted as long strips and attached securely. Follow these detailed instructions carefully, and you'll have a gorgeous market bag in no time.
Panel (Make 2)
Cast On: With MC (Sage Green), cast on 40 stitches using your preferred method (long-tail cast on works well).
Rows 1-4 (Garter Stitch Bottom Edge): Knit every row for 4 rows. This creates a sturdy, non-curling bottom edge for your bag.
Row 5 (Right Side) – Begin Leaf Pattern: Knit 4 stitches in MC, then begin the leaf chart: *K1 in Contrast A (Cream), K3 in MC* – repeat from * to * across the row, ending with K4 in MC. You will have 4 MC border stitches on each side of the panel, creating a clean frame for the leaf motif.
Row 6 (Wrong Side): Purl 4 stitches in MC, then *P1 in Contrast A, P3 in MC* – repeat from * to * across, ending with P4 in MC. Remember to carry the unused yarn loosely across the back of the work to prevent puckering.
Rows 7-18 (Leaf Motif – First Row of Leaves): Continue working the leaf pattern in stockinette stitch (knit on right side, purl on wrong side) following the chart. Each leaf is a diamond shape that is 7 stitches wide and 13 rows tall. Work 3 leaves across the panel, spaced 3 MC stitches apart. For best results, use a separate small ball of Contrast A for each leaf to avoid long floats across the back, or twist the yarns at color changes to catch the floats every 3-4 stitches.
Pro Tip: When changing colors, always bring the new yarn over the old yarn to prevent holes in your work. Keep your tension even – not too tight, not too loose – for a professional finish.
Row 19: Knit all stitches in MC.
Row 20: Purl all stitches in MC.
Rows 21-34 (Second Row of Leaves – Staggered): Work a second row of leaves, but this time offset them by half a leaf width. Start with 7 MC stitches, then work the leaf pattern, continuing across the row. This staggered arrangement creates a beautiful, organic diamond pattern that mimics climbing vines.
Rows 35-36: Work in stockinette stitch with MC only.
Rows 37-50 (Third Row of Leaves): Work a third row of leaves, aligning them with the first row to create a repeating pattern. The leaves should stack vertically, creating a lovely rhythm across the bag.
Rows 51-54 (Garter Stitch Top Edge): Work in garter stitch with MC for 4 rows to create a matching top edge that won't curl.
Bind Off: Bind off loosely to maintain the stretch of the top edge. If your bind-off tends to be tight, use a larger needle or a stretchy bind-off method.
Repeat the entire panel instructions to create the second panel.
Handles (Make 2)
Cast On: Cast on 8 stitches with MC.
Work in Garter Stitch: Knit every row until the handle measures 18 inches (or your desired length – consider how you'll carry the bag and adjust accordingly).
Bind Off: Bind off all stitches loosely.
Optional Terracotta Accent: For a pop of color, you can work a stripe of Contrast B (Terracotta) every 10 rows or so, or work the entire handle in MC for a more classic look.
Finishing & Assembly
Now comes the satisfying part – bringing your panels together to create the finished tote!
Step 1: Seam the Panels
With right sides together, sew the side seams of the two panels using mattress stitch. This invisible seaming technique creates a beautiful, professional finish. Leave the top edge open – this will be the opening of your bag.
Step 2: Turn Right Side Out
Carefully turn the bag right side out through the top opening. Gently shape the corners and press the seams flat with your fingers.
Step 3: Prepare the Handles
Fold each handle in half lengthwise (bringing the long edges together) and sew the long edges together using a whip stitch or mattress stitch. This creates a sturdy, double-thickness strap that will comfortably carry your market finds.
Step 4: Attach the Handles
Position each handle on the inside of the bag at the top edge, placing them about 3 inches from each side seam. Make sure the handles are not twisted and are evenly spaced. Sew securely with MC yarn, using a strong, reinforced stitch. Go over the attachment points twice for extra durability – you don't want a handle coming loose while carrying heavy produce!
Step 5: Weave in All Ends
Using your tapestry needle, weave in all loose yarn ends on the inside of the bag. Take your time with this step – properly woven ends will ensure your bag lasts for years.
Optional Felting for a Denser Structure
If you prefer a denser, more structured tote that holds its shape beautifully, you can felt the bag before attaching the handles. Here's how:
- Place the seamed bag (without handles) in a washing machine with hot water and a small amount of mild soap.
- Run a normal cycle and check the bag frequently – felting happens quickly and you don't want to over-felt.
- Once you reach the desired density, remove the bag and rinse it thoroughly in cold water.
- Shape the bag while damp, pulling it into the desired rectangular form, and allow it to dry completely.
- Only after the bag is fully dry should you attach the handles following the instructions above.
Note: Felting will shrink the bag somewhat, so keep this in mind if you choose this option. The pattern works beautifully unfelted too, giving you a softer, drapier bag that's perfect for everyday use.
Final Thoughts
Your Whispering Vine Market Tote is now complete! This botanical carryall is more than just a bag – it's a statement piece that showcases your knitting skills and your commitment to eco-friendly, handmade accessories. The textured leaf pattern and earthy color palette make it a versatile accessory that pairs beautifully with everything from casual jeans to summer dresses.
This pattern is perfect for practicing stranded colorwork, and the repetitive nature of the leaf motif makes it a relaxing, meditative knit. Plus, cotton yarn is durable, washable, and perfect for carrying everything from fresh produce to library books.
We'd love to see your finished tote! Share your creation on social media with the hashtag #WhisperingVineTote and inspire fellow knitters. Happy knitting, and enjoy your beautiful new market companion!