The Nomad's Compass Chevron Backpack Free Pattern – A Knitted Geometric Traveler
The Nomad's Compass Chevron Backpack Free Pattern – A Knitted Geometric Traveler
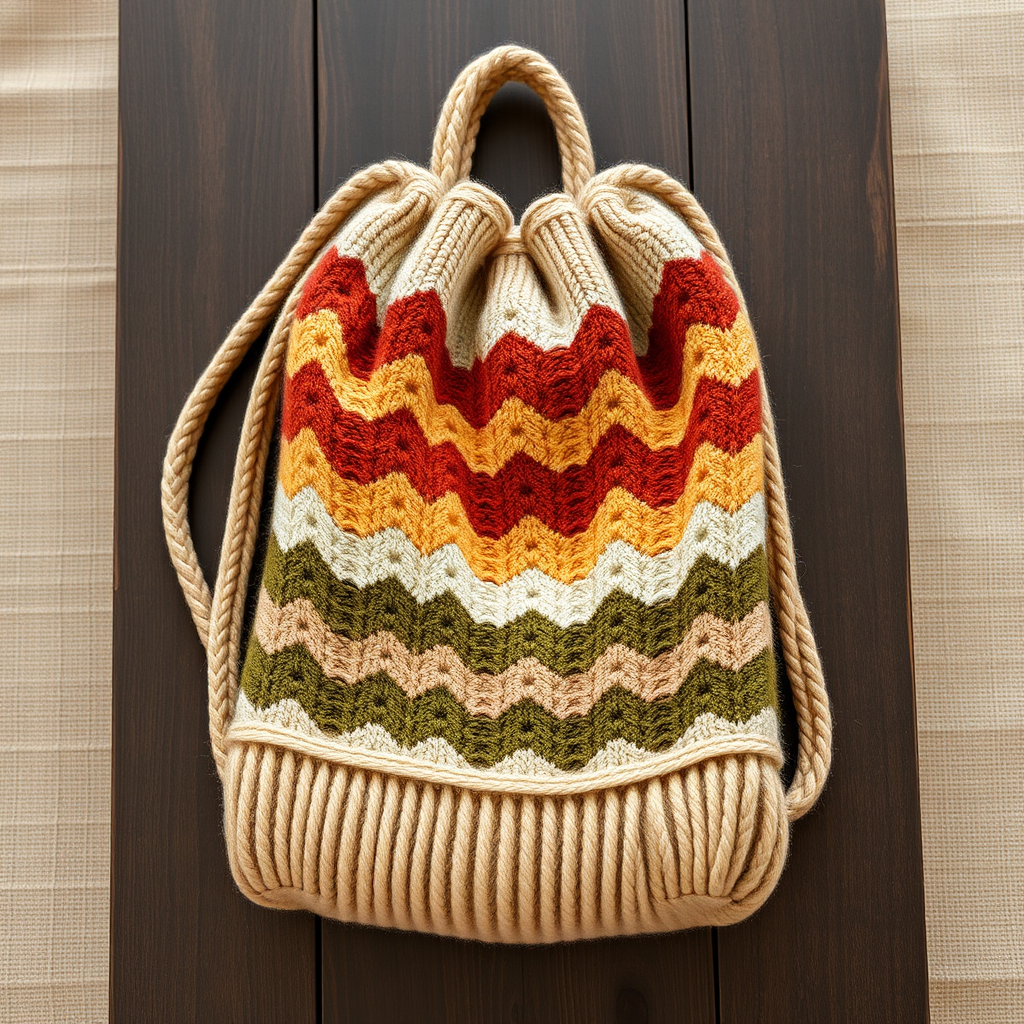
Carry your world with this textured chevron backpack, knit in earthy desert tones with a sturdy felted base. It's a modern take on wanderlust, blending geometric stitchwork with practical, hands-free style. Whether you're heading to a farmer's market, a weekend hike, or just want a boho-chic accessory for daily errands, this backpack is as functional as it is beautiful. The chevron pattern, created with simple increases and decreases, is surprisingly beginner-friendly once you get into the rhythm. Plus, the felting process transforms your knitting into a dense, durable fabric that holds its shape beautifully.
This free pattern will guide you through every step—from casting on the base to the final felting magic. Let's get started!
Materials Needed
Before you begin, gather the following supplies. Having everything ready will make your knitting experience smooth and enjoyable.
Yarn
- Worsted weight wool yarn (100% wool is essential for felting; avoid superwash treated yarns)
- Color A (Sand): Approx 200g
- Color B (Terracotta): Approx 100g
- Color C (Olive): Approx 100g
- Total: approx 400g
Needles & Notions
- US 7 (4.5mm) circular needles, 24" long (for the main body)
- US 7 (4.5mm) double-pointed needles (for the straps)
- Stitch markers (optional, but helpful)
- Tapestry needle for seaming and weaving in ends
- Pillowcase (for felting)
- Mild detergent
Gauge
Before felting: 20 stitches and 26 rows = 4 inches in stockinette stitch.
After felting: 22 stitches and 30 rows = 4 inches (fabric will shrink and firm up).
Always knit a gauge swatch and felt it to ensure your final bag meets the finished dimensions.
Step-by-Step Instructions
Finished Dimensions
Approximately 14" wide x 16" tall x 5" deep (after felting). The felting process will shrink your knitted piece, so don't be alarmed when it looks larger before washing.
Abbreviations
- CO: Cast on
- K: Knit
- P: Purl
- K2tog: Knit two together (right-leaning decrease)
- SSK: Slip, slip, knit (left-leaning decrease)
- M1: Make one (increase)
- St(s): Stitch(es)
- St st: Stockinette stitch (knit on RS, purl on WS)
- WS: Wrong side
- RS: Right side
- YO: Yarn over
Pattern Notes
- The bag is worked flat in one piece from the bottom up, then seamed at the sides.
- The chevron pattern is created with paired increases (M1) and decreases (K2tog and SSK), which naturally form the zigzag peaks and valleys.
- After knitting, the entire bag (including straps) is felted in a washing machine to create a dense, sturdy fabric that holds its shape.
BASE (Worked Flat)
With Color A (Sand), CO 60 stitches.
- Row 1 (RS): K all.
- Row 2 (WS): P all.
Repeat Rows 1-2 until the piece measures 5 inches from the cast-on edge. End with a WS row. This forms the sturdy base of your backpack.
BODY (Chevron Pattern)
Switch to Color B (Terracotta). You will now work in Stockinette stitch (K on RS, P on WS) while shaping the chevrons. Follow the 10-row repeat below. The pattern is written for the full 60 stitches; the repeat is marked with asterisks (*).
- Row 1 (RS): K2, *K2tog, K8, M1, K1, M1, K8, SSK, K2; repeat from * to end. (60 sts)
- Row 2 (WS): P all.
- Row 3 (RS): K2, *K2tog, K6, M1, K3, M1, K6, SSK, K2; repeat from * to end.
- Row 4 (WS): P all.
- Row 5 (RS): K2, *K2tog, K4, M1, K5, M1, K4, SSK, K2; repeat from * to end.
- Row 6 (WS): P all.
- Row 7 (RS): K2, *K2tog, K2, M1, K7, M1, K2, SSK, K2; repeat from * to end.
- Row 8 (WS): P all.
- Row 9 (RS): K2, *K2tog, M1, K9, M1, SSK, K2; repeat from * to end.
- Row 10 (WS): P all.
These 10 rows form the chevron repeat. Continue working in pattern, alternating colors every 10 rows in this sequence: B (Terracotta), C (Olive), B, C, B. Work until the piece measures 14 inches from the cast-on edge. End with a WS row.
Tip: Place a stitch marker at the center of each chevron repeat to help you keep track of your increases and decreases.
TOP EDGE (Drawstring Casing)
Switch back to Color A (Sand). Work in Stockinette stitch for 1 inch (about 6 rows). Then create the casing for your drawstring:
- Row 1 (RS): K all.
- Row 2 (WS): P all.
- Row 3 (RS): *K2tog, YO (yarn over); repeat from * to end. (This creates eyelet holes for the drawstring.)
- Row 4 (WS): P all.
- Row 5 (RS): K all.
- Row 6 (WS): P all.
Bind off loosely. This ensures the casing is flexible enough to thread the drawstring through later.
FINISHING (Seaming)
- Fold the piece in half with right sides together, matching the cast-on edge and side seams.
- Sew the side seams from the bottom to the top, leaving the top 1 inch open for the drawstring casing. Use a mattress stitch or whip stitch for a neat finish.
- Turn the bag right side out.
STRAPS (Knit in the Round)
With Color A (Sand), CO 8 stitches onto double-pointed needles. Distribute evenly (2-3 sts per needle).
- Round 1: K all.
Work in Stockinette stitch in the round (knit every round) until the strap measures 30 inches. Bind off loosely. Make a second strap identically.
Tip: To avoid ladders (loose stitches) between DPNs, pull the yarn snug when switching needles.
ASSEMBLY (Attaching Straps)
- Position each strap end on the inside of the bag at the side seams, about 2 inches below the top edge.
- Sew the strap ends securely using a tapestry needle and matching yarn. Reinforce with a few extra stitches to ensure they withstand the weight of your belongings.
FELTING (The Magic Step)
This is where your backpack transforms from loose knitting into a dense, felted fabric.
- Place the entire bag (including the straps) inside a pillowcase and tie the top closed. This protects your knitting from excessive agitation.
- Wash in a washing machine on a hot water cycle with a small amount of mild detergent.
- Check the progress every 5 minutes by removing the bag and inspecting it. You want the fabric to felt to a firm density—stitches should still be visible but the fabric should feel solid and not stretchy.
- Once felted to your liking, remove the bag from the pillowcase and shape it while damp. Gently pull the sides to square off the bottom and smooth the chevron pattern.
- Allow the bag to dry completely, ideally over a form (like a box or books) to help it hold its shape.
DRAWSTRING
With Color A (Sand), create a drawstring. You have two options:
- Crochet: Chain 30 inches.
- Knit: Work an I-cord for 30 inches.
Thread the drawstring through the eyelet casing (Row 3 of the top edge). Tie the ends in a secure knot. You can add wooden beads or tassels to the ends for extra boho flair.
Final Thoughts
Congratulations! You've created a stunning, one-of-a-kind felted chevron backpack. The earthy desert tones and geometric pattern make it a versatile accessory that pairs beautifully with denim, linen, or anything in your wardrobe. Because you felted it, the bag is incredibly durable and will hold its shape for years of adventures.
Happy knitting, and may your new Nomad's Compass carry you to wonderful places!