Whispering Pines Textured Throw Free Pattern
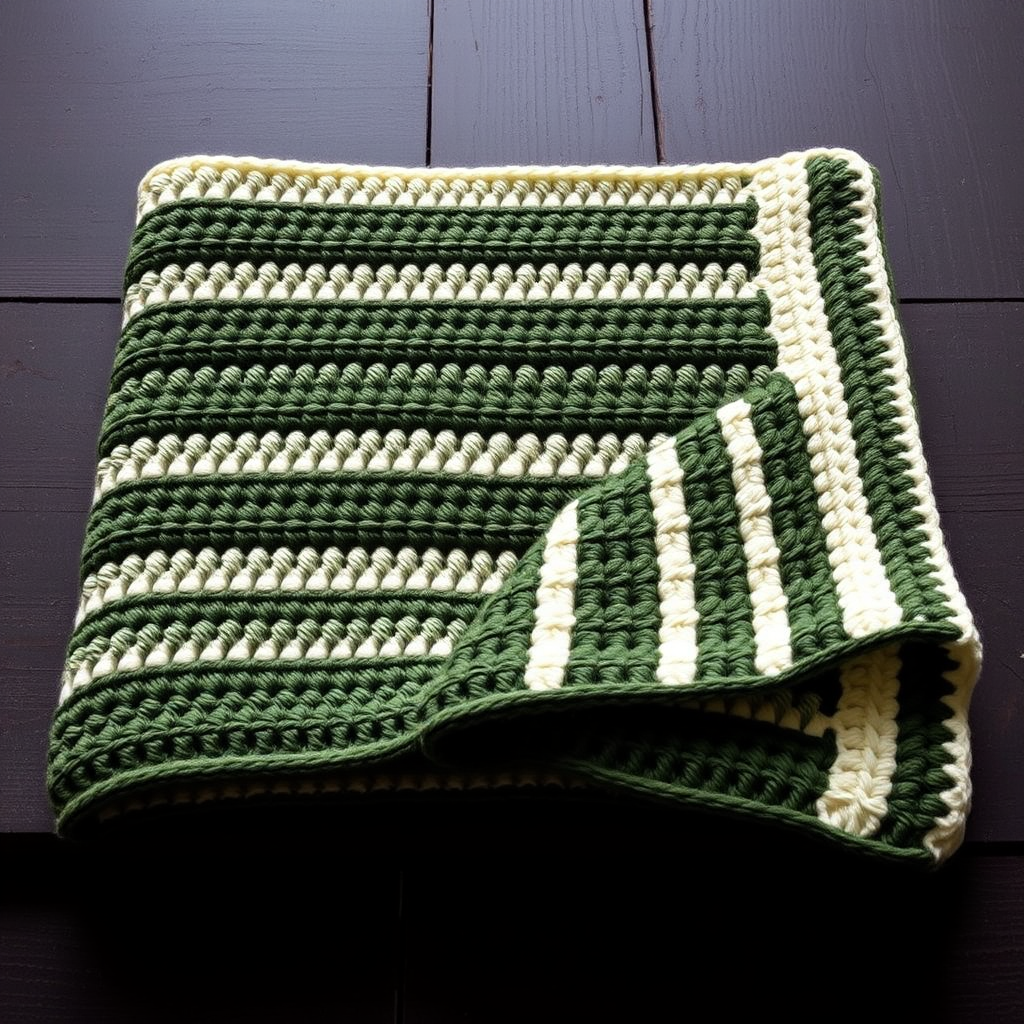
Whispering Pines Textured Throw: A Free Crochet Pattern for a Cozy Forest-Inspired Blanket
Imagine wrapping yourself in the serene beauty of a quiet forest, where the ground is soft with moss and the air is crisp with the scent of pine. That's the feeling you'll create with the Whispering Pines Textured Throw. This deeply textured crochet blanket features a stunning interplay of moss and pine stitches, creating a rich, tactile fabric that is as beautiful to look at as it is to snuggle under. This is a relaxing, modern project that works up quickly thanks to super bulky yarn, making it the perfect weekend make for both intermediate crocheters and confident beginners looking for a rewarding challenge.
In this comprehensive guide, we'll walk you through every step, from gathering your materials to weaving in the final ends. By the end, you'll have a gorgeous, handmade throw that adds a touch of organic, modern comfort to any room.
Materials Needed: Gathering Your Forest Palette
Before you begin, it's essential to gather all your supplies. This pattern uses a simple palette of three colors that evoke a forest landscape. The yarn specified is super bulky, which is key to the blanket's quick construction and plush feel.
Yarn Requirements
You will need Super Bulky Weight Yarn (Size 6). The total yardage required is approximately 1200-1400 yards. The sample uses three colors, but feel free to adapt the palette to your own home decor.
- Color A (Forest Green): 700 yards – This is your main color, used for the large moss stitch sections.
- Color B (Moss Heather): 500 yards – This color creates the textured pine stitch bands.
- Color C (Cream): 200 yards – Used for the thin, crisp separating stripes and the border.
Tools & Notions
- Crochet Hook: US Size N/P (10 mm) hook. This large hook is essential for achieving the correct gauge with super bulky yarn.
- Scissors: For cutting your yarn when changing colors.
- Tapestry Needle: A large-eyed needle for weaving in the ends securely.
- Measuring Tape: To check your gauge and the final dimensions of your throw.
Gauge & Finished Size
Getting the right gauge is crucial for ensuring your blanket is the correct size and has the right drape. The gauge for this pattern is 4 stitches and 3 rows = 4 inches in Moss Stitch pattern (after blocking). Always make a gauge swatch before starting your project to ensure your tension is correct.
Step-by-Step Instructions: Crafting Your Throw
This pattern is worked in rows from the bottom up. It uses a simple, repeating two-row sequence for the moss stitch and a two-row sequence for the pine stitch. Pay close attention to the stitch multiples and the special stitch definitions below.
Stitch Abbreviations
- ch: chain
- sc: single crochet
- dc: double crochet
- fpdc: front post double crochet
- bpdc: back post double crochet
- st(s): stitch(es)
- sk: skip
Special Stitches Explained
- Moss Stitch (MS): This is a classic, woven-looking stitch. The pattern is (sc, ch 1, sk 1) repeated. On subsequent rows, you will work your sc into the ch-1 spaces from the previous row. This creates a dense, flat fabric.
- Pine Stitch (PS): This is the star of the show, creating the raised, ribbed texture. It involves working a (fpdc, bpdc) into the same stitch to create a column of texture. The alternating front and back posts create a beautiful, elastic ribbing.
Pattern Foundation
With Color A (Forest Green), begin by making a slip knot and chaining 96 stitches. This chain count is crucial for the stitch multiples, so take your time and count carefully.
Section 1: The First Moss Stitch Panel (Color A)
This section establishes the base of your blanket with the beautiful, dense moss stitch.
- Row 1 (Right Side): Sc in the 2nd ch from your hook. Then, *ch 1, sk 1, sc in next ch*; repeat from * to * across the row. Turn. (You should have 48 sc and 47 ch-1 spaces).
- Row 2: Ch 1 (this counts as your first sc), sc in the first st. Then, *sc in the next ch-1 space, ch 1, sk the next sc*; repeat from * to * across, ending with a sc in the last ch-1 space, and a sc in the last st. Turn. (48 sc, 47 ch-1 spaces).
- Row 3: Ch 1, sc in the first st. Then, *ch 1, sk the next sc, sc in the next ch-1 space*; repeat from * to * across, ending with ch 1, sk the next sc, sc in the last st. Turn.
- Rows 4-6: Repeat Rows 2 and 3, alternating them. At the end of Row 6, fasten off Color A and weave in the end.
Section 2: The First Pine Stitch Panel (Color B)
Now we introduce the star texture of the blanket. This section creates the beautiful, ribbed bands that mimic tree bark.
- Row 7 (with Color B): Join Color B in the first st. Ch 2 (this counts as your first dc). Then, *fpdc around the next sc (the sc from the row below), bpdc around the next sc*; repeat from * to * across, ending with a dc in the last st. Turn. (You will have 48 raised stitches + 2 edge dc).
- Row 8: Ch 2 (counts as dc). Then, *bpdc around the next fpdc, fpdc around the next bpdc*; repeat from * to * across, ending with a dc in the last st. Turn. (This alternation is what creates the beautiful, continuous ribbed texture).
- Rows 9-10: Repeat Row 8. Fasten off Color B at the end of Row 10 and weave in the ends.
Section 3: The Cream Separator (Color C)
This thin stripe provides a crisp, modern contrast between the textured bands.
- Row 11 (with Color C): Join Color C in the first st. Ch 1, sc in the first st. Then, *ch 1, sk the next st, sc in the next st*; repeat from * to * across, ending with a sc in the last st. Turn. (This row re-establishes the moss stitch base).
- Rows 12-13: Repeat Rows 2 and 3 (moss stitch) with Color C. Fasten off Color C and weave in the ends.
Building the Blanket: Repeating the Sequence
Now that you have the rhythm, you will simply repeat the sections you've just completed to build the full length of the throw. Follow this sequence carefully:
- Rows 14-16: With Color A, repeat Rows 2 and 3 (moss stitch). Fasten off Color A.
- Rows 17-20: With Color B, repeat Rows 7-10 (pine stitch). Fasten off Color B.
- Rows 21-22: With Color C, repeat Rows 11-12 (moss stitch). Fasten off Color C.
- Rows 23-25: With Color A, repeat Rows 2 and 3 (moss stitch). Fasten off Color A.
- Rows 26-29: With Color B, repeat Rows 7-10 (pine stitch). Fasten off Color B.
- Rows 30-31: With Color C, repeat Rows 11-12 (moss stitch). Fasten off Color C.
- Rows 32-34: With Color A, repeat Rows 2 and 3 (moss stitch). Fasten off Color A.
- Rows 35-38: With Color B, repeat Rows 7-10 (pine stitch). Fasten off Color B.
- Rows 39-40: With Color C, repeat Rows 11-12 (moss stitch). Fasten off Color C.
- Rows 41-43: With Color A, repeat Rows 2 and 3 (moss stitch). Fasten off Color A.
- Rows 44-47: With Color B, repeat Rows 7-10 (pine stitch). Fasten off Color B.
- Rows 48-49: With Color C, repeat Rows 11-12 (moss stitch). Fasten off Color C.
- Rows 50-52: With Color A, repeat Rows 2 and 3 (moss stitch). Fasten off Color A.
Adding the Finishing Border
The border gives your throw a clean, professional finish. It's worked in the round around the entire perimeter.
- Border Round: With Color C, join your yarn in any corner of the blanket. Ch 1. Work 1 round of sc evenly around the entire blanket. When you reach each corner, work 3 sc in the corner stitch to ensure the corner lies flat and turns nicely. Join with a slip stitch to the first sc. Fasten off Color C.
Final Finishing Touches
Your blanket is almost complete! The last step is crucial for showcasing all your hard work.
- Weave in Ends: Using your tapestry needle, carefully weave in all the loose ends from your color changes. Make sure to weave them in securely so they don't come loose with use.
- Blocking: Gently block the blanket to even out the stitches and enhance the beautiful texture. To do this, lay the blanket flat on a clean surface. Lightly mist it with water (or use a steam iron on a low setting, holding it above the fabric without touching it). Gently pat it into the desired rectangular shape and dimensions. Allow it to dry completely flat. This process will make your stitches look more uniform and professional.
Once dry, your Whispering Pines Textured Throw is ready to be draped over a sofa, folded at the foot of a bed, or used for cozy evenings. The combination of the dense moss stitch and the lofty pine stitch creates a fabric that is not only visually stunning but also wonderfully warm and heavy. Enjoy the fruits of your labor, and the serene, forest-inspired comfort you've crafted with your own hands!


