Whispering Pines Crochet Scarf Free Pattern
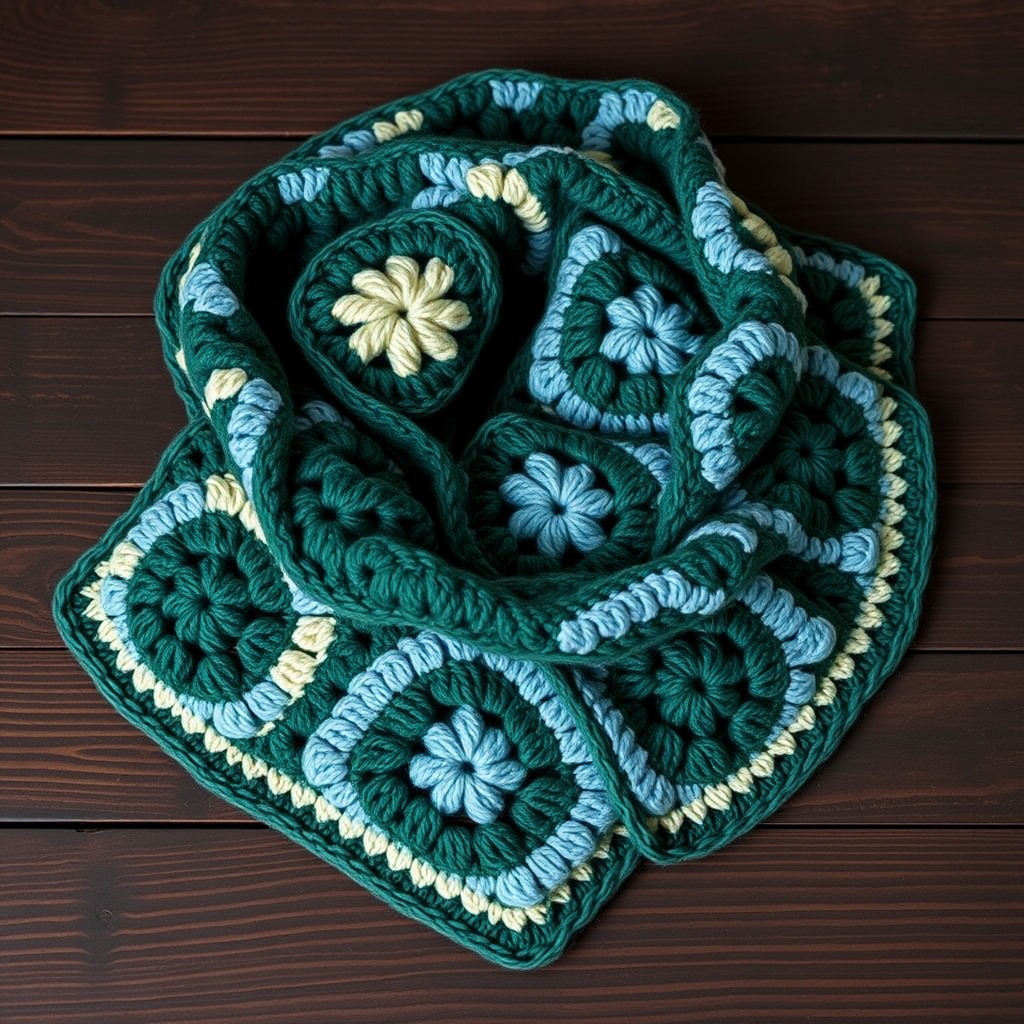
Whispering Pines Crochet Scarf: A Modern Granny Square Masterpiece
Wrap yourself in the serene beauty of a misty pine forest with this exquisite textured crochet scarf. The Whispering Pines Crochet Scarf takes the classic granny square and gives it a contemporary, sophisticated twist. Featuring a stunning palette of deep forest green, creamy white, and dusty blue, this scarf is more than just an accessory—it's a wearable piece of art. The soft, draping design and rich, dimensional texture make it perfect for adding a touch of handmade elegance to any outfit, whether you're heading to a cozy cabin retreat or a chic city brunch.
This pattern is a joy to work on. The construction is simple and repetitive, making it a relaxing and meditative project that's perfect for beginners and experienced crocheters alike. By creating individual granny squares and joining them in a staggered, offset pattern, you'll craft a scarf that flows beautifully and drapes gracefully around your neck. Let's dive into this wonderful project and create something truly special.
Materials Needed
Before we begin, let's gather all the necessary supplies. Having everything ready will ensure a smooth and enjoyable crocheting experience.
Yarn
- Worsted weight yarn in 3 colors:
- Main Color (MC): Forest Green – approximately 400-500 yards
- Color A: Cream – approximately 200-250 yards
- Color B: Dusty Blue – approximately 200-250 yards
Note: The exact yardage will depend on the size you choose to make. A Teen/Adult Small scarf (12 squares) will require less yarn than an Adult Large scarf (16 squares).
Hook and Notions
- H/8 (5.0 mm) crochet hook
- Tapestry needle for weaving in ends and joining squares
- Scissors
- Stitch markers (optional, but helpful for keeping track of rounds)
Gauge
- One granny square = 4 inches x 4 inches
It's always a good idea to make a test square first to check your gauge. If your square is larger than 4 inches, try using a smaller hook. If it's smaller, switch to a larger hook.
Step-by-Step Instructions
This scarf is made by crocheting individual granny squares and then joining them in a staggered pattern to create a beautiful, flowing scarf. The construction is simple and repetitive, making it a relaxing project. We'll break it down into three main parts: creating the granny squares, assembling them, and adding the finishing edging.
Part 1: The Granny Square Pattern
First, decide on your scarf size. For a Teen/Adult Small, you'll need to make 12 squares. For an Adult Large, you'll need 16 squares. Each square is worked in the round, starting from the center and working outward. Let's create one beautiful square at a time.
Round 1: The Center (Forest Green)
- With MC (Forest Green), make a magic ring. If you're not familiar with this technique, it's a great way to start a project in the round with no hole in the center. Wrap the yarn around your finger twice, insert your hook, and pull up a loop. Chain 1 to secure.
- Chain 3 (this counts as your first double crochet).
- Work 2 double crochet (dc) into the ring. You should now have 3 dc in total (the chain-3 and 2 dc).
- Chain 2 to create the first corner space.
- Now, work the corner sequence: (3 dc, chain 2) three times into the ring. This will create four corners in total.
- To close the round, join with a slip stitch to the top of the beginning chain-3. This completes the center of your square.
- Fasten off MC and pull the magic ring tight to close the center hole.
At the end of this round, you should have 12 dc stitches and 4 ch-2 spaces (the corners).
Round 2: Adding the Cream Center Border
- Join Color A (Cream) in any ch-2 corner space. To do this, insert your hook into the space, pull up a loop of Color A, and chain 1 to secure.
- Chain 3 (counts as first dc).
- Work (2 dc, chain 2, 3 dc) in the same ch-2 space. This creates the first corner of this round.
- Chain 1 to create the side space.
- In the next ch-2 space, work (3 dc, chain 2, 3 dc) to create the second corner.
- Repeat from * around: *Chain 1, work (3 dc, chain 2, 3 dc) in next ch-2 space.*
- After the last corner, chain 1 to match the other sides.
- Join with a slip stitch to the top of the beginning chain-3.
- Fasten off Color A.
At the end of this round, you should have 24 dc stitches, 4 ch-2 corners, and 4 ch-1 side spaces.
Round 3: Introducing the Dusty Blue Border
- Join Color B (Dusty Blue) in any ch-2 corner space.
- Chain 3 (counts as first dc).
- Work (2 dc, chain 2, 3 dc) in the same corner space.
- Chain 1 to move to the side.
- Work 3 dc in the next ch-1 space (this is the side space from Round 2).
- Chain 1 to move to the next corner.
- In the next ch-2 corner space, work (3 dc, chain 2, 3 dc).
- Repeat from * around: *Chain 1, work 3 dc in next ch-1 space. Chain 1, work (3 dc, chain 2, 3 dc) in next corner space.*
- After the last corner, chain 1.
- Join with a slip stitch to the top of the beginning chain-3.
- Fasten off Color B.
At the end of this round, you should have 36 dc stitches, 4 ch-2 corners, and 8 ch-1 side spaces.
Round 4: Finishing with Forest Green
- Join MC (Forest Green) in any ch-2 corner space.
- Chain 3 (counts as first dc).
- Work (2 dc, chain 2, 3 dc) in the same corner space.
- Chain 1 to move to the side.
- Work 3 dc in the next ch-1 space.
- Chain 1 to move to the next side space.
- Work 3 dc in the next ch-1 space.
- Chain 1 to move to the next corner.
- In the next ch-2 corner space, work (3 dc, chain 2, 3 dc).
- Repeat from * around: *Chain 1, work 3 dc in next ch-1 space. Chain 1, work 3 dc in next ch-1 space. Chain 1, work (3 dc, chain 2, 3 dc) in next corner space.*
- After the last corner, chain 1.
- Join with a slip stitch to the top of the beginning chain-3.
- Fasten off and weave in all ends carefully with your tapestry needle.
At the end of this round, you should have 48 dc stitches, 4 ch-2 corners, and 12 ch-1 side spaces. Your beautiful granny square is complete!
Repeat this entire process to create the total number of squares needed for your chosen size (12 or 16 squares). As you complete each square, weave in the ends immediately. This will save you a lot of time and frustration at the end of the project.
Part 2: Assembling the Scarf
Now comes the magical part—watching your individual squares transform into a stunning, flowing scarf. The key to this design is the staggered, offset pattern, which gives the scarf its modern and elegant drape.
Arranging Your Squares
- Lay out your finished squares on a flat surface in front of you.
- For a Teen/Adult Small scarf, arrange them in a 2-square-wide by 6-square-long layout.
- For an Adult Large scarf, arrange them in a 2-square-wide by 8-square-long layout.
- Now, here's the crucial step for the staggered pattern: offset the second row by half a square. This means that instead of the squares lining up perfectly side-by-side, the top row of squares should be shifted so that the seam between two squares in the bottom row falls in the middle of a square in the top row. This creates the beautiful, cascading effect.
Joining the Squares
- To join the squares, pick up two adjacent squares that need to be connected.
- Hold the two squares with their right sides together (the fronts of the squares facing each other).
- Thread a length of MC (Forest Green) yarn onto your tapestry needle. A length of about 18-24 inches is usually sufficient.
- Starting at one corner, use a whip stitch to sew the squares together. Insert your needle through the back loops only of the edge stitches of both squares. This technique creates a flat, nearly invisible seam on the right side of the work.
- Continue whip stitching along the entire edge of the two squares, working through the back loops only. Keep your stitches even and not too tight, so the seam remains flexible.
- When you reach the end of the edge, secure the yarn with a knot and weave in the ends.
- Join all squares in this manner, following your staggered layout. Take your time to ensure the pattern is correct before sewing each seam.
Part 3: The Finishing Edging
With all your squares joined, it's time to give your scarf a clean, polished finish. This simple edging will frame your beautiful work and help it lay flat.
- With the right side of the scarf facing you, join MC (Forest Green) in any corner of the scarf. Use a slip knot to attach the yarn to your hook, then insert your hook into the corner stitch and pull up a loop.
- Chain 1 (this does not count as a stitch).
- Work a round of single crochet (sc) evenly around the entire outer edge of the scarf. This means working one single crochet into each stitch and space along the edges of the squares.
- When you reach each corner of the scarf, work 3 single crochet in the corner stitch. This will help the corners turn nicely and lie flat.
- Continue working single crochet around the entire perimeter of the scarf.
- When you return to the starting corner, join with a slip stitch to the first single crochet of the round.
- Fasten off and weave in all remaining ends with your tapestry needle.
Congratulations! You've just completed your very own Whispering Pines Crochet Scarf. Lay it flat and gently block it if desired to even out the stitches and enhance the drape. Now, wrap yourself in the serene beauty of your creation and enjoy the compliments that are sure to come your way. This scarf is not just a project; it's a cozy, handmade treasure that captures the quiet elegance of a forest in every stitch. Happy crocheting!