Twisted Shell Cable Cuff Free Crochet Pattern: A Minimalist Bulky Wool Jar Cozy
Twisted Shell Cable Cuff Free Crochet Pattern: A Minimalist Bulky Wool Jar Cozy
Introduction
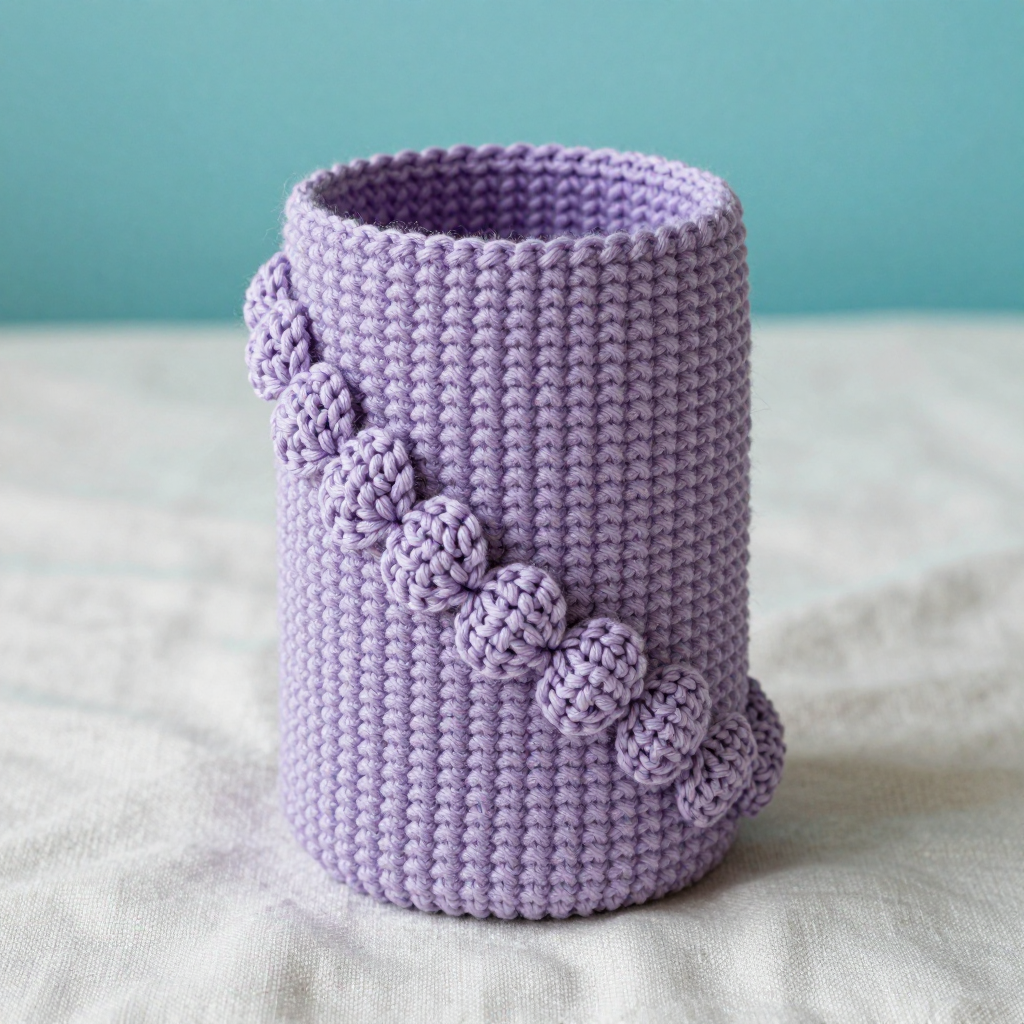
If you have ever wanted to make something beautiful with your own hands but felt sure you "aren't crafty," this is the project for you. This minimalist jar cozy is a simple crocheted tube in soft lilac bulky wool, finished with one gentle spiral of raised shell stitches that wraps diagonally around the jar like a single soft ribbon. It is perfect for total beginners because it uses only the most basic crochet stitches, works up in an evening, and gives you a finished object you will actually want to display on your shelf. The finished cozy feels smooth and slightly fuzzy, hugs a standard candle jar with a snug, satisfying fit, and the raised shells add just enough sculptural texture to make it look far more complicated than it is. If you can make a slip knot and hold a hook, you can make this.
Materials Needed
- Yarn: Bulky weight yarn (weight category 5), approximately 95–110 yd (87–100 m) / 3.5 oz (100 g) per skein. The sample uses 1 skein of lilac bulky wool (approx. 100 yd / 91 m). Wool gives the crispest stitch definition; a wool-blend also works.
- Crochet hook: US size K-10.5 / 6.5 mm (or the size needed to match gauge).
- Stitch marker: 1 removable stitch marker (or a scrap of contrasting yarn) to mark the start of each round.
- Tapestry needle: A blunt-tipped needle with an eye large enough for bulky yarn, for the surface shells and weaving in ends.
- Scissors: Any sharp pair for cutting yarn.
- Finished size: Fits a standard candle jar approx. 3 1/4 in (8.3 cm) diameter x 3 1/2 in (8.9 cm) tall. The finished cozy measures approx. 10 in (25.4 cm) circumference x 3 1/2 in (8.9 cm) tall, unstretched, with slight negative ease so it hugs the jar. The shell motif spirals once around the tube.
Abbreviations and Beginner Glossary
- ch – chain. Make a loop, wrap yarn over the hook, and pull it through the loop on your hook. That is one chain.
- sc – single crochet. Insert your hook into the stitch, wrap yarn over the hook, pull up a loop (2 loops on hook), wrap yarn over again, and pull through both loops. One loop remains.
- sl st – slip stitch. Insert your hook into the stitch, wrap yarn over, and pull it straight through both the stitch and the loop on your hook. It joins without adding height.
- dc – double crochet. Wrap yarn over the hook, insert into the stitch, pull up a loop (3 loops on hook), wrap yarn over and pull through 2 loops, wrap yarn over and pull through the last 2 loops.
- sp – space. The gap between stitches, rather than a stitch itself.
- st(s) – stitch(es).
- BLO – back loop only. Every stitch has two top loops (a front loop near you and a back loop away from you). Working "in the back loop only" means you insert your hook under just the far loop, leaving the near loop free. This creates the smooth, knit-like texture.
- shell – 5 dc worked into the same stitch or space, fanning out to look like a little scallop.
- magic ring – an adjustable loop you make by crossing the yarn tail over the working yarn and working your first stitches into the loop; pulling the tail closes the center hole tightly.
- fasten off – cut the yarn a few inches from your work and pull the tail all the way through the last loop to lock it.
- weave in ends – thread a yarn tail onto a tapestry needle and run it back and forth through the fabric so it disappears and cannot unravel.
Gauge
12 sc x 13 rounds = 4 in (10 cm) in spiral single crochet worked in the round with the 6.5 mm hook. Shell motif gauge: one 5-dc shell measures approx. 1 1/4 in (3.2 cm) wide and 3/4 in (2 cm) tall.
Why gauge matters: Gauge is how many stitches and rounds fit into 4 inches. If your stitches are bigger than the pattern expects, the cozy will be baggy and slide off the jar; if smaller, it will not fit over the jar at all. How to swatch: Chain 16, then work 14 sc back and forth (or in a spiral) for about 15 rows. Lay the swatch flat, measure 4 in across the middle, and count the stitches; measure 4 in up and count the rounds. If you have more than 12 stitches in 4 in, go up one hook size. If you have fewer, go down one hook size. Then begin the cozy.
Beginner Tips Before You Start
- Use the stitch marker every round. Because this tube is worked in a continuous spiral with no joining, the marker in the first stitch of each round is your only guide. Move it up each round.
- Do not pull the yarn too tight. Tension is the number-one beginner struggle. Let the yarn flow; snug stitches, not strangling ones. Tight stitches make a stiff tube that will not stretch over the jar.
- Count your stitches at the end of every round. If you lose your place, count from the marker. The count should match the number in parentheses.
- Work the back loop only deliberately. Look at the top of each stitch and find the two loops; insert your hook under the far one only. This is what gives the smooth stockinette look.
- Keep the shell embroidery loose. The surface shells should sit raised and soft, not squashed flat. Loose loops look sculptural; tight loops disappear into the fabric.
- Try the cozy on the jar as you go. After Round 5, slip it over the jar to check the fit before you commit to the full height.
Step-by-Step Instructions
Note on the Stockinette Look
Work all single crochet rounds in the back loop only (BLO) to create a smooth, knit-like vertical texture. Do not turn your work; work in a continuous spiral. Place a stitch marker in the first stitch of each round and move it up as you go.
Tube
Set-up: Make a magic ring.
Round 1: Ch 1 (does not count as a st), work 6 sc into the magic ring. Do not join. Place marker in first sc. (6 sc)
Round 2: 2 sc in each sc around. (12 sc)
Round 3: [2 sc in next sc, 1 sc in next sc] around. (18 sc)
Round 4: [2 sc in next sc, 1 sc in each of next 2 sc] around. (24 sc)
Round 5: [2 sc in next sc, 1 sc in each of next 3 sc] around. (30 sc)
Rounds 6–12: Sc in each sc around, working BLO. (30 sc each round)
Round 13 (optional firm edge): Sc in each sc around, working through both loops. Sl st to next sc. Fasten off, leaving a 6 in (15 cm) tail. Weave in ends. (30 sc)
Math check: 10 in circumference x 12 sc per 4 in = 30 sc per round. Height 3 1/2 in x 13 rounds per 4 in = approx. 11–12 rounds; the pattern works 13 rounds total, which gives a firm top edge and a snug fit.
Shell Spiral Embroidery
Use the same lilac bulky wool and a tapestry needle. The spiral is worked as a surface chain of shells, not as a crocheted round, so it does not change the stitch count.
Step 1: Thread the tapestry needle with a 24 in (61 cm) length of yarn. Do not knot; leave a 3 in (7.6 cm) tail inside the tube.
Step 2: Anchor the yarn at the lower edge of the tube, about 1 in (2.5 cm) from the seam line. Bring the needle up through the fabric from inside to outside.
Step 3: Work the first shell: insert the needle back into the fabric about 1/2 in (1.3 cm) to the right of the starting point, then bring it up about 1/2 in (1.3 cm) to the left and slightly above, creating a small fan-shaped chain loop. Repeat this fan motion 4 more times, each fan overlapping the previous one by about 1/4 in (6 mm), to build a 5-dc shell shape on the surface. Keep the loops loose enough to sit raised above the stockinette surface.
Step 4: Continue the spiral: after each shell, move the starting point up and around the tube by about 3/4 in (2 cm) along the diagonal. Work a total of 9 shells, spiraling once around the tube from lower edge to upper edge. The last shell should sit about 1/2 in (1.3 cm) below the top edge.
Step 5: Bring the needle to the inside of the tube, tie off securely with the starting tail, and weave in the end. Do not pull tightly; the shell chain should lie softly on the surface.
Assembly and Finishing
Weave in all ends. Thread each yarn tail onto the tapestry needle and run it back and forth through the inside of the fabric for about 1 in (2.5 cm), then trim close to the fabric. Running it in two directions locks it so it will not work loose.
Turn the cozy right side out. The smooth stockinette side with the raised shells should face outward.
Fit it to the jar. Slip the cozy over the candle jar; the tube should hug the jar with slight negative ease and the shell spiral should wrap diagonally around the jar in one continuous soft line.
Adjust the shells. Gently adjust the shell loops with your fingers so they sit evenly raised and evenly spaced around the diagonal.
Blocking (optional but recommended). Lightly mist the cozy with cool water, slip it over a jar or a similar-sized cylinder, and let it dry completely. This evens out the stitches and sets the shell spiral. Do not wring or twist the wool.
Care: Hand wash cold, reshape, and dry flat. Do not wring.
Pro Tips and Variations
- Change the color of the shells. Work the tube in lilac and the surface shells in a contrasting cream or charcoal for a bolder, graphic look. Keep the same bulky weight so the shells sit at the same height.
- Adjust the size. To fit a wider jar, add one more increase round (Round 6: [2 sc in next sc, 1 sc in each of next 4 sc] around = 36 sc) and work the body rounds to the height you need, adding or removing rounds in the Rounds 6–12 section. The shell spiral stays at 9 shells for a standard jar; add one shell for every 1 in (2.5 cm) of extra height.
- Substitute the yarn. A worsted weight (category 4) yarn held double, or a chunky cotton, will also work; always swatch first, because a different yarn will change your gauge and therefore the fit.
- Make it a set. Work the same tube in three different colors and stack them on three jars for a coordinated shelf display. The minimalist tube looks especially striking in a single monochrome palette.