Sunflower Motif Crochet Tea Towel Free Pattern: A Granny Square Bloom Grid
A Little Garden for Your Kitchen
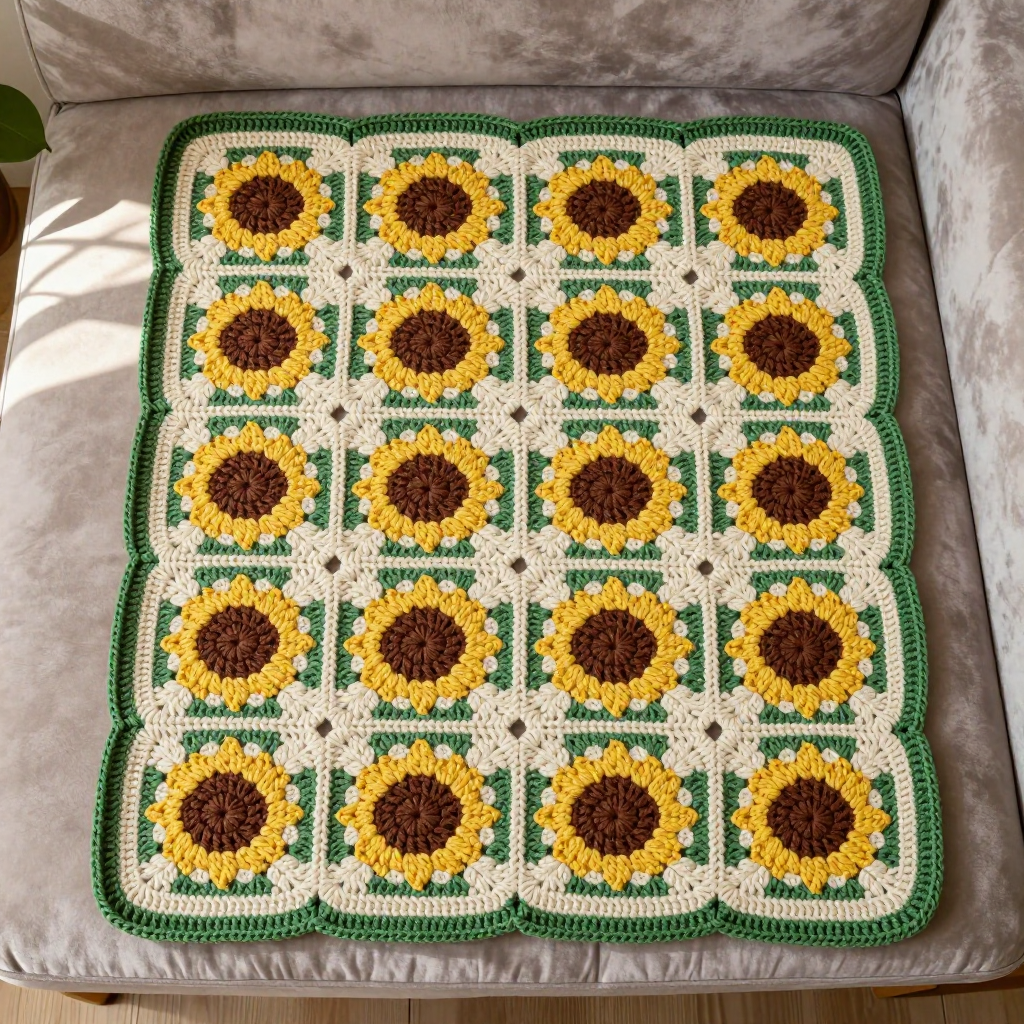
If you have ever wanted to make something that looks like it took years of skill but is really just one small square repeated over and over, this sunflower tea towel is for you. It is perfect for a brand-new crocheter who has just learned the basic stitches and wants a real, useful project to show off. The finished towel is a flat rectangle about 12 inches wide and 18 inches long, made of 24 little sunflower squares joined into a grid. Each square has a dark brown center, a ring of golden petals, a cream background, and a green edge, so the whole towel looks like a sunny flower field. It feels slightly crisp and sturdy after blocking, exactly like a proper cotton kitchen towel, and it will make you smile every time you reach for it.
Materials Needed
- Yarn: Lace weight (size 0) cotton crochet thread, approximately 350–400 yards total. Break it down as: 180 yards cream, 120 yards leaf green, 50 yards golden yellow, and 15 yards dark brown. Cotton is important here because it absorbs water and can take a wash.
- Hook: Size D/3 (3.25 mm) crochet hook. The "D" is the US letter and "3.25 mm" is the metric size; they are the same hook.
- Stitch markers: At least 4. These are little clips or loops you slide onto a stitch so you can find it again.
- Tapestry needle: A blunt, large-eyed needle for sewing squares together and hiding yarn tails.
- Scissors: Small sharp ones are easiest.
- Finished size: 12 inches wide x 18 inches long (30.5 x 45.5 cm), made from 4 squares across x 6 squares down = 24 squares, plus a border.
Abbreviations and Beginner Glossary
Read this list once before you start. Every term used later in the pattern is explained here in plain English.
- ch – chain. Wrap the yarn over your hook and pull it through the loop already on your hook. That makes one chain stitch.
- sl st – slip stitch. Insert your hook into the stitch, wrap yarn over, and pull that loop straight through both the stitch and the loop on your hook. It joins things without adding height.
- sc – single crochet. Insert hook into stitch, pull up a loop (2 loops on hook), wrap yarn over, pull through both loops. One loop remains.
- dc – double crochet. Wrap yarn over hook first, insert hook into stitch, pull up a loop (3 loops on hook), wrap yarn over and pull through 2 loops, wrap yarn over and pull through the last 2 loops.
- st / sts – stitch / stitches. One completed loop-and-post unit in your fabric.
- sp – space. The gap between stitches, usually under a chain.
- magic ring – an adjustable loop you make by wrapping yarn around your fingers, then working stitches into it. When you pull the short tail, the center closes tight with no hole.
- join with sl st – finish a round by making a slip stitch into the very first stitch of that round so the circle closes.
- fasten off – cut the yarn a few inches from your work and pull the tail all the way through the last loop so it cannot unravel.
- whipstitch – a simple sewing stitch: bring the needle up through both pieces, over the edge, and back down, repeating along the seam.
- blocking – dampening the finished piece and pinning it flat to the correct size so it dries square and even.
Gauge
Gauge: One finished sunflower square = 3 inches (7.5 cm) square after blocking. In double crochet, 8 dc and 4 rounds = 1 inch (2.5 cm).
Gauge means how big your stitches come out. It matters because the towel is built from squares: if your squares are 2.5 inches instead of 3, your towel will be too small, and if they are 3.5 inches, it will be too big and floppy. To check, make one complete sunflower square exactly as written below, block it (mist with water, pin it flat, let it dry), then measure across the middle. If it is bigger than 3 inches, try again with a smaller hook; if it is smaller, use a larger hook. One test square is all you need, and it becomes square number one of your 24.
Beginner Tips Before You Start
- Make all 24 squares first, then join. It feels slow, but it keeps your tension consistent and lets you see your progress pile up.
- Use a stitch marker in the first stitch of every round. Rounds are circles, and without a marker it is very easy to lose where a round began.
- Do not pull your yarn too tight. New crocheters often choke the hook. Keep the yarn snug but relaxed so your hook slides in easily.
- Count after every round. The stitch counts in parentheses are your safety net; if a round is off, fix it before moving on.
- Leave 6-inch tails when you fasten off. Short tails are impossible to weave in later.
- Keep your squares the same size. If one comes out noticeably larger, it will pucker the towel; redo it with a slightly tighter hand.
Step-by-Step Instructions
Part 1: The Sunflower Square (make 24)
Each square uses cream for the background, golden yellow for petals, dark brown for the center face, and leaf green for the outer round. Work all 24 squares the same way.
Round 1 (center face): With dark brown, make a magic ring. Ch 3 (this counts as your first dc), then work 11 dc into the ring. Join with sl st to the top of the ch-3. Fasten off dark brown. (12 dc)
Round 2 (petals): Join golden yellow with a sl st in any dc. Ch 3, then dc in the same stitch. Work 2 dc in each stitch around. Join with sl st to the top of the ch-3. Fasten off golden yellow. (24 dc)
Round 3 (cream background): Join cream with a sl st in any stitch. Ch 3, dc in the same stitch, dc in the next stitch, then [2 dc in the next stitch, dc in the next stitch] around. Join with sl st to the top of the ch-3. (36 dc)
Round 4 (square shaping): Ch 3, dc in the next 2 stitches, then [2 dc in the next stitch, dc in the next 2 stitches] around. Join with sl st to the top of the ch-3. (48 dc)
Round 5 (square corners): Ch 1, sc in the same stitch, sc in the next 3 stitches. Then work [sc in the next 3 stitches, ch 2, sc in the next 3 stitches] to form a corner, and continue around working sc in each stitch and ch 2 at each corner. Join with sl st to the first sc. Fasten off cream. (4 corners, 12 sc per side)
Round 6 (green edge): Join leaf green with a sl st in any corner ch-2 space. Ch 1, work [sc, ch 2, sc] in the corner space, then sc in each stitch across to the next corner, and repeat around. Join with sl st to the first sc. Fasten off leaf green, leaving a 6-inch tail for joining. (4 corners, 14 sc per side)
Repeat Rounds 1–6 twenty-three more times, for 24 squares total.
Part 2: Joining the Squares
Arrange your 24 squares in a grid that is 4 squares wide by 6 squares tall. You can alternate the direction of the green edge for a subtle woven look, or keep them all the same. With cream yarn and your tapestry needle, whipstitch the squares together through the back loops of the edge stitches, matching corners as you go. Join all the vertical seams first, then all the horizontal seams, keeping the towel flat on the table as you work. (24 squares joined into one 12 x 18 inch panel)
Part 3: The Border
Border Round 1: Join leaf green with a sl st in any corner of the assembled towel. Ch 1, then sc evenly around the entire outer edge, working 3 sc in each corner so the corners stay sharp. Join with sl st to the first sc. (One sc round around the full edge, 3 sc per corner)
Border Round 2: Ch 1, sc in each stitch around, working 3 sc in each corner. Join with sl st to the first sc. Fasten off and weave in ends. (One final sc round, 3 sc per corner)
Assembly and Finishing
Seaming: Thread your tapestry needle with cream yarn and whipstitch along each seam, catching the back loop of the edge stitches on both squares so the seam stays flat and hidden. Work one seam at a time and check that corners line up before you tie off.
Weaving in ends: Thread each yarn tail onto the tapestry needle and run it through the back of several stitches in one direction, then turn and run it back through a few more. This locks it in place. Trim the excess close to the fabric.
Blocking: Mist the finished towel lightly with water until it is damp but not soaking. Pin it flat to exactly 12 x 18 inches on a towel-covered board or mat, squaring the corners. Let it dry completely, then unpin. This is what makes the squares even and the towel lie flat.
Hanging loop (optional): With green yarn, ch 12, join with a sl st to form a loop, and sew it securely to one corner.
Pro Tips and Variations
- Change the colors: Swap golden yellow for orange or rust for an autumn towel, or use a soft blue background instead of cream for a different garden feel.
- Resize it: Add or remove squares to change the size. A 4 x 4 grid makes a small dishcloth; a 4 x 8 grid makes a longer hand towel. Keep the border the same.
- Substitute yarn: Sport weight (size 2) cotton with an E/3.5 mm hook makes a thicker, faster towel; just check your square gauge again so the finished size stays close to 12 x 18 inches.
- Add texture: Work Border Round 2 in the back loop only for a subtle ridged edge that helps the towel grip the counter.