Birch Bark Glass Cozy Free Pattern: A Nordic Winter Crochet Wine Glass Holder
Birch Bark Glass Cozy: A Nordic Winter Crochet Wine Glass Holder
Introduction
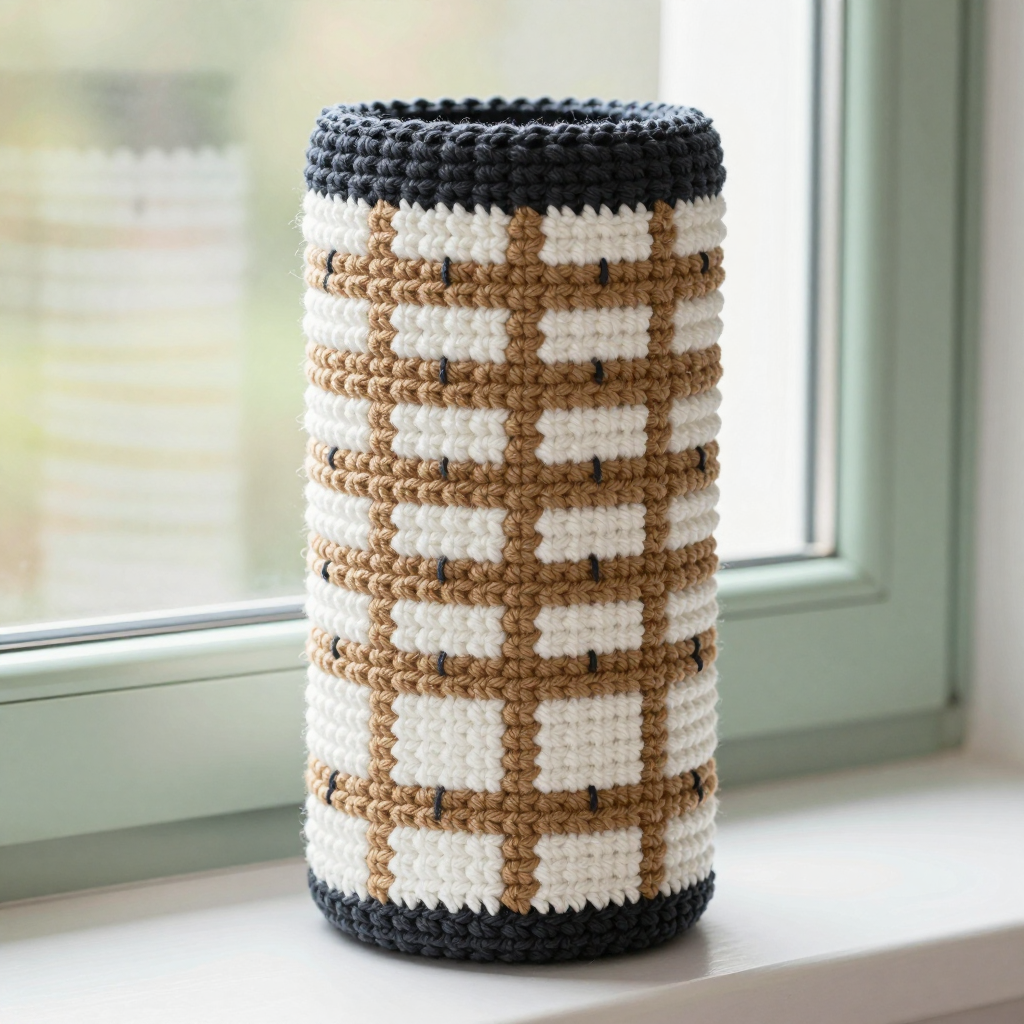
This Birch Bark Glass Cozy is the perfect first project for anyone who has ever admired a cozy, handmade table and thought, "I could never do that." It is a simple straight tube worked in single crochet, which means you only need to learn one stitch to make the whole thing. The finished cozy looks like a little birch log wrapped around your glass: crisp white and warm tan vertical stripes, a dark charcoal base, and a snug dark ribbing band at the top that grips the stem. Small dark "bark eyes" are added at the very end with a simple surface stitch, giving it that unmistakable Nordic winter charm. Slip it over the base of a wine glass and your table instantly feels like a cabin in the snow.
Materials Needed
- Yarn: Worsted weight (category 4) acrylic or cotton blend yarn in three colors:
- Color A (white): 60 yards
- Color B (tan): 40 yards
- Color C (dark charcoal): 15 yards
- Crochet hook: J/10 (6.0 mm)
- Stitch markers: At least 2, to mark the first stitch of each round and your color changes
- Tapestry needle: A blunt-tipped needle with a large eye, for weaving in ends
- Scissors
- Finished size: Approximately 3.5 inches (9 cm) tall and 3 inches (7.5 cm) in diameter, designed to fit snugly around the base of a standard wine glass
Abbreviations and Beginner Glossary
- ch – chain. Make a loop of yarn on your hook, wrap yarn over the hook, and pull it through the loop. That is one chain.
- sc – single crochet. Insert your hook into the stitch, wrap yarn over the hook, pull up a loop (2 loops on hook), wrap yarn over again, and pull through both loops. One single crochet made.
- sl st – slip stitch. Insert your hook into the stitch, wrap yarn over, and pull it straight through both the stitch and the loop on your hook at the same time. It makes a nearly invisible joining stitch.
- st / sts – stitch / stitches. One completed loop of yarn in your fabric.
- rnd – round. One complete circle of stitches worked around the tube.
- BLO – back loop only. Every single crochet stitch has two loops at its top, a front loop (closer to you) and a back loop (farther away). "In BLO" means you insert your hook under only the back loop, which creates a raised ridge.
- FLO – front loop only. The same idea, but you work under only the front loop. (Not used in this pattern, but good to know.)
- 2 sc in next st – work two single crochets into the same stitch. This adds one stitch and makes the circle grow.
- Magic ring – an adjustable loop of yarn that you crochet into and then pull tight, so the center hole closes up completely.
- Join with sl st – finish the round by making a slip stitch into the first stitch of that round, closing the circle.
- Fasten off – cut the yarn a few inches from your work and pull the tail all the way through the last loop to lock it.
- Surface slip stitch – a slip stitch worked on top of finished fabric (not into a stitch edge) to draw a line or dash on the surface.
Gauge
14 sc x 16 rounds = 4 inches (10 cm) in single crochet worked in the round.
Gauge simply means how big your stitches come out. If your stitches are looser or tighter than the designer's, your cozy will be too big or too small for the glass. To check, crochet a small flat swatch of single crochet about 4 inches wide, lay a ruler across the middle, and count how many stitches fit in 4 inches. If you get more than 14, your stitches are tight, so try a larger hook. If you get fewer than 14, your stitches are loose, so try a smaller hook. Because this cozy must grip the glass, gauge matters here more than in a scarf.
Beginner Tips Before You Start
- Mark your first stitch. Place a stitch marker in the first stitch of every round. When you reach the marker again, you know the round is complete and you will not accidentally add or lose stitches.
- Do not pull the yarn too tight. Beginners often tug each stitch snug. Keep your tension relaxed so the tube stays soft and slides over the glass easily.
- Change colors on the last pull-through. To switch from white to tan, begin the final single crochet of the round as normal, but pull the new color through the last two loops. Then join with the new color. This keeps the stripe edge clean.
- Count every round. Every round in this pattern has exactly 40 stitches. Count them before you join. It takes ten seconds and saves you from ripping out.
- Keep your tube straight. Do not turn your work at the end of each round. Always work in the same direction so the stripes stay vertical.
- Save the bark eyes for last. Do not try to add the dark dashes while the tube is still on your hook. Add them after the tube is finished, when you can see the whole surface.
Step-by-Step Instructions
Bottom Edge (Color C)
With Color C, make a magic ring.
Rnd 1: Ch 1, work 8 sc into the ring, join with sl st to first sc. (8 sc)
Rnd 2: Ch 1, 2 sc in each st around, join with sl st. (16 sc)
Rnd 3: Ch 1, [2 sc in next st, sc in next st] around, join with sl st. (24 sc)
Rnd 4: Ch 1, [2 sc in next st, sc in next 2 sts] around, join with sl st. (32 sc)
Rnd 5: Ch 1, [2 sc in next st, sc in next 3 sts] around, join with sl st. (40 sc)
Rnd 6: Ch 1, sc in each st around, join with sl st. (40 sc)
Fasten off Color C.
Body (Color A and Color B vertical stripes)
Join Color A with sl st to any st of Rnd 6. Each stripe is two rounds tall, so the stripes run vertically up the tube.
Rnds 7–8: Ch 1, sc in each st around, join with sl st. (40 sc)
Change to Color B.
Rnds 9–10: Ch 1, sc in each st around, join with sl st. (40 sc)
Change to Color A.
Rnds 11–12: Ch 1, sc in each st around, join with sl st. (40 sc)
Change to Color B.
Rnds 13–14: Ch 1, sc in each st around, join with sl st. (40 sc)
Change to Color A.
Rnds 15–16: Ch 1, sc in each st around, join with sl st. (40 sc)
Change to Color B.
Rnds 17–18: Ch 1, sc in each st around, join with sl st. (40 sc)
Change to Color A.
Rnds 19–20: Ch 1, sc in each st around, join with sl st. (40 sc)
Change to Color B.
Rnds 21–22: Ch 1, sc in each st around, join with sl st. (40 sc)
Change to Color A.
Rnds 23–24: Ch 1, sc in each st around, join with sl st. (40 sc)
Fasten off Color A.
Top Ribbing Band (Color C)
Join Color C with sl st to any st of Rnd 24.
Rnd 25: Ch 1, sc in each st around, join with sl st. (40 sc)
Rnd 26: Ch 1, sc in BLO of each st around, join with sl st. (40 sc) This round creates the raised ridge that grips the glass.
Rnds 27–28: Ch 1, sc in each st around, join with sl st. (40 sc)
Fasten off Color C.
Bark Eyes (Surface Slip Stitch with Color C)
Work on the right side of the finished tube. Each dash is a short horizontal line across a Color B (tan) stripe.
Step 1: Insert your hook into a stitch on a Color B stripe about 1 inch from the bottom edge. Yarn over and pull up a loop.
Step 2: Work 3 surface sl sts horizontally across the stripe, then fasten off.
Step 3: Repeat, spacing the dashes randomly across the Color B stripes, about 1 to 1.5 inches apart, alternating heights. Make 6 to 8 dashes total.
Weave in all ends.
Assembly and Finishing
Weaving in ends: Thread each yarn tail onto your tapestry needle. Turn the cozy inside out and run the needle through the back of several stitches, then back through a few more in the opposite direction. This locks the tail so it will not work loose. Trim the yarn close to the fabric. Do this for every color change and every fasten-off.
Blocking: Lightly dampen the cozy with cool water and gently press it flat with your hands. Slip it over a wine glass (or a glass of similar size) and let it dry completely. Blocking relaxes the stitches, evens out the stripes, and helps the cozy hold its shape.
Checking the fit: The cozy should fit snugly around the base of the wine glass, with the dark ribbing band at the top gripping the glass stem. If it feels loose, block it again while it is on the glass.
Pro Tips and Variations
- Change the colors: Swap white and tan for cream and soft gray, or deep green and red for a holiday look. Keep one dark color for the base, ribbing, and bark eyes so the design still reads as birch bark.
- Adjust the size: To fit a wider glass, add one more increase round to the base (for example, [2 sc in next st, sc in next 4 sts] around for 48 sts), then work every body round with 48 sts. To make it taller, add extra two-round stripes in the body.
- Substitute yarn: Cotton yarn gives a crisper, more washable cozy, while acrylic is softer and stretchier. Any worsted weight yarn works, but always check your gauge first.
- Add more bark: For a busier birch look, make 10 to 12 dashes instead of 6 to 8, and vary their lengths between 2 and 4 stitches.