The Snuggle Cub Lion Booties: A Free Knitting Pattern for Textured, Adorable Baby Footwear
Introduction: Welcome the King of the Jungle to Your Little One's Wardrobe
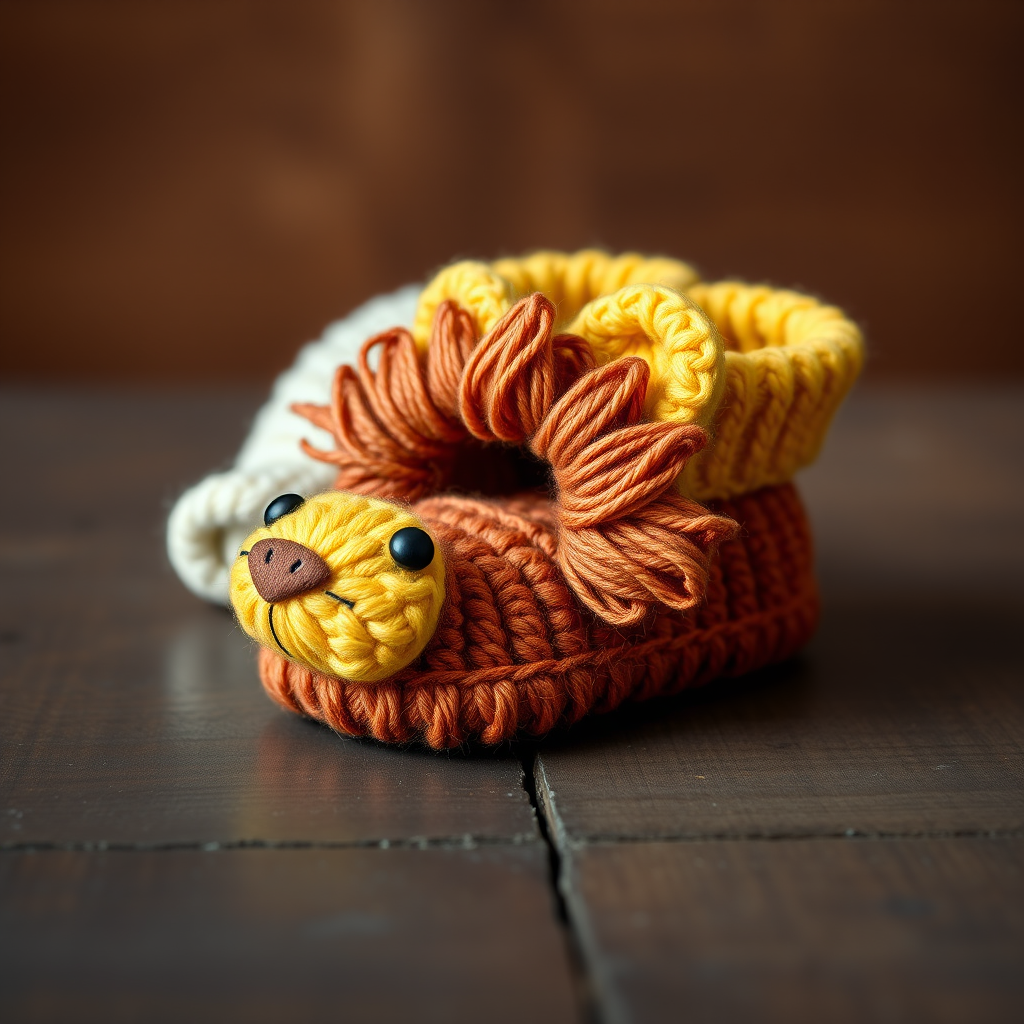
There's something truly magical about creating a handmade gift that combines whimsy with practicality. The Snuggle Cub Lion Booties are the perfect project for knitters looking to craft an heirloom-quality baby gift that will be treasured for years to come. These adorable booties feature a unique textured mane that encircles the opening, giving them a fluffy lion appearance that's both playful and sophisticated.
Designed with a cozy, secure fit and a flat, slightly curved sole, these booties are as functional as they are cute. The pattern uses worsted-weight yarn, making it a quick and satisfying knit that produces a soft, plush texture. Whether you're a seasoned knitter or a confident beginner ready for a fun challenge, this free pattern will guide you through creating a pair of lion booties that are sure to become a cherished keepsake.
With detailed instructions for three sizes (0-3 months, 3-6 months, and 6-12 months), you can customize the perfect fit for any little cub. Let's get started on this delightful knitting adventure!
Materials Needed: Gather Your Supplies
Before you begin, ensure you have all the necessary materials. The quality of your yarn and tools will directly impact the final look and feel of your booties.
Yarn Requirements
- Main Color (MC) - Golden Yellow: Approximately 50 grams of worsted weight (#4) yarn. This forms the body, sole, and outer ears of the booties.
- Contrast Color (CC) - Rust or Brown: Approximately 30 grams of worsted weight (#4) yarn. This creates the mane and inner ears.
- Black Yarn (small amount): For embroidering the eyes and nose. A scrap of fingering or sport weight is ideal.
Tools and Notions
- Knitting Needles: US size 6 (4.0mm) double-pointed needles (DPNs) or a circular needle suitable for the magic loop method. You'll need these for working in the round.
- Tapestry Needle: For weaving in ends, sewing pieces together, and embroidery.
- Stitch Markers: At least one, to mark the beginning of rounds and the top of the foot.
- Scissors
- Optional: Crochet hook (same size or slightly smaller) if you choose to make the optional cord.
Gauge Information
20 stitches and 28 rows = 4 inches (10 cm) in stockinette stitch, after blocking. Achieving the correct gauge is crucial for the booties to fit properly. Always knit a gauge swatch and block it before measuring.
Step-by-Step Instructions: Knit Your Lion Booties
This pattern is written for the smallest size (0-3 months), with instructions for larger sizes (3-6 months) and (6-12 months) in parentheses. Read through the entire pattern before beginning.
Abbreviations
- CO: Cast on
- K: Knit
- P: Purl
- K2tog: Knit two together (right-leaning decrease)
- SSK: Slip, slip, knit (left-leaning decrease)
- M1L: Make one left (increase, left-leaning)
- M1R: Make one right (increase, right-leaning)
- St(s): Stitch(es)
- MC: Main Color (Golden Yellow)
- CC: Contrast Color (Rust/Brown)
- RS: Right side
- WS: Wrong side
- BO: Bind off
Step 1: Knit the Sole (Make 2 with MC)
The sole is worked flat in stockinette stitch, starting from the heel and increasing to the toe, then decreasing back to the heel.
- CO 6 (8, 10) sts.
- Row 1 (RS): K1, M1L, K to last st, M1R, K1. (8, 10, 12 sts)
- Row 2 (WS): Purl all stitches.
- Repeat Rows 1-2 three more times. (14, 16, 18 sts)
- Work even in stockinette stitch (K on RS, P on WS) until piece measures 2.5 (3, 3.5) inches from CO edge, ending with a WS row.
- Next Row (RS): K1, SSK, K to last 3 sts, K2tog, K1. (12, 14, 16 sts)
- Next Row (WS): Purl all stitches.
- Repeat the last two rows once more. (10, 12, 14 sts)
- BO all sts loosely. Weave in ends.
Step 2: Knit the Sides (Make 2 with MC)
This section creates the body of the bootie, worked in the round from the sole upward.
- With RS facing, pick up and knit 30 (34, 38) sts evenly around the sole. Join for working in the round, being careful not to twist. Place a marker to denote the beginning of the round.
- Round 1: Knit all stitches.
- Round 2: Purl all stitches.
- Repeat Rounds 1-2 for 4 (5, 6) more rounds (total 6 (7, 8) rounds from pick-up).
Step 3: Shape the Toe
Now we'll shape the rounded toe of the bootie. We work decreases only on the top half of the stitches.
- Change to CC (Rust/Brown).
- Round 1: Knit all stitches.
- Place a marker after 15 (17, 19) sts to denote the top of the foot. The remaining 15 (17, 19) sts are the heel.
- Round 2 (decrease round): K1, SSK, K to 3 sts before marker, K2tog, K1, slip marker, K to end. (28, 32, 36 sts)
- Round 3: Knit all stitches.
- Repeat Rounds 2-3 until 12 (14, 16) sts remain (6 (7, 8) sts on top, 6 (7, 8) on bottom).
Step 4: Finish the Toe
- Cut yarn, leaving a long tail (approximately 12 inches).
- Thread the tail through a tapestry needle.
- Slide the needle through all remaining stitches, removing them from the knitting needle.
- Pull the yarn tight to close the toe, forming a rounded shape.
- Secure the yarn by weaving it through the stitches on the inside of the bootie. Weave in ends.
Step 5: Knit the Mane (Make 2 with CC)
The mane is a separate rectangular piece worked flat in a ribbed pattern, which creates the textured, fluffy look.
- CO 20 (22, 24) sts.
- Row 1 (RS): *K1, P1* repeat across.
- Row 2 (WS): *P1, K1* repeat across.
- Repeat Rows 1-2 for 10 (12, 14) rows total.
- BO all sts loosely.
Step 6: Knit the Ears (Make 2 with MC, 2 with CC)
Each ear has an outer (MC) and inner (CC) piece, which are sewn together.
- With MC, CO 6 sts.
- Row 1: Knit all stitches.
- Row 2: Purl all stitches.
- Row 3: K1, M1L, K to last st, M1R, K1. (8 sts)
- Row 4: Purl all stitches.
- Row 5: K1, M1L, K to last st, M1R, K1. (10 sts)
- Row 6: Purl all stitches.
- BO all sts.
- Repeat with CC for the inner ear.
Step 7: Assemble the Booties
This is where your lion comes to life! Take your time with the sewing to ensure a neat finish.
- Sew the Mane: Position the mane piece around the back and sides of the bootie opening, with the ribbing facing outward (like a lion's mane). The mane should sit just above the sole, covering the pick-up row. Using a tapestry needle and CC yarn, whipstitch the mane securely in place.
- Create the Ears: Place a MC ear and CC ear together with wrong sides facing. Using a tapestry needle and MC, whipstitch around the curved edge, leaving the straight bottom edge open. Stuff lightly with small yarn scraps to give the ears a bit of dimension. Sew the ears to the top of the bootie, positioned behind the toe shaping (about 1-2 rows back from the toe closure).
- Embroider the Face: With black yarn, embroider a small nose and two eyes on the toe section. Use satin stitch for the nose (a small, filled triangle or oval) and French knots for the eyes. Position the eyes slightly above and to the sides of the nose.
- Repeat all assembly steps for the second bootie.
Step 8: Optional Cord for Tying
This cord helps keep the booties securely on little feet.
- With MC, crochet a chain 12 inches long, or knit an I-cord of the same length.
- Thread the cord through the bootie opening, weaving it between the mane and the sole. Tie a small bow at the front or side.
Congratulations! You've just created a pair of Snuggle Cub Lion Booties that are as unique as the little one who will wear them. These booties make a wonderful baby shower gift or a special treat for your own child. Enjoy the process, and don't forget to share your finished project with fellow knitters!