The Hearthside Honeycomb Baby Cardigan Free Pattern – A Knitted Cozy Cocoon

The Hearthside Honeycomb Baby Cardigan: A Free Knitting Pattern for a Cozy Heirloom
There is something truly magical about knitting for a little one. Every stitch carries love, warmth, and the promise of sweet snuggles. Today, I am absolutely thrilled to share a pattern that has captured my heart: the Hearthside Honeycomb Baby Cardigan. This isn't just another baby knit; it's a timeless, heirloom-quality garment designed to become a cherished family keepsake.
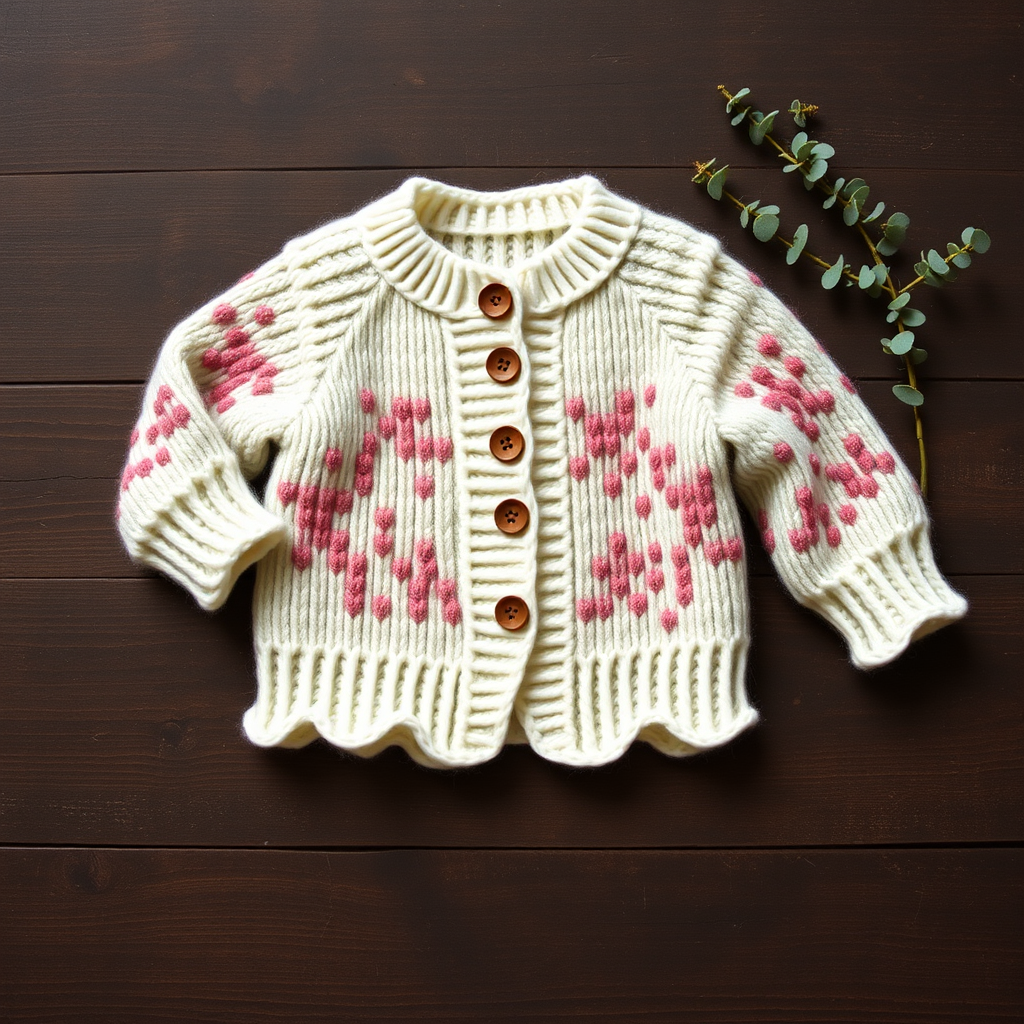
The beauty of this cardigan lies in its exquisite, dimensional honeycomb texture. Created by a simple, rhythmic alternation of knits and purls, the fabric looks like a cozy, waffle-like cocoon, offering both incredible visual interest and plush warmth. With its charming button neck closure and classic, set-in sleeves, this pattern is as delightful to knit as it is to gift. Whether you're a seasoned knitter looking for a satisfying project or a confident beginner ready for a beautiful challenge, the Hearthside Honeycomb is the perfect project to wrap your little one in the softest embrace.
Let's dive into this free pattern and create a beautiful, handmade treasure together.
Materials Needed: Gathering Your Supplies
Before we cast on, let's ensure you have everything you need. This project calls for simple, readily available materials, making it an accessible and enjoyable knit.
Yarn
- Weight: Worsted weight (Category 4) yarn. A soft, washable wool blend is ideal for a baby garment, as it's both gentle on delicate skin and easy to care for.
- Yardage: Approximately 300-350 yards for the 6-12 months size. Adjust accordingly for smaller sizes.
- Suggested Yarns: Cascade 220 Superwash or Lion Brand Heartland are excellent choices that offer great stitch definition and durability.
Needles & Notions
- Knitting Needles: US Size 7 (4.5 mm) knitting needles. You can use straight needles or circular needles for the flat pieces, whichever you prefer.
- Tapestry Needle: For weaving in ends and seaming the pieces together.
- Buttons: 5 small buttons, approximately 1/2 inch in diameter. Wooden buttons add a lovely, rustic touch that complements the honeycomb texture beautifully.
Gauge
Getting the correct gauge is crucial for achieving the right size. Always take the time to knit a swatch!
- Gauge: 20 stitches and 26 rows = 4 inches in honeycomb stitch pattern (blocked).
Step-by-Step Instructions: Knitting Your Hearthside Honeycomb
Now, for the fun part! This pattern is worked in flat pieces and seamed together. The instructions are provided for sizes 0-3 (3-6, 6-12) months, with measurements given in that order. Let's walk through each step carefully.
Understanding the Honeycomb Stitch Pattern
This beautiful texture is easier than it looks! It's worked over a multiple of 4 stitches + 2. Here is the 4-row repeat:
- Row 1 (RS): *K2, P2; repeat from * to last 2 sts, K2.
- Row 2 (WS): *P2, K2; repeat from * to last 2 sts, P2.
- Row 3: *P2, K2; repeat from * to last 2 sts, P2.
- Row 4: *K2, P2; repeat from * to last 2 sts, K2.
Repeat Rows 1-4 for the pattern. You'll see the honeycomb emerge as the stitches interlock!
Knitting the Back Panel
- Cast On: Cast on 46 (50, 54) sts.
- Main Body: Work in the Honeycomb pattern until the piece measures 6 (7, 8) inches from the cast-on edge, ending with a wrong-side (WS) row.
- Shape Armholes:
- Bind off 3 (3, 4) sts at the beginning of the next 2 rows.
- Decrease 1 stitch at each edge on every right-side (RS) row 2 (2, 3) times. To decrease: On the RS, K1, k2tog, work to last 3 sts, ssk, K1.
- Continue in pattern on the remaining 36 (40, 40) sts until the armhole measures 3.5 (4, 4.5) inches, ending with a WS row.
- Shape Neck:
- Work across the first 12 (13, 13) sts, then bind off the center 12 (14, 14) sts, and work to the end of the row.
- Working each side separately, bind off 2 sts at the neck edge once.
- Work even on the remaining 10 (11, 11) sts until the armhole measures 4.5 (5, 5.5) inches.
- Bind off all sts. Repeat for the other side of the neck.
Knitting the Left Front Panel
- Cast On: Cast on 26 (28, 30) sts.
- Main Body & Buttonholes: Work in the Honeycomb pattern for 2 inches, ending with a WS row.
- Buttonhole Row (RS): Work 4 sts in pattern, k2tog, yo, work to end.
- Repeat this buttonhole row every 1.5 inches, for a total of 4 buttonholes, with the last one at the neck edge.
- Shape Armhole: When the piece measures the same as the back to the armhole, shape the armhole at the beginning of RS rows exactly as you did for the back.
- Shape Neck (at the same time): When the piece measures 1 inch less than the back to the shoulder, begin neck shaping:
- Bind off 5 (6, 6) sts at the neck edge (end of RS rows) once.
- Then, bind off 2 sts at the neck edge once.
- Then, decrease 1 st at the neck edge every RS row 2 times.
- Finish: Work even on the remaining 10 (11, 11) sts until the armhole measures the same as the back. Bind off all sts.
Knitting the Right Front Panel
- Cast On: Cast on 26 (28, 30) sts.
- Main Body: Work in the Honeycomb pattern, mirroring the left front. Do not create any buttonholes.
- Shape Armhole: Shape the armhole at the beginning of WS rows (instead of RS rows) to mirror the left front.
- Shape Neck: Shape the neck at the beginning of RS rows (bind off at the beginning of RS rows instead of the end). Work to match the left front. Bind off.
Knitting the Sleeves (Make 2)
- Cast On: Cast on 28 (30, 32) sts.
- Main Body: Work in the Honeycomb pattern. Increase 1 stitch at each edge every 4th row until you have 38 (42, 46) sts. To increase: On a RS row, K1, M1L, work to last st, M1R, K1.
- Shape Cap: Work even until the sleeve measures 5 (6, 7) inches from the cast-on, ending with a WS row.
- Bind off 3 (3, 4) sts at the beginning of the next 2 rows.
- Decrease 1 st at each edge every RS row until 12 (14, 14) sts remain.
- Bind off 2 sts at the beginning of the next 4 rows.
- Bind off the remaining 4 (6, 6) sts.
Finishing Touches: Seaming and the Button Band
- Seam the Garment: Sew the shoulder seams. Set in the sleeves, then sew the side and sleeve seams. Weave in all loose ends with your tapestry needle.
- Knit the Neck Button Band: With the right side (RS) facing, pick up and knit stitches evenly around the entire neck edge, including the front panels. Work in garter stitch (knit every row) for 4 rows. Bind off loosely to prevent the edge from being too tight.
- Attach Buttons: Sew the 5 buttons opposite the buttonholes on the left front band (or right, depending on your desired overlap for a boy or girl).
- Blocking: Gently block the cardigan to the specified measurements. This will even out the honeycomb stitches and give your garment a professional, polished finish.
And there you have it—a beautiful, handcrafted Hearthside Honeycomb Baby Cardigan, ready to be filled with love and tiny cuddles. This pattern is a joy to knit and creates a stunning, heirloom-quality piece that will be treasured for years to come. Happy knitting!