Pastel Hexagon Patchwork Crochet Backpack Free Pattern
Pastel Hexagon Patchwork Crochet Backpack – Free Beginner Pattern
Introduction
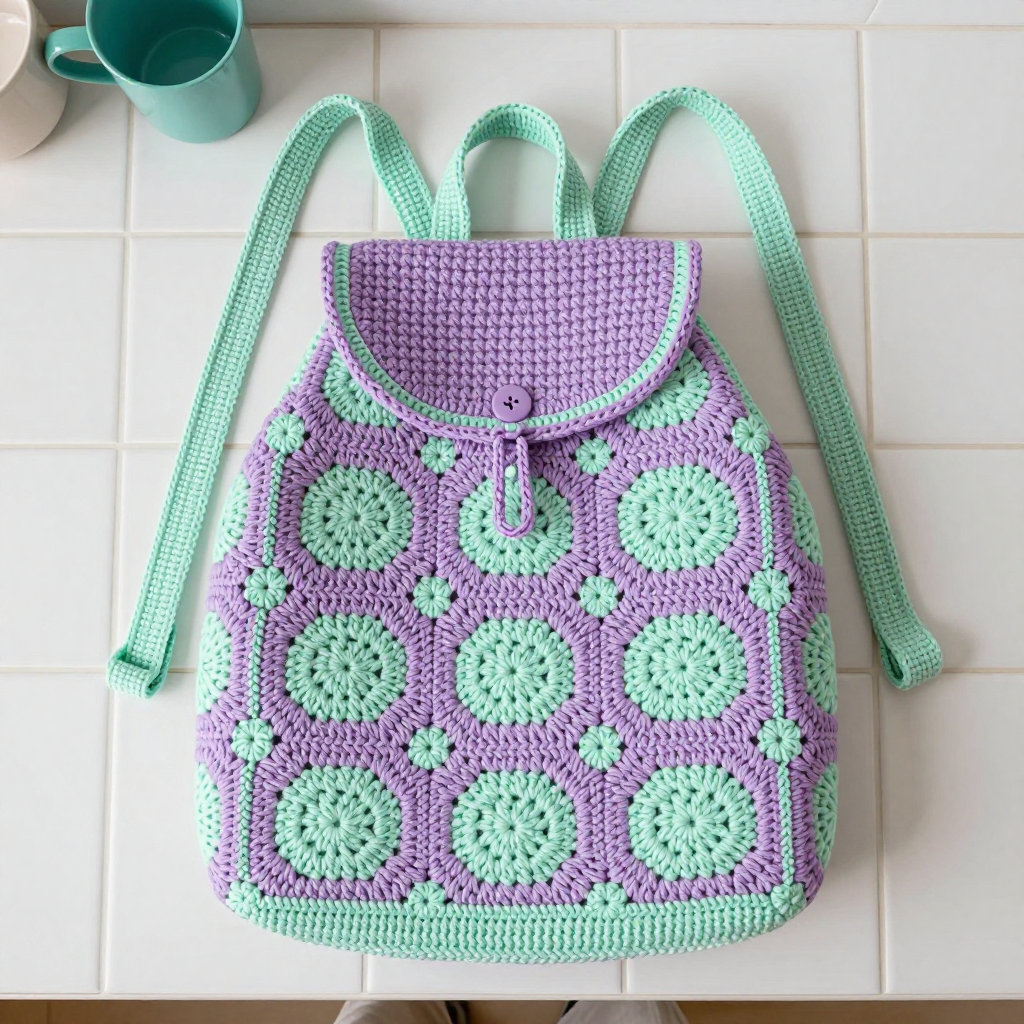
If you have ever looked at a crocheted bag and thought "I could never make that," this is the project that will prove you wrong. This dreamy pastel backpack is built from twelve simple hexagon motifs — six in soft lavender and six in fresh mint — that you join into one flat panel and fold into a roomy little bag. It is perfect for a complete beginner because every single motif is identical, so by the third one your hands will already know what to do. The finished backpack is about 11.5 inches wide, 13 inches tall, and 3 inches deep, with two sturdy straps, a buttoned flap, and a squishy worsted-weight texture that feels like a favorite sweater. Best of all, there is no shaping, no complicated counting, and no scary techniques — just one small shape repeated twelve times and a few straight seams.
Materials Needed
- Yarn: Worsted weight (category 4) acrylic or cotton blend — approx 350 yards lavender (Color A) and 250 yards mint (Color B).
- Crochet hook: Size I/9 (5.5 mm).
- Stitch marker (one is enough, but a few help).
- Tapestry needle (a big blunt needle with a large eye for sewing seams and weaving in ends).
- Scissors.
- 2 small buttons (optional, for the flap closure).
- Finished size: approx 11.5 in wide x 13 in tall x 3 in deep (29 x 33 x 7.5 cm), plus straps about 24 in long.
Abbreviations and Beginner Glossary
- ch – chain: wrap yarn over hook, pull it through the loop on your hook. Makes one chain.
- sl st – slip stitch: insert hook into stitch, yarn over, pull through both the stitch and the loop on your hook at once. Makes a nearly invisible joining stitch.
- sc – single crochet: insert hook into stitch, yarn over, pull up a loop (2 loops on hook), yarn over, pull through both loops. One loop remains.
- hdc – half double crochet: yarn over, insert hook, yarn over, pull up a loop (3 loops on hook), yarn over, pull through all 3 loops. (Listed for reference; not used in this pattern.)
- dc – double crochet: yarn over, insert hook, yarn over, pull up a loop (3 loops on hook), yarn over, pull through 2 loops, yarn over, pull through last 2 loops.
- sc2tog – single crochet two together (a decrease): insert hook into first stitch, pull up a loop, insert hook into next stitch, pull up a loop (3 loops on hook), yarn over, pull through all 3 loops. Turns 2 stitches into 1.
- st(s) – stitch(es).
- sp – space (the little gap under a chain from the previous round).
- MR – magic ring: an adjustable loop you crochet into, then pull tight so there is no hole in the center.
- Rnd – round: one complete circle of stitches worked in the round.
- Row – one straight line of stitches worked back and forth.
- Join – connect the last stitch of a round to the first with a slip stitch.
- Fasten off – cut the yarn a few inches from your work and pull the tail through the last loop to lock it.
Gauge
Gauge: one hexagon motif = 3.5 inches (9 cm) across, flat-to-flat. In single crochet: 4 sc = 1 inch, and 4 sc rows = 1 inch.
Gauge simply means how big your stitches turn out. If your hexagons come out bigger than 3.5 inches, your bag will be bigger than the measurements above; if smaller, the bag shrinks. That is why we check first. To make a gauge swatch: crochet one complete hexagon motif exactly as written below, then lay it flat and measure straight across from one flat side to the opposite flat side (not corner to corner). If it measures 3.5 inches, you are perfect. If it is larger, try a smaller hook (H/8, 5.0 mm); if smaller, try a larger hook (J/10, 6.0 mm). One motif is your whole swatch — nothing is wasted, because it becomes part of the bag!
Beginner Tips Before You Start
- Make all twelve motifs first, then join. Motifs are portable and quick; doing them in a batch keeps your tension consistent and lets you double-check your count before seaming.
- Use a stitch marker in the first stitch of every round. It is the easiest way to know where a round begins and ends so you never lose your place.
- Do not pull your yarn too tight. Relaxed, even tension makes a soft, squishy fabric. If your hook fights you, loosen your grip.
- Count your corners out loud. Every hexagon must have exactly 6 corners. If you have 5 or 7, the motif will not lie flat when joined.
- Weave in ends as you go. Twelve motifs means twenty-four yarn tails — threading them in after each motif saves a painful pile at the end.
- Keep your seams loose. When joining, work slip stitches gently so the panel stays flat instead of puckering.
Step-by-Step Instructions
Part 1: Hexagon Motifs (make 12 — 6 lavender, 6 mint)
Each motif is worked in the round from the center outward. Rnd 1: With your color, make a magic ring, ch 2 (this counts as your first dc), work 11 dc into the ring, join with sl st to the top of the ch-2. (12 dc)
Rnd 2: Ch 2, dc in the same stitch, [ch 1, 2 dc in the next stitch] around, ch 1, join with sl st to the top of the ch-2. (6 ch-1 spaces, 12 dc)
Rnd 3: Sl st into the next dc and into the next ch-1 space, ch 3 (counts as first dc), work (2 dc, ch 2, 3 dc) in that same ch-1 space — this makes your first corner. *Ch 1, 3 dc in the next ch-1 space, ch 1, (3 dc, ch 2, 3 dc) in the next ch-1 space; repeat from * around, ending with ch 1, then join with sl st to the top of the ch-3. Fasten off and weave in ends. (6 corners, 6 flat sides)
Each motif should measure about 3.5 inches (9 cm) flat-to-flat. Make 6 in lavender (A) and 6 in mint (B).
Part 2: Joining the Panel
Lay your 12 motifs out in a grid 3 wide by 4 tall, alternating colors like a checkerboard:
Row 1 (top): A, B, A
Row 2: B, A, B
Row 3: A, B, A
Row 4 (bottom): B, A, B
Join with a flat slip-stitch seam: hold two motifs right sides together (the pretty sides facing each other), insert your hook through the matching stitches of both layers at once, and work one sl st in each stitch across that one side edge. Join all vertical seams first (the three columns), then all horizontal seams (the four rows), so everything forms one flat rectangular panel about 10.5 inches wide x 14 inches tall. Fasten off and weave in ends.
Part 3: Forming the Bag Body
Fold: Fold the panel in half with right sides together so the fold sits at the bottom. The panel is now about 10.5 inches wide x 7 inches tall.
Side seams: Working through both layers, sc (or sl st) from the bottom fold up to the top opening along one side edge. Repeat on the other side edge. Fasten off. Turn the bag right side out.
Part 4: Base Reinforcement
With mint (B), join yarn at one bottom corner of the bag. Ch 1, then work sc evenly around the entire bottom perimeter — about 40 sc — and join with sl st. This firms up the base so the bag stands nicely. Fasten off.
Part 5: Top Edging
With mint (B), join yarn at one side of the top opening. Rnd 1: Ch 1, sc evenly around the entire top opening — about 44 sc — join with sl st. (44 sc)
Rnd 2: Ch 1, sc in each stitch around, join with sl st. (44 sc) Fasten off and weave in ends.
Part 6: Flap
With lavender (A), ch 22.
Row 1: Sc in the 2nd ch from hook and in each ch across. (21 sc)
Rows 2–10: Ch 1, turn, sc in each st across. (21 sc)
Row 11: Ch 1, turn, sc2tog, sc in each st to the last 2 sts, sc2tog. (19 sc)
Row 12: Ch 1, turn, sc in each st across. (19 sc)
Row 13: Ch 1, turn, sc2tog, sc in each st to the last 2 sts, sc2tog. (17 sc)
Row 14: Ch 1, turn, sc in each st across. Fasten off, leaving a long tail for sewing. (17 sc)
Part 7: Straps (make 2)
With mint (B), ch 6.
Row 1: Sc in the 2nd ch from hook and in each ch across. (5 sc)
Rows 2–60: Ch 1, turn, sc in each st across. (5 sc)
Fasten off, leaving a long tail. Each strap measures about 24 inches long.
Assembly and Finishing
Sew the flap: Center the flap on the back top edge of the bag with the right side facing out, and whipstitch (small stitches over the edge, through both layers) along its top edge using the long tail. Sew the button: Sew a button to the front of the bag directly under the flap tip. If you like, work a small ch-5 loop at the flap tip and slip stitch it closed to make a closure that hooks over the button. Attach the straps: Sew one end of each strap to the top back edge of the bag, about 2 inches in from each side seam. Sew the other end of each strap to the bottom front corners. Go over each attachment point twice with extra stitches so the straps are strong. Weave in all ends: Thread each tail onto the tapestry needle and run it back and forth through the inside of the fabric for about an inch, then trim. Block: Lightly mist the bag with water, pat it into shape (stuff it with a towel so it holds its form), and let it dry flat overnight. This smooths the seams and evens out the motifs.
Pro Tips and Variations
- Change the palette: Swap lavender and mint for any two colors you love — blush and cream, mustard and sage, or a bold black-and-white checkerboard. Keep one color as A and one as B so the checkerboard stays crisp.
- Resize the bag: Add a fifth row of motifs for a taller tote, or use a 3x3 grid for a smaller purse. Just remember each extra motif adds about 3.5 inches in one direction, and add extra strap length to match.
- Substitute yarn: Cotton gives a crisp, sturdy bag; acrylic stays soft and squishy. Whatever you choose, match the worsted weight and re-check your hexagon gauge before making all twelve.
- Add a lining: Cut a fabric rectangle slightly smaller than the bag body, sew it into a pouch, and hand-sew it inside the top opening for extra durability and a professional finish.