Indigo Grid Utility Crossbody Bag Free Crochet Pattern
Indigo Grid Utility Crossbody Bag — Free Crochet Pattern
Introduction
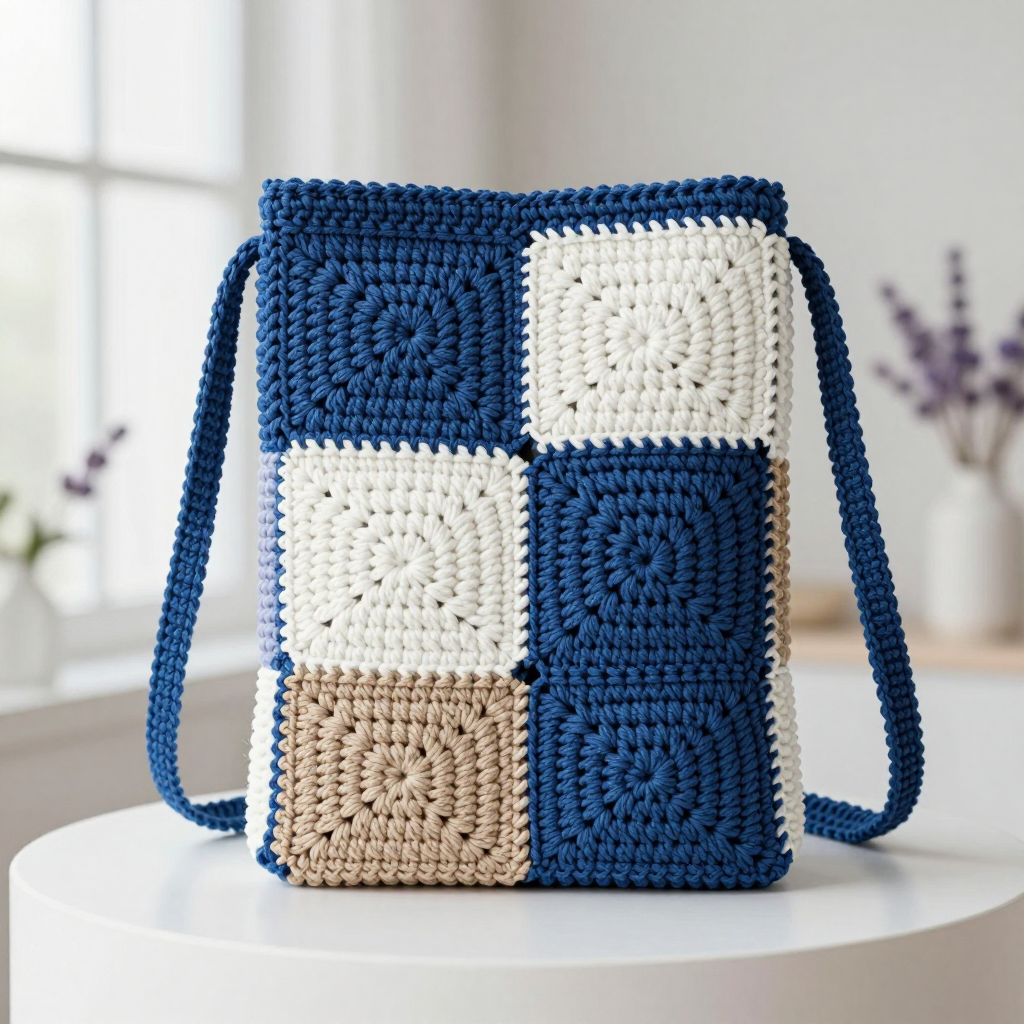
If you have never held a crochet hook before, this is the perfect first real project for you. The Indigo Grid Utility Crossbody Bag is built from six simple solid squares — the same square repeated six times — so you only have to learn one small skill before you have a finished, wearable bag. It is special because the "design" comes from color placement, not complicated stitches: three indigo squares, two white, and one oatmeal snap together into a quiet, graphic grid that looks far more advanced than it is. The finished bag is a flat rectangular pouch about 6.5 inches wide and 9.75 inches tall, with a folded top and a narrow 50-inch strap that sits comfortably across your body. In worsted-weight cotton it feels sturdy, matte, and slightly stiff in the best way — the kind of little bag that holds a phone, keys, and a wallet and gets better with every wear.
Materials Needed
- Yarn: Worsted weight (category 4) cotton or cotton-blend yarn — approximately 120 yards indigo, 60 yards white, 60 yards oatmeal.
- Hook for squares and body: US G/6 (4.0 mm).
- Hook for strap: US H/8 (5.0 mm).
- Stitch markers (at least 6) — small clips or safety pins work fine.
- Tapestry needle (a big-eyed, blunt-tipped needle for sewing yarn).
- Scissors for cutting yarn.
- Measuring tape or ruler.
- Finished size: Body 6.5 in wide x 9.75 in tall (flat, before folding the top down). Folded finished height approx. 7 in. Strap 50 in long x 0.75 in wide. Each square 3.25 in x 3.25 in.
Abbreviations and Beginner Glossary
- ch — chain. Make a loop of yarn on the hook, wrap yarn over the hook, and pull it through the loop. That is one chain stitch. Chains look like tiny V's.
- sc — single crochet. Insert hook into the stitch, wrap yarn over hook, pull up a loop (2 loops on hook), wrap yarn over again, pull through both loops. One loop remains.
- sl st — slip stitch. Insert hook into stitch, wrap yarn over, and pull it straight through both the stitch and the loop on your hook in one motion. It makes a nearly invisible joining stitch.
- st / sts — stitch / stitches. One completed stitch, or several.
- rep — repeat. Do the instruction again.
- * ... * — asterisks mark a group of stitches you repeat. The pattern tells you how many times.
- magic ring — an adjustable loop of yarn you crochet into, then pull tight so the center closes with no hole. If it feels tricky, you may instead ch 4 and join with a sl st into a ring, then work Round 1 into that ring.
- join with sl st — finish a round by making a slip stitch into the very first stitch of that round, connecting the last stitch to the first.
- fasten off — cut the yarn leaving a 6-inch tail, pull the tail all the way through the last loop, and tighten.
- weave in ends — thread a yarn tail onto a tapestry needle and sew it back and forth through the back of the fabric so it disappears.
- right side — the "front" or prettier face of the fabric. Wrong side is the back.
- block — dampen the piece and pin it flat to the stated measurements so it dries square and even.
- turn — flip the work over so you can crochet back the other direction (used only for the strap).
Gauge
Gauge: One solid square = 3.25 in x 3.25 in (8.25 cm) using the G/6 (4.0 mm) hook. In single crochet, 17 sc x 19 rows = 4 in (10 cm).
Gauge simply means "how big your stitches come out." If your square is bigger than 3.25 inches, your bag will be bigger than planned and the six squares won't line up neatly; if it's smaller, the bag shrinks. To check: crochet one complete square exactly as written, then lay it flat and measure across the middle. If it measures more than about 3.5 inches, switch to a smaller hook (US F/5, 3.75 mm). If it measures under 3 inches, switch to a larger hook (US H/8, 5.0 mm). One test square is all it takes — and you can use it as one of your six squares.
Beginner Tips Before You Start
- Make all six squares before you join anything. Squares worked at different times can come out slightly different sizes; blocking them all at the end evens them out.
- Use a stitch marker in the first stitch of every round. Because you work in joined rounds, it is very easy to lose track of where a round began. Move the marker up each round.
- Do not pull your yarn tight. Keep an easy, relaxed tension — tight stitches make a stiff, curly square that won't lie flat.
- Count every round out loud. Each round has a stated stitch count in parentheses. If your count matches, you are on track.
- Keep your color changes clean. Work each square in a single color from start to finish; do not carry colors inside a square.
- Check your square after Round 6. It should be a flat square, not a bowl or a ruffled circle. If it curls, your stitches are too tight.
Step-by-Step Instructions
Grid Layout (how the six squares are arranged)
Viewed from the front, top row first:
- Row 1: Indigo | White
- Row 2: White | Indigo
- Row 3: Oatmeal | Indigo
Total: 3 indigo, 2 white, 1 oatmeal square.
Solid Square Motif (make 6: 3 indigo, 2 white, 1 oatmeal)
Worked in joined rounds with the G/6 (4.0 mm) hook. You do not turn between rounds; you always work in the same direction.
Round 1: With your chosen color, make a magic ring. Ch 1. Work 8 sc into the ring. Join with sl st to the first sc. (8 sc)
Round 2: Ch 1. Work 2 sc in each st around. Join with sl st to the first sc. (16 sc)
Round 3: Ch 1. *2 sc in next st, sc in next st; rep from * around. Join with sl st to the first sc. (24 sc)
Round 4: Ch 1. *2 sc in next st, sc in next 2 sts; rep from * around. Join with sl st to the first sc. (32 sc)
Round 5: Ch 1. *2 sc in next st, sc in next 3 sts; rep from * around. Join with sl st to the first sc. (40 sc)
Round 6 (square shaping): Ch 1. Sc in next 4 sts, *(sc, ch 2, sc) in next st (this makes a corner), sc in next 9 sts; rep from * 3 times, then (sc, ch 2, sc) in next st, sc in last 5 sts. Join with sl st to the first sc. (48 sc plus 4 ch-2 corner spaces) Fasten off and weave in ends.
Each square should measure 3.25 in x 3.25 in. Block all six squares lightly to size and let them dry completely before joining.
Joining the Grid
Arrange the six squares in the 2x3 layout above. Using indigo yarn and the G/6 (4.0 mm) hook, join squares with a slip stitch seam worked through both loops of matching edge stitches, in this order:
Step 1: Join the two squares of Row 1 together along their vertical inner edges.
Step 2: Join the two squares of Row 2 together the same way.
Step 3: Join the two squares of Row 3 together the same way.
Step 4: Join Row 1 to Row 2 along the long horizontal edge.
Step 5: Join Row 2 to Row 3 along the long horizontal edge.
You now have one flat rectangular panel measuring 6.5 in wide x 9.75 in tall. Fasten off and weave in ends.
Forming the Pouch
Fold the panel in half widthwise so the bottom edge meets the top edge, with right sides facing out. The fold becomes the bottom of the bag; the open edges become the top opening.
Side seams: Using indigo yarn and the G/6 hook, join the two side edges with a slip stitch seam through both layers, working from the folded bottom up to the top opening on each side. Fasten off and weave in ends. Turn the bag right side out.
Top Edging
Round 1: Join indigo yarn with a sl st at one top corner. Ch 1. Work sc evenly around the entire top opening, approximately 40 sc. Join with sl st to the first sc. (approx. 40 sc)
Round 2: Ch 1. Sc in each st around. Join with sl st to the first sc. (approx. 40 sc) Fasten off and weave in ends.
The top edge naturally folds down about 2.75 in to create the folded-top closure; no zipper or button is used.
Strap
With the H/8 (5.0 mm) hook and indigo yarn, leaving a 6 in tail, ch 4.
Row 1: Sc in the 2nd ch from hook and in each ch across. Ch 1, turn. (3 sc)
Row 2: Sc in each st across. Ch 1, turn. (3 sc)
Rows 3–end: Repeat Row 2 until the strap measures 50 in from the beginning. (3 sc) Fasten off, leaving a 6 in tail.
Attaching the Strap
Fold the top edge of the bag down 2.75 in to the inside. Position one end of the strap at the top side edge, centered on the folded band, and sew it securely with indigo yarn through all layers using a tapestry needle. Repeat on the opposite side. Weave in all ends.
Assembly and Finishing
Seaming: All seams in this bag are slip stitch seams worked with indigo yarn and the G/6 hook. To work one, hold the two edges together with right sides facing out, insert the hook through both layers at the same time, wrap yarn over, and pull it through both layers and the loop on your hook. Move to the next stitch pair and repeat. Keep the seam loose enough that the fabric doesn't pucker.
Weaving in ends: Thread each yarn tail onto the tapestry needle and sew it back and forth through the wrong side of the fabric for about 2 inches, changing direction once so it can't pull out. Trim close to the fabric.
Blocking: Lightly steam-block the finished bag to settle the seams and square the grid. Hold a steam iron an inch or two above the fabric (never press it down onto cotton crochet) and let the steam relax the stitches, then pat the bag flat and let it dry fully. If you prefer no-heat blocking, mist the bag with water, pin it flat to the measurements, and let it air-dry.
Final check: The bag is worn crossbody with the folded top facing outward.
Pro Tips and Variations
- Change the color story: Keep the same six-square grid but swap indigo for charcoal, white for cream, and oatmeal for camel for a warmer, neutral bag — or use three shades of one color for a tonal look.
- Resize the bag: Each square is 3.25 in, so the math is easy. A 2x2 grid (four squares) makes a small 6.5 in x 6.5 in pouch; a 2x4 grid (eight squares) makes a taller 6.5 in x 13 in bag. Add or subtract squares and adjust yarn amounts by roughly 20 yards per square.
- Substitute yarn: Any worsted weight (category 4) yarn works, but cotton or a cotton blend gives the crisp, matte, structured look shown. Acrylic will be softer and floppier; linen will be sturdier and slightly stiffer.
- Customize the strap: Make the strap longer for a crossbody fit on a taller frame or shorter for a shoulder bag — just measure as you go and stop at your preferred length. You can also work the strap in white or oatmeal to echo the grid.