Laddered Rung Blanket Border Free Pattern: Neon Grunge Crochet Throw
Laddered Rung Blanket Border: A Neon Grunge Crochet Throw
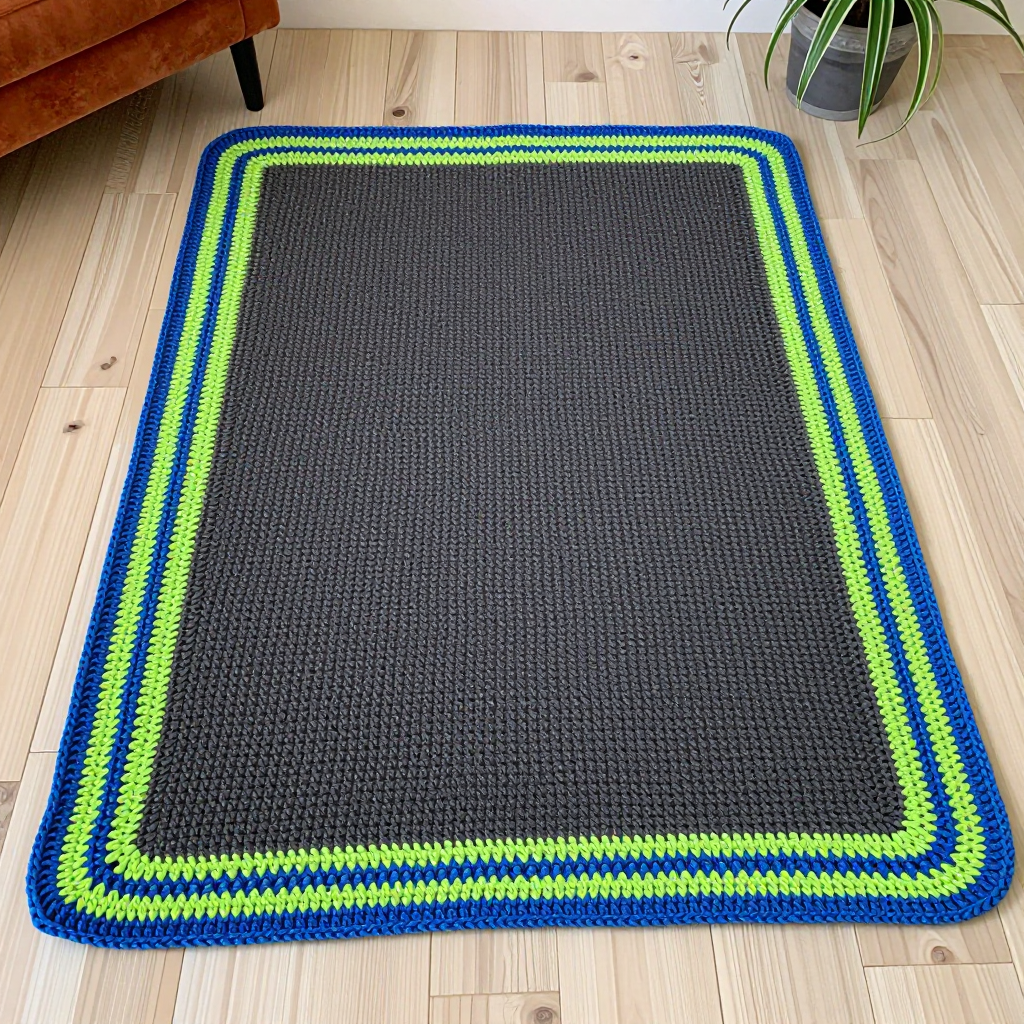
This throw is the perfect project for anyone who has mastered the basic double crochet stitch and wants to make something with real visual punch. The main body is a simple, meditative rectangle of solid charcoal double crochet that works up quickly and feels dense, warm, and cozy in your lap. What makes it special is the border: a graduated ladder-stitch edging worked in alternating neon lime and electric blue, with long straight yarn float bridges that echo a chain-link fence and give the whole piece a bold, grunge-inspired attitude. The finished blanket measures 48 inches wide by 60 inches long, with a 3-inch border on all four sides, and it looks like a piece of street art you can curl up under. If you can chain, single crochet, and double crochet, you can absolutely make this.
Materials Needed
- Yarn (main body): Worsted weight (#4) acrylic yarn, about 1,400 yards of charcoal.
- Yarn (border): Worsted weight (#4) acrylic yarn, about 120 yards of neon lime and 120 yards of electric blue.
- Hook: Size H/8 (5.0 mm) crochet hook, or whatever size you need to match the gauge below.
- Stitch markers: At least 4, to mark corners and the start of each round.
- Tapestry needle: A large blunt needle with an eye big enough for worsted yarn, for weaving in ends.
- Scissors: Sharp craft scissors for cutting yarn.
- Finished size: 48 in wide x 60 in long (122 x 152 cm), plus a 3 in (7.5 cm) border on all sides.
Abbreviations and Beginner Glossary
- ch – chain. Make a loop with the yarn on your hook, wrap yarn over the hook, and pull it through the loop. That is one chain.
- dc – double crochet. Wrap yarn over the hook, insert the hook into the stitch, pull up a loop (3 loops on hook), yarn over and pull through 2 loops, yarn over and pull through the last 2 loops.
- sc – single crochet. Insert the hook into the stitch, pull up a loop (2 loops on hook), yarn over and pull through both loops.
- sl st – slip stitch. Insert the hook into the stitch, yarn over, and pull the yarn through both the stitch and the loop on your hook at the same time. It makes a nearly invisible join.
- sk – skip. Do not work into that stitch; move past it to the next one.
- sp – space. The little gap created by a chain (for example, a "ch-5 sp" is the hole inside a chain of 5).
- st / sts – stitch / stitches.
- rep – repeat. Do the instruction again.
- rnd – round. One complete trip around the blanket edge, ending back where you started.
- tog / join – to connect the end of a round to its beginning, usually with a slip stitch.
- fasten off – cut the yarn a few inches from your work and pull the tail all the way through the last loop to lock it.
- turn – flip your work over so you can work back across the row you just made.
- row-end – the little edge stitch at the side of each finished row, where you will place border stitches later.
Gauge
14 dc x 8 rows = 4 in (10 cm) in double crochet.
Gauge matters because it is how we make sure your blanket comes out the size promised. If your stitches are bigger than the gauge, your blanket will be too large and you may run short on yarn; if they are smaller, it will be too small. To check, crochet a practice square about 6 inches across in double crochet, lay it flat, and measure 4 inches across the middle. Count the stitches in that 4 inches. If you have more than 14, try a larger hook; if you have fewer, try a smaller hook. Always measure the middle of the swatch, never the edges, because edges pull in.
Beginner Tips Before You Start
- Count your chains carefully on Row 1. The foundation chain sets the whole width. Count it twice before you start the first double crochet.
- Use stitch markers at every corner. Place one in each corner stitch before you begin the border rounds so you never lose your place.
- Do not pull your yarn too tight. The ladder loops and float bridges need to stay loose and open so they look like a fence, not a knot.
- Carry the unused color loosely along the back. If you pull the carried yarn tight, the border will pucker and the blanket will not lie flat.
- Work the border with the blanket flat on a table so you can see the loops forming evenly all the way around.
- Keep a tally of your rounds. The border alternates colors for 14 rounds; write each round number down as you finish it.
Step-by-Step Instructions
Body (charcoal)
Row 1: Ch 170. Dc in the 3rd ch from the hook and in each ch across. (168 dc)
Row 2: Ch 2 (this does not count as a stitch), turn. Dc in each st across. (168 dc)
Rows 3–120: Repeat Row 2. (168 dc; 120 rows total, approx. 60 in long)
Do not fasten off, and do not turn after the final row. You will now work the border straight from the last stitch.
Border Setup
Round 1: Ch 1, turn to work along the side edge. Work 1 sc in each row-end along the side (120 sc), 1 sc in each st across the bottom (168 sc), 1 sc in each row-end along the other side (120 sc), and 1 sc in each st across the top (168 sc). Join with a sl st to the first sc. (576 sc)
Round 2: Ch 1, sc in each sc around, working 3 sc in each corner. Join with a sl st. (584 sc)
Graduated Ladder Border (worked in joined rounds, alternating colors)
Note: Each ladder rung is a ch-5 loop anchored with a sc. Float bridges are long ch-12 loops worked over the rung loops. Carry the unused color loosely along the back. Fasten off each color at the end of its round.
Round 3 (neon lime): Ch 1, sc in the first sc. *Ch 5, sk 3 sc, sc in the next sc; rep from * around, working [ch 5, sk 3, sc] at each corner. Join with a sl st to the first sc. Fasten off lime.
Round 4 (electric blue): Join blue with a sl st in any ch-5 sp. Ch 1, sc in the same sp. *Ch 12, sc in the next ch-5 sp; rep from * around. Join with a sl st. Fasten off blue.
Round 5 (neon lime): Join lime with a sl st in any ch-12 sp. Ch 1, sc in the same sp. *Ch 5, sc in the next ch-12 sp; rep from * around. Join with a sl st. Fasten off lime.
Round 6 (electric blue): Join blue with a sl st in any ch-5 sp. Ch 1, sc in the same sp. *Ch 12, sc in the next ch-5 sp; rep from * around. Join with a sl st. Fasten off blue.
Round 7 (neon lime): Join lime with a sl st in any ch-12 sp. Ch 1, sc in the same sp. *Ch 5, sc in the next ch-12 sp; rep from * around. Join with a sl st. Fasten off lime.
Round 8 (electric blue): Join blue with a sl st in any ch-5 sp. Ch 1, sc in the same sp. *Ch 12, sc in the next ch-5 sp; rep from * around. Join with a sl st. Fasten off blue.
Round 9 (neon lime): Join lime with a sl st in any ch-12 sp. Ch 1, sc in the same sp. *Ch 5, sc in the next ch-12 sp; rep from * around. Join with a sl st. Fasten off lime.
Round 10 (electric blue): Join blue with a sl st in any ch-5 sp. Ch 1, sc in the same sp. *Ch 12, sc in the next ch-5 sp; rep from * around. Join with a sl st. Fasten off blue.
Round 11 (neon lime): Join lime with a sl st in any ch-12 sp. Ch 1, sc in the same sp. *Ch 5, sc in the next ch-12 sp; rep from * around. Join with a sl st. Fasten off lime.
Round 12 (electric blue): Join blue with a sl st in any ch-5 sp. Ch 1, sc in the same sp. *Ch 12, sc in the next ch-5 sp; rep from * around. Join with a sl st. Fasten off blue.
Round 13 (neon lime): Join lime with a sl st in any ch-12 sp. Ch 1, sc in the same sp. *Ch 5, sc in the next ch-12 sp; rep from * around. Join with a sl st. Fasten off lime.
Round 14 (electric blue): Join blue with a sl st in any ch-5 sp. Ch 1, sc in the same sp. *Ch 12, sc in the next ch-5 sp; rep from * around. Join with a sl st. Fasten off blue.
Round 15 (neon lime): Join lime with a sl st in any ch-12 sp. Ch 1, sc in the same sp. *Ch 5, sc in the next ch-12 sp; rep from * around. Join with a sl st. Fasten off lime.
Round 16 (electric blue): Join blue with a sl st in any ch-5 sp. Ch 1, sc in the same sp. *Ch 12, sc in the next ch-5 sp; rep from * around. Join with a sl st. Fasten off blue.
Border complete: 14 alternating color rounds (Rounds 3–16), giving a graduated ladder edging about 3 in (7.5 cm) deep on all four sides.
Assembly and Finishing
Weave in all ends. Thread each yarn tail onto your tapestry needle and run it back and forth through the back of several stitches in the same color, then trim close. Never knot your ends; weaving hides them securely.
Block lightly. Lay the blanket flat on a clean towel or blocking mat. Mist it lightly with water and gently pat the ladder loops and float bridges so they sit straight and open. Do not press the loops flat with an iron; you want them to keep their three-dimensional fence look. Let it dry completely before moving it.
Final check. Walk around the blanket and make sure every rung and bridge is even and no carried yarn is pulled tight. Gently stretch any tight spots with your fingers.
Pro Tips and Variations
- Change the colors: Swap the neon lime and electric blue for hot pink and orange, or keep it monochrome with two shades of gray for a subtler grunge look.
- Adjust the size: To make a smaller lap throw, start with fewer chains in multiples of 4 plus 2, and work fewer body rows; keep the border rounds the same.
- Substitute yarn: Any worsted weight (#4) yarn works, but check your gauge first, since a different fiber may change the stitch size.
- Add more ladder rounds: For a deeper border, repeat the alternating lime and blue rounds as many times as you like, always ending on a blue round.