Harbor Light Granny Square Throw Free Pattern
Harbor Light Granny Square Throw: A Free Beginner Crochet Pattern
Introduction
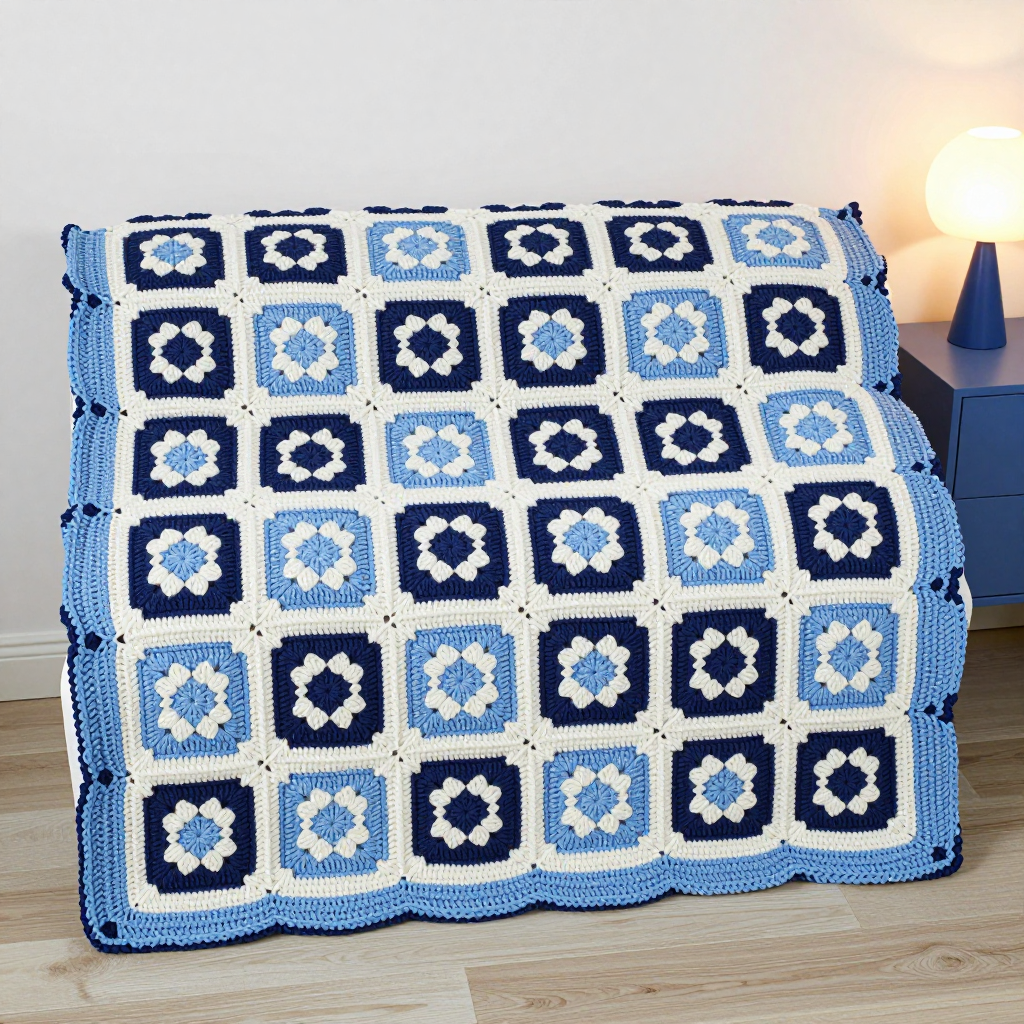
If you have ever looked at a crocheted blanket and thought, "I could never do that," this is the pattern that will prove you wrong. The Harbor Light Granny Square Throw is made from 180 tiny, two-round squares — and each one is so simple that you will have the rhythm memorized after your very first try. It is perfect for complete beginners because you only ever need to know a handful of basic stitches, and you build the whole blanket one small, satisfying square at a time. The finished throw is a generous 48 by 60 inches, with crisp navy and pale blue centers framed in white, so the joined squares look like a windowpane grid of sea glass and sailcloth. It feels soft and cozy on the sofa, drapes beautifully over the porch chair, and looks like an heirloom you bought in a coastal boutique — even though you made it yourself.
Materials Needed
- Yarn: Worsted weight (#4) acrylic or cotton-blend yarn — approximately 1,200 yards navy, 900 yards white, and 700 yards pale blue (about 2,800 yards total).
- Crochet hook: Size H/8 (5.0 mm). Buy two if you can — one to work with and one to use as a gauge check.
- Stitch markers: At least 8, to mark corners and count squares.
- Tapestry needle: A blunt-tipped needle with an eye big enough for worsted yarn, for weaving in ends and joining.
- Scissors: Sharp craft scissors for cutting yarn cleanly.
- Measuring tape or ruler: To check your 4-inch squares and your gauge.
- Blocking supplies (optional but recommended): A spray bottle of water and rust-proof pins or a blocking mat.
- Finished size: Approximately 48 inches (122 cm) wide x 60 inches (152 cm) long, made from a grid of 12 squares across x 15 squares down = 180 squares total. Each square measures about 4 inches (10 cm) across after joining.
Abbreviations and Beginner Glossary
Every abbreviation used in this pattern is listed below with a plain-English explanation. Read through this list once before you begin — you do not need to memorize it.
- ch — chain. Wrap the yarn over your hook and pull it through the loop on your hook. This creates one chain stitch.
- sl st — slip stitch. Insert your hook into the stitch, wrap the yarn over, and pull it through both the stitch and the loop on your hook at the same time. It makes a nearly invisible joining stitch.
- sc — single crochet. Insert your hook into the stitch, wrap the yarn over and pull up a loop (2 loops on hook), wrap the yarn over again and pull through both loops. One single crochet made.
- dc — double crochet. Wrap the yarn over your hook first, insert the hook into the stitch, wrap and pull up a loop (3 loops on hook), wrap and pull through 2 loops, wrap and pull through the last 2 loops. One double crochet made.
- st / sts — stitch / stitches. One completed stitch or several of them.
- magic ring — an adjustable loop of yarn that you crochet into and then pull tight, so there is no hole in the center of your square. If you prefer, you can chain 4 and join with a slip stitch to make a ring instead.
- ch-2 corner space — the little gap made by two chain stitches at a corner. You will work your corner stitches into this gap.
- ch-1 side space — the small gap made by one chain stitch along the side of a square.
- join with a sl st — finish a round by making a slip stitch into the top of the first stitch of that round, closing the circle.
- fasten off — cut the yarn a few inches from your work, then pull the tail all the way through the last loop to lock it.
- right side — the front, prettier face of your work that will show on the finished blanket.
- work evenly — space your stitches at a comfortable, consistent distance without counting into specific stitches, so the edge stays flat.
- 3 sc in each corner — work three single crochet stitches into the same corner spot so the blanket turns the corner smoothly without puckering.
Gauge
Gauge: 4 dc = 1 inch (2.5 cm), and 2 dc rounds = 1 inch (2.5 cm). Each finished square measures 4 inches (10 cm) across after joining.
Gauge simply means how big your stitches turn out. It matters because if your squares come out bigger or smaller than 4 inches, your blanket will not match the finished size, and your 180 squares may not line up neatly in the grid. To check your gauge, crochet one complete square exactly as written below. Lay it flat and measure straight across from edge to edge. If it measures about 4 inches, you are ready to go. If it is larger than 4 inches, switch to a smaller hook (such as G/6, 4.0 mm). If it is smaller than 4 inches, switch to a larger hook (such as I/9, 5.5 mm). Always make a full square rather than a small swatch, because the square itself is your truest test.
Beginner Tips Before You Start
- Make one square and measure it before you make 180. It takes five minutes and saves hours of rework. Once your square measures 4 inches, you know every square after it will match.
- Do not pull your yarn too tight. Beginners often crochet tightly out of nerves. Keep your loops relaxed and let the hook do the work, or your squares will shrink and your hands will ache.
- Use stitch markers to mark the four corners of each square. Slip a marker into each ch-2 corner space as you make it, so you can find them easily on Round 2.
- Weave in your ends as you go. After every handful of squares, thread the tails onto your tapestry needle and weave them in. Saving 360 yarn tails for the end is the fastest way to lose your motivation.
- Keep all 180 squares the same size by using the same hook and the same tension throughout. If you set the project down for a week, make one test square first to re-find your rhythm.
- Count your stitches at the end of every round. Each square should end Round 1 with 12 dc and Round 2 with 24 dc. Catching a mistake on one small square is easy; catching it after joining is not.
Step-by-Step Instructions
Part 1: The Square Motif (make 180 total)
Note: You will make 144 navy-centered squares and 36 pale-blue-centered squares. Both are identical except that the pale-blue squares use pale blue in Round 1 instead of navy. Round 2 is always white.
Round 1 (navy or pale blue): With navy (or pale blue), make a magic ring. Ch 3 (this counts as your first dc), work 2 dc into the ring, ch 2, [3 dc into the ring, ch 2] 3 times. Join with a sl st to the top of the beginning ch-3. Fasten off. (12 dc, 4 ch-2 corner spaces)
Round 2 (white): Join white with a sl st in any ch-2 corner space. Ch 3 (counts as first dc), work 2 dc in the same corner space, ch 2, 3 dc in the same corner space, *ch 1, 3 dc in the next ch-2 corner space, ch 2, 3 dc in the same corner space; repeat from * around, ch 1, join with a sl st to the top of the beginning ch-3. Fasten off white. (24 dc, 4 ch-2 corners, 4 ch-1 side spaces)
Check your square: It should measure approximately 4 inches (10 cm) across. If it is larger, go down one hook size; if smaller, go up one hook size. Make all 180 squares at the same gauge.
Part 2: Color Arrangement
Lay your finished squares out on the floor or a large table in a grid of 12 squares across and 15 squares down. Follow this windowpane sequence from the bottom edge upward:
- Rows 1–4: navy-centered squares.
- Row 5: pale-blue-centered squares.
- Rows 6–9: navy-centered squares.
- Row 10: pale-blue-centered squares.
- Rows 11–14: navy-centered squares.
- Row 15: pale-blue-centered squares.
This gives you the 4-and-1 sequence repeated three times (12 rows), finished with 3 more navy rows — 15 rows total. Each row uses 12 squares, so you need 144 navy-centered squares (12 rows x 12 squares) and 36 pale-blue-centered squares (3 rows x 12 squares).
Part 3: Joining the Squares
Join with white yarn using either a flat slip-stitch join or a single crochet join, working with right sides together so the seam sits on the back of the blanket. To work a flat slip-stitch join: hold two squares with right sides facing, insert your hook through the corner stitch of both squares at once, pull up a loop of white, and slip stitch through both layers along the edge, matching stitch to stitch. Keep your joins loose and even so the grid stays crisp and the blanket does not pucker.
Step 1 — Horizontal strips: Join the squares into 15 horizontal strips of 12 squares each. Work one strip at a time, joining square to square across the row.
Step 2 — Vertical joins: Lay the 15 strips out in order and join them together vertically, strip to strip, until all 180 squares are connected. Check the windowpane pattern as you go so no strip ends up in the wrong place.
Part 4: The Border
Round 1 (pale blue): With the right side facing, join pale blue with a sl st in any corner. Ch 1, work sc evenly around the entire outer edge, working 3 sc in each corner to turn smoothly. Join with a sl st to the first sc.
Round 2 (pale blue): Ch 1, work sc in each sc around, working 3 sc in each corner. Join with a sl st to the first sc. Fasten off pale blue.
Round 3 (navy): Join navy with a sl st in any corner. Ch 1, work sc in each sc around, working 3 sc in each corner. Join with a sl st to the first sc. Fasten off and weave in all ends.
Assembly and Finishing
Weaving in ends: Thread each yarn tail onto your tapestry needle. Turn the blanket to the wrong side and weave the tail in and out through the backs of several stitches, changing direction once so it cannot work loose. Trim the yarn close to the fabric — do not leave long tails hanging.
Blocking: Lay the finished throw flat on a blocking mat or a clean towel. Mist it lightly with water until it is damp but not soaking. Gently pat and stretch it into its final 48 x 60 inch rectangle, squaring up the corners and straightening the grid lines. Pin the edges in place if you like, then let it dry completely — usually overnight. Do not iron the blanket, as heat can flatten the stitches and melt acrylic fibers.
Final check: Once dry, give the blanket a gentle shake, fold it, and admire your 180 little squares. You are officially a blanket maker.
Pro Tips and Variations
- Change the colors: Swap navy for charcoal, pale blue for sage green, and white for cream for a woodland version. Keep the same 4-and-1 row sequence so the windowpane effect stays intact.
- Resize the blanket: For a baby blanket, use a 6 x 8 grid (48 squares) and work the same three-round border. For a bed-size throw, use a 15 x 18 grid (270 squares). Just keep the square count divisible by your row pattern.
- Substitute yarn: Any worsted weight (#4) yarn works — acrylic is easy-care and budget-friendly, while cotton-blend gives a heavier, coastal feel. Always check your gauge square again after switching yarns.
- Try a different join: A single crochet join gives a slightly raised, textured seam, while the flat slip-stitch join keeps the grid perfectly smooth. You can also join all squares in navy for a bolder windowpane frame.