Hearthside Cloud Soccasins: Free Crochet Pattern for Cozy Winter Footwear
Hearthside Cloud Soccasins: Free Crochet Pattern for Cozy Winter Footwear
Introduction
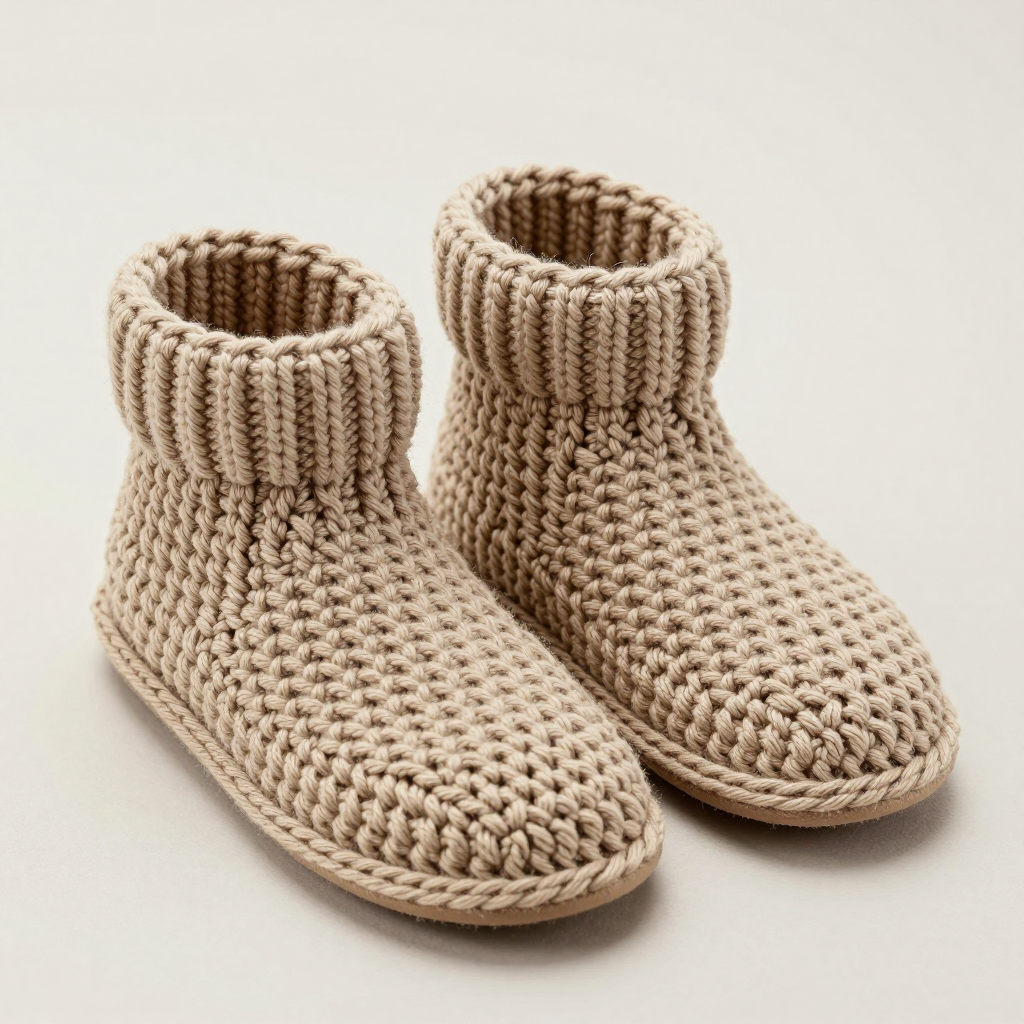
If you have ever wanted to make something with your own two hands that feels like a warm hug for your feet, these Hearthside Cloud Soccasins are exactly the project to start with. They are perfect for the absolute beginner who has just learned a chain and a single crochet, because the entire slipper is built from just two simple stitches worked in easy, forgiving rounds. The finished soccasins look like soft, rounded little slippers with a snug ankle cuff and a gently cushioned sole, and they feel cloud-like and toasty against bare feet on a cold morning. Worked in a fine, soft wool-nylon blend, they have a neat, even texture that looks far more advanced than the skills required to make them. Best of all, they work up quickly, so you can finish a pair in a weekend and gift them (or keep them all to yourself).
Materials Needed
- Yarn: Fine (2) weight yarn, approximately 300–350 yards total for the pair. The sample uses a soft wool-nylon blend in oatmeal heather. Choose a yarn that feels soft against skin, because it will be worn on bare feet.
- Smaller hook: C/2 (2.75 mm) crochet hook — used for the sole and toe so the fabric is denser and more durable.
- Larger hook: E/4 (3.5 mm) crochet hook — used for the upper foot and cuff so the fabric stays flexible and comfortable.
- Stitch markers: At least 4 (or use small scraps of contrasting yarn). These help you keep track of the beginning of each round and the toe and heel increase points.
- Tapestry needle: A blunt-tipped needle with a large eye, for weaving in yarn ends and seaming.
- Scissors: Any sharp pair for cutting yarn.
- Optional: A measuring tape or ruler for checking gauge, and a suede patch or fabric paint for a non-slip sole.
Finished size / dimensions: Written for adult sizes S (M, L). Finished foot length is approximately 9 (10, 11) inches (23 (25, 28) cm) from toe to heel, and the ankle cuff stands about 3 inches (7.5 cm) tall. The slipper is designed to fit with a little negative ease so it hugs the foot snugly.
Abbreviations and Beginner Glossary
Do not worry if these look like a secret code — every single one is explained below in plain English. Read through this list once before you begin.
- ch – chain. Make a slip knot on your hook, then wrap the yarn over the hook and pull it through the loop on your hook. That is one chain. A row of chains is your starting foundation.
- sc – single crochet. Insert your hook into the next stitch, wrap the yarn over the hook and pull up a loop (you now have 2 loops on the hook), wrap the yarn over again and pull it through both loops on the hook. One single crochet made.
- sl st – slip stitch. Insert your hook into the next stitch, wrap the yarn over and pull it through both the stitch and the loop on your hook in one motion. It creates almost no height and is used to join rounds.
- sc2tog – single crochet two stitches together (a decrease). Insert your hook into the next stitch, pull up a loop (2 loops on hook), insert your hook into the following stitch, pull up a loop (3 loops on hook), wrap the yarn over and pull through all 3 loops. This turns two stitches into one.
- st / sts – stitch / stitches. One completed unit of crochet work.
- rep – repeat. Do the instruction again the number of times stated.
- round – one complete circuit of crochet worked around a circle or tube, joined at the end with a slip stitch.
- row – one straight line of crochet worked back and forth, turning at the end.
- turn – flip your work over so you can crochet back in the opposite direction.
- join – work a slip stitch into the first stitch of the round to close the circle.
- fasten off – cut the yarn a few inches from your work, pull the tail all the way through the last loop, and pull tight to secure.
- weave in ends – thread a yarn tail onto a tapestry needle and sew it back and forth through the inside of the fabric so it disappears and cannot unravel.
- evenly – spaced out at roughly equal distances, without bunching.
- gauge – how many stitches and rounds fit into a set measurement (see the next section).
Gauge
Gauge: 22 stitches and 24 rounds = 4 inches (10 cm) in single crochet with the larger (E/4, 3.5 mm) hook.
Why gauge matters: Gauge is simply how tightly or loosely you crochet. If your stitches are bigger than the designer's, your slippers will come out too large; if they are smaller, the slippers will be too tight. Because slippers need to fit a real foot, checking gauge first saves you from disappointment after hours of work.
How to make a gauge swatch: With your larger hook and your chosen yarn, chain 26. Work single crochet into the second chain from the hook and into each chain across (25 stitches). Work 26 rows of single crochet, turning at the end of each row. Lay the swatch flat without stretching it and measure a 4-inch (10 cm) square in the middle. Count how many stitches fit across and how many rows fit up. If you have more stitches than 22, your tension is tight — try going up one hook size. If you have fewer, your tension is loose — try going down one hook size. Change hooks until your swatch matches.
Beginner Tips Before You Start
- Use stitch markers to track rounds. Place a marker in the first stitch of every round. When you reach the marker again, you know the round is complete and you will not accidentally add or lose stitches.
- Do not pull your yarn too tight. Beginners often grip the yarn hard, which makes stiff, small slippers. Keep an easy, relaxed tension so the fabric stays soft and cloud-like.
- Count your stitches at the end of every round. The stitch count in parentheses tells you exactly how many you should have. If it is off, fix it right away — it is much easier to correct one round than ten.
- Mark your toe and heel increase points. When the pattern says to increase at the toe and heel, pop a marker where the increases go so you can find the same spot on the next round.
- Work the sole and toe with the smaller hook. This denser fabric protects the bottom of the slipper from wear. Switch to the larger hook only when the pattern tells you to.
- Try the slipper on as you go. Once the upper foot is a few rounds tall, slip it onto your foot to check the fit before you commit to the cuff.
Step-by-Step Instructions
Notes: Soccasins are worked from the toe up, then the heel is shaped, and finally the ankle cuff is added. Use the smaller hook for the sole and toe for a denser fabric, and the larger hook for the upper foot and cuff for flexibility. The pattern is written for adult sizes S (M, L) with changes in parentheses. Make two identical slippers.
Sole (make 2)
Use the smaller C/2 (2.75 mm) hook for this section.
Setup: Ch 21 (24, 27).
Round 1: Sc in the 2nd ch from hook, then sc in each ch across (you will work 19 (22, 25) sc along the chain). Work 3 sc in the last ch (this turns the corner). Now working along the opposite side of the foundation chain, sc in each ch across (19 (22, 25) sc), then work 2 sc in the same ch as the first sc. Join with a sl st to the first sc. (42 (48, 54) sts)
Round 2: Ch 1, sc in each st around, working 3 increases evenly across the toe end and 2 increases across the heel end. Join with a sl st to the first sc. (47 (53, 59) sts)
Round 3: Ch 1, sc in each st around, working 2 increases evenly across the toe end and 1 increase across the heel end. Join with a sl st to the first sc. (50 (56, 62) sts)
Fasten off. Weave in the ends.
Upper Foot
Switch to the larger E/4 (3.5 mm) hook for this section and everything that follows.
Round 1: Join the yarn at the center back of the sole. Ch 1, sc in each st around. Join with a sl st to the first sc. (50 (56, 62) sts)
Round 2: Ch 1, sc in each st around. Join. (50 (56, 62) sts)
Round 3: Ch 1, sc in each st around. Join. (50 (56, 62) sts)
Round 4: Ch 1, sc in each st around. Join. (50 (56, 62) sts)
Round 5: Ch 1, sc in each st around. Join. (50 (56, 62) sts)
Round 6: Ch 1, sc in each st around. Join. (50 (56, 62) sts)
Shape instep:
Row 7: Ch 1, sc in the next 18 (20, 22) sts, turn. Leave the remaining stitches unworked (these form the opening for the heel). (18 (20, 22) sts)
Row 8: Ch 1, sc2tog, sc in each st across to the last 2 sts, sc2tog, turn. (16 (18, 20) sts)
Row 9: Repeat Row 8 (sc2tog at the beginning, sc across to the last 2 sts, sc2tog, turn). (14 (16, 18) sts)
Row 10: Repeat Row 8. (12 (14, 16) sts)
Row 11: Repeat Row 8. (10 (12, 14) sts)
Row 12: Repeat Row 8. (8 (10, 12) sts)
Fasten off. You now have 8 (10, 12) sts remaining, exactly as the pattern requires.
Heel
Use the larger E/4 (3.5 mm) hook.
Round 1: Join the yarn at the right side of the instep opening. Ch 1, work sc evenly around the entire heel opening (down one side, across the back, and up the other side), then sc2tog at each corner to shape. Join with a sl st to the first sc. (Count should match the sole edge; keep it even and snug.)
Round 2: Ch 1, sc in each st around. Join. (Same stitch count as Round 1)
Round 3: Ch 1, sc in each st around. Join. (Same stitch count as Round 1)
Round 4: Ch 1, sc in each st around. Join. (Same stitch count as Round 1)
Fasten off. Weave in the ends.
Ankle Cuff
Use the larger E/4 (3.5 mm) hook.
Round 1: Join the yarn at the center back of the upper foot. Ch 1, sc in each st around. Join with a sl st to the first sc. (50 (56, 62) sts)
Round 2: Ch 1, sc in each st around. Join. (50 (56, 62) sts)
Round 3: Ch 1, sc in each st around. Join. (50 (56, 62) sts)
Round 4: Ch 1, sc in each st around. Join. (50 (56, 62) sts)
Round 5: Ch 1, sc in each st around. Join. (50 (56, 62) sts)
Round 6: Ch 1, sc in each st around. Join. (50 (56, 62) sts)
Round 7: Ch 1, sc in each st around. Join. (50 (56, 62) sts)
Round 8: Ch 1, sc in each st around. Join. (50 (56, 62) sts)
Round 9: Ch 1, *sc in the next 3 sts, sc2tog; rep from * around. Join with a sl st to the first sc. (40 (45, 50) sts)
Round 10: Ch 1, sc in each st around. Join. (40 (45, 50) sts)
Round 11: Ch 1, sc in each st around. Join. (40 (45, 50) sts)
Round 12: Ch 1, sc in each st around. Join. (40 (45, 50) sts)
Fasten off. Weave in the ends.
Assembly and Finishing
Seaming: These soccasins are worked in the round, so there are very few seams. If any small gaps appear at the heel corners where you joined the yarn, use your tapestry needle and a length of the same yarn to sew them closed with a simple whip stitch (pass the needle over the edge of both pieces and back through, working small even stitches). Keep the stitches loose enough that the fabric does not pucker.
Weaving in ends: Thread each yarn tail onto your tapestry needle. Turn the slipper inside out and sew the tail back and forth through the inside of the fabric for about 1 inch (2.5 cm), changing direction once or twice so it cannot pull loose. Trim the tail close to the fabric. Do this for every tail on both slippers.
Blocking: Lightly steam block each slipper. Hold a steam iron a few inches above the fabric (never press the iron directly onto the stitches) and let the steam relax the yarn. Gently pat the slipper into shape with your hands, smoothing the sole flat and easing the cuff into a neat circle. Let it dry completely before wearing. This step makes the stitches even and gives the slippers their polished, cloud-soft look.
Optional non-slip sole: To make the slippers safer on smooth floors, apply a few lines of fabric paint or a suede patch to the bottom of each sole. Let it dry fully before use.
Pro Tips and Variations
- Change colors for a personal touch: Work the sole in one color and the upper foot and cuff in another, joining the new color at the start of the Upper Foot Round 1. You can also add a contrasting stripe every few rounds of the cuff.
- Adjust the size: To make a larger or smaller slipper, add or remove chains in the Sole setup in multiples of 3 (for example, ch 18 or ch 30 instead of 21), then keep the increase pattern the same. Always check your gauge and try the slipper on as you go.
- Substitute yarn: Any Fine (2) weight yarn will work, but choose one that is soft and slightly elastic. A wool or wool-blend yarn gives warmth and bounce; a cotton blend is cooler and more washable. Avoid stiff or scratchy yarns for footwear.
- Make a taller cuff or a folded brim: Continue working even single crochet rounds after Round 12 for a taller bootie-style cuff, or work a few extra rounds and fold them over for a cozy rolled brim.