Free Pattern: Valley Fold Crochet Ear Warmer in Moss & Lichen Bulky Wool
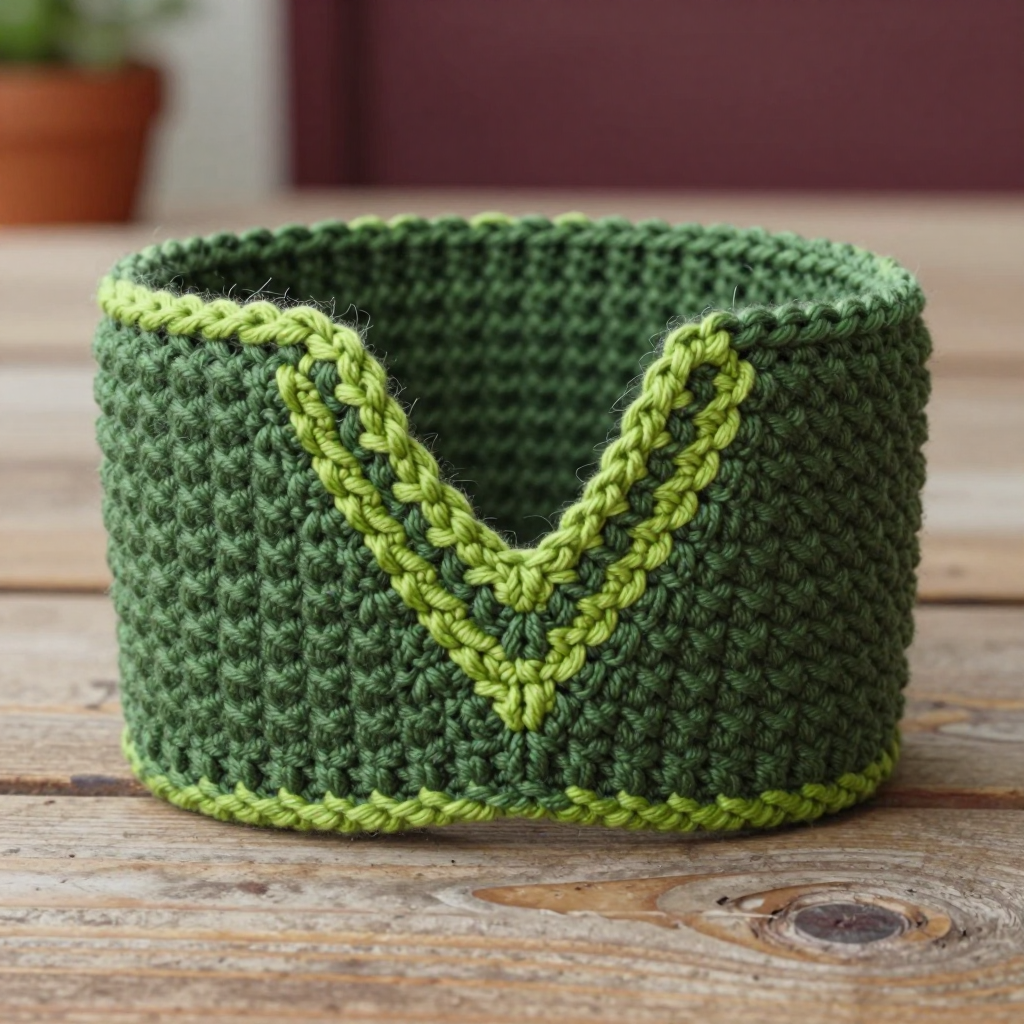
Valley Fold Crochet Ear Warmer in Moss & Lichen Bulky Wool
Introduction
If you have never held a crochet hook before, this is the perfect first project for you. The Valley Fold Ear Warmer is a simple rectangular tube worked in a friendly, repeating v-stitch pattern, then seamed into a cozy loop that slips over your head and hugs your ears. What makes it special is one single row of deeper v-stitches in a contrasting lichen green at the center front — it pulls the fabric into a gentle V-shaped dip that looks just like a mountain valley, giving the piece its vintage 1970s autumn feel. The finished warmer is about 20 inches around and 3.5 inches tall, made from squishy bulky wool that feels warm, woolly, and soft against your skin, with a muted moss-green base and earthy lichen highlights. You only need one skein of main color, a scrap of contrast color, and a few basic skills to make something you will actually wear all season.
Materials Needed
- Yarn: Bulky (weight 5) wool yarn, approximately 120–140 yd (110–130 m) total. You need 1 skein moss green (MC) and a small amount of lichen green (CC) for the fold row and edging.
- Crochet hook: Size J/10 (6.0 mm), or whatever size you need to match the gauge below.
- Stitch markers: At least 2, to mark the beginning of rows and the center front.
- Tapestry needle: A large blunt needle with an eye big enough for bulky yarn, for seaming and weaving in ends.
- Scissors: Any sharp pair for cutting yarn.
- Measuring tape: For checking gauge and finished size.
- Finished size: Approximately 20 in (51 cm) circumference, unstretched, and 3.5 in (9 cm) tall. This fits a 21–23 in (53–58 cm) head with 1–3 in of negative ease (meaning it stretches slightly to hug the head).
Abbreviations and Beginner Glossary
Every abbreviation used in this pattern is explained here in plain English. Read through this list once before you begin — no prior knowledge is assumed.
- ch – chain. Make a loop with the yarn, then pull a new loop through it. Each loop you pull through is one chain. Chains form your foundation.
- sc – single crochet. Insert your hook into the stitch, pull up a loop (2 loops on hook), yarn over (wrap yarn around hook), pull through both loops. One loop remains.
- dc – double crochet. Yarn over, insert hook into the stitch, pull up a loop (3 loops on hook), yarn over, pull through 2 loops (2 loops remain), yarn over, pull through the last 2 loops. One loop remains.
- v-st – v-stitch. Work (dc, ch 1, dc) all into the same stitch or space. This makes a little "V" shape.
- deep-v – deep v-stitch. Work (dc, ch 2, dc) all into the same stitch or space. It is like a v-stitch but with a wider gap, which creates the valley dip.
- sl st – slip stitch. Insert hook into the stitch, yarn over, and pull the yarn through both the stitch and the loop on your hook at the same time. It joins without adding height.
- st(s) – stitch or stitches.
- sp – space. The little gap made by a chain, such as the ch-1 space inside a v-stitch.
- MC – main color (moss green).
- CC – contrast color (lichen green).
- RS – right side. The side of the fabric that faces out when worn.
- turn – flip your work over so you can crochet back the other way.
- rep – repeat. Do the instruction again.
- approx. – approximately (about).
Gauge
Gauge: 12 sts and 7 rows = 4 in (10 cm) in the v-stitch pattern. One v-stitch counts as 2 stitches.
Gauge matters because it tells you whether your finished warmer will actually fit. If your stitches are too big, the band will be loose and slide off; if they are too small, it will be tight and uncomfortable. To check your gauge, crochet a small practice swatch: chain 21, then work Row 1 and Row 2 of the pattern below a few times until your swatch is about 4 inches tall. Lay it flat, measure 4 inches across the middle, and count how many stitches and rows you get. If you have more stitches than 12, try a larger hook; if you have fewer, try a smaller hook. Wash and dry your swatch the way you plan to care for the finished warmer, because wool can change size slightly after blocking.
Beginner Tips Before You Start
- Count your v-stitches every row. You should always have 30 v-stitches. If you lose one, the edges will slant. Count before you turn.
- Use a stitch marker. Place one in the first stitch of each row and one at the center front so you always know where the valley fold belongs.
- Do not pull your yarn too tight. Bulky wool needs a relaxed hand. If your hook squeaks or the stitches feel stiff, loosen your grip — tight stitches make the band too small.
- Work the chains loosely. The ch-1 inside each v-stitch should be big enough to fit your hook into easily on the next row.
- Keep the contrast row in the middle. The deep-v row in CC is Row 5 of 10, so it naturally sits at the center. If you add or remove rows, keep it centered.
- Practice the two stitches first. Make a tiny practice square of dc and v-stitch before starting the real piece. Ten minutes of practice saves an hour of fixing.
Step-by-Step Instructions
This ear warmer is worked flat as a rectangle in rows, then seamed into a tube. All stitches are worked in US terms. The piece is 10 rows tall and 30 v-stitches wide.
Set-Up and Body
Set-Up: With MC, ch 61.
Row 1 (RS): Dc in the 4th ch from hook (this counts as the first dc of a v-stitch), ch 1, dc in the same ch, *skip the next ch, work a v-st in the next ch; rep from * across to the last ch, skip the last ch, dc in the final ch, turn. (30 v-sts)
Row 2: Ch 3 (counts as the first dc), dc in the first st, *work a v-st in the next ch-1 sp; rep from * across, ending with a dc in the top of the turning ch, turn. (30 v-sts)
Rows 3–4: Repeat Row 2 twice more in MC. (30 v-sts)
Valley Fold Row
Row 5 (Valley Fold Row, CC): Change to CC. Ch 3, dc in the first st, *work a deep-v in the next ch-1 sp; rep from * across, ending with a dc in the top of the turning ch, turn. (30 deep-v sts)
This is the row that creates the mountain-valley dip at the center front. The wider ch-2 gaps pull the fabric into a soft V shape.
Upper Body
Rows 6–9: Change back to MC. Repeat Row 2 four times. (30 v-sts)
Row 10: Repeat Row 2 once more in MC. Do not fasten off. (30 v-sts)
You now have a rectangle 10 rows tall and 30 v-stitches wide, with the CC deep-v row sitting exactly in the middle at Row 5.
Edging
Round 1: Ch 1, work sc evenly around the entire outer edge of the rectangle — about 1 sc per row along the short sides and 1 sc per stitch along the long sides — then join with a sl st to the first sc. Fasten off, leaving a 12 in (30 cm) tail. (Approx. 80 sc total)
Tip: along the long sides, work one sc into each dc and one sc into each ch-1 space so the edge stays flat and does not ruffle.
Assembly and Finishing
Step 1 — Seam the tube. Fold the rectangle in half with right sides together so the two short ends meet, aligning Row 1 with Row 10. Thread your tapestry needle with the long tail and whipstitch (or sl st) the short ends together to form a tube. Whipstitching means passing the needle through the edge stitches of both layers in a simple over-and-over motion. Be careful not to twist the band as you join.
Step 2 — Turn right side out. Turn the tube right side out so the seam is hidden inside. The CC deep-v row should sit at the center front, creating the valley dip.
Step 3 — Weave in ends. Thread each yarn tail onto the tapestry needle and run it through the inside of several stitches, changing direction once so it cannot work loose. Trim close to the fabric.
Step 4 — Block lightly. Mist the warmer with cool water until slightly damp. Shape the valley fold with your fingers, gently stretching the band to about 20 inches around. Lay it flat to dry. Do not press it flat with an iron — you want to keep the textured v-stitch and the dip.
Pro Tips and Variations
- Change the colors. Try a charcoal base with a rust fold row for a deeper autumn look, or cream with sage for a softer vintage feel. Any bulky wool works beautifully.
- Adjust the size. To change the circumference, add or subtract 2 chains for every 1 inch (2.5 cm) of width change — each v-stitch measures about 0.67 in (1.7 cm). To change the height, add or remove Row 2 repeats in pairs so the CC row stays centered.
- Substitute the yarn. If you cannot find bulky wool, hold two strands of worsted (weight 4) yarn together and swatch again to check gauge. A wool-blend or alpaca blend will feel even softer.
- Make it reversible. Work the seam with a flat sl st join instead of a whipstitch so the band looks neat from both sides, and wear the valley fold at the back for a second look.


