Evergreen Embrace Wreath Free Pattern – A Knitted Nordic Star Garland
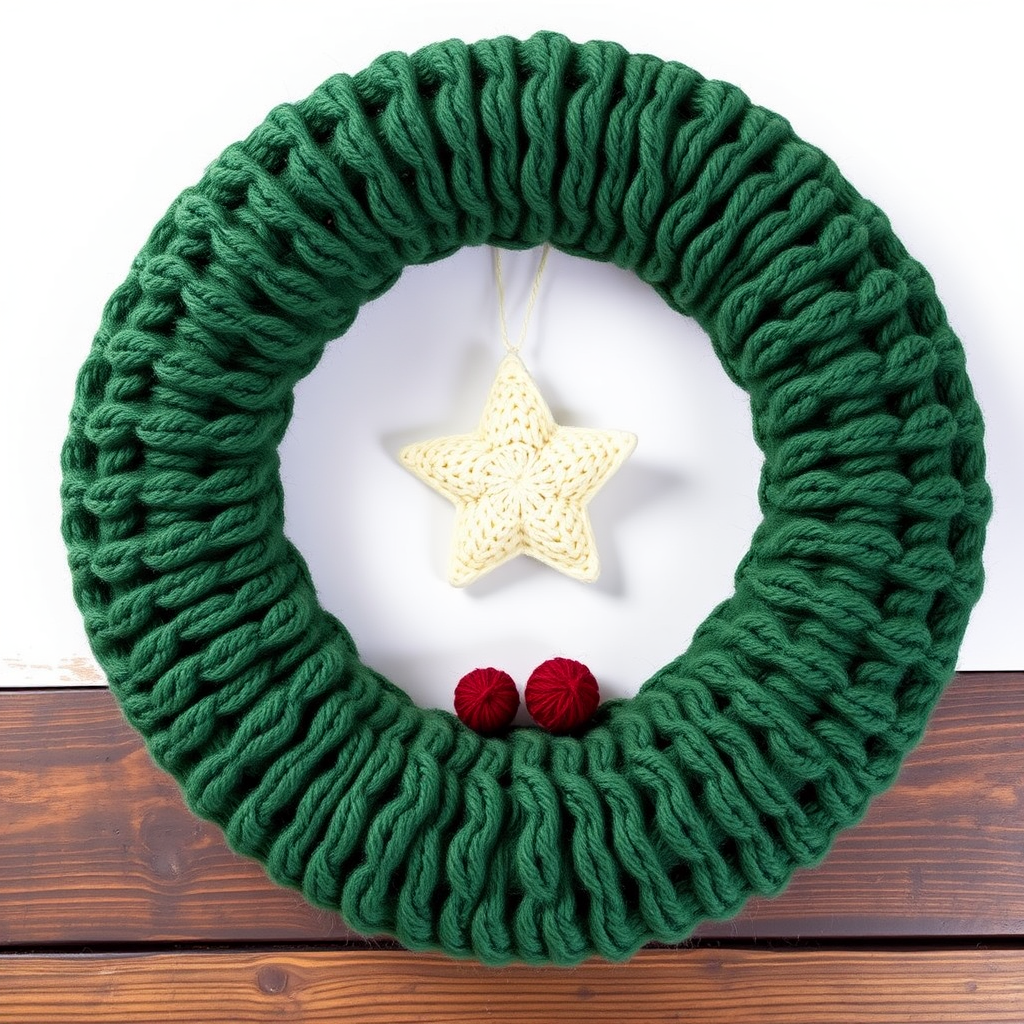
Evergreen Embrace Wreath: A Knitted Nordic Star Garland
Wrap your front door in the cozy, heirloom-quality charm of a Nordic winter with the Evergreen Embrace Wreath. This free knitting pattern creates a lush, textured wreath featuring a radiant cream star and burgundy berry accents. Unlike traditional pine wreaths, this handmade garland is soft, plush, and built to last for generations. Whether you're a seasoned knitter or a confident beginner looking for a rewarding holiday project, this pattern delivers a stunning piece of decor that captures the essence of Scandinavian hygge.
In this comprehensive guide, I'll walk you through every step—from casting on to the final hanging loop—so you can create a wreath that looks like it came straight from a cozy winter cabin. Let's dive in!
Materials Needed
Before you begin, gather the following supplies. All yarn amounts are approximate and based on the pattern's specifications.
Yarn
- Forest Green (Main Body): Worsted weight yarn, approximately 250 yards. This forms the lush base of the wreath.
- Cream (Star Motif): Worsted weight yarn, approximately 100 yards. This creates the radiant five-pointed star.
- Burgundy (Berries): Worsted weight yarn, approximately 50 yards. These small spheres add a festive pop of color.
Tools & Notions
- Knitting Needles: US 7 (4.5 mm) straight needles.
- Tapestry Needle: For seaming, weaving in ends, and attaching embellishments.
- Scissors: For cutting yarn.
- Stitch Markers (optional): Helpful for tracking rows during the shaping sections.
Gauge
20 stitches and 26 rows = 4 inches in stockinette stitch. While gauge isn't critical for a decorative wreath, maintaining consistent tension will ensure your two crescents match perfectly and the final ring lies flat.
Step-by-Step Instructions
This wreath is constructed in three main stages: knitting the base crescents, creating the star and berries, and assembling everything into a finished ring. Follow each step carefully, and you'll have a beautiful wreath in no time.
Part 1: Knit the Base Wreath (Make 2 Identical Halves)
The base of the wreath is formed by knitting two identical crescent shapes. These are then seamed together to create a full ring with a hollow center. Let's start with the first crescent.
Cast On & Main Body
Using your forest green yarn and US 7 needles, cast on 40 stitches.
- Row 1 (Right Side): Knit all stitches.
- Row 2 (Wrong Side): Purl all stitches.
Repeat Rows 1 and 2 for a total of 60 rows, or until your piece measures approximately 15 inches long. This rectangular section will form the outer circumference of the wreath ring. Keep your tension even—this is the visible surface of your wreath, so smooth stockinette stitch is key.
Shape the Inner Curve
Now we'll begin decreasing to create the crescent shape. This section will form the inner edge of the wreath, giving it that hollow center.
- Row 61 (RS): K2tog (knit two together), knit to the last 2 stitches, K2tog. (You now have 38 stitches.)
- Row 62 (WS): Purl all stitches.
Repeat Rows 61 and 62 until you have 20 stitches remaining. This will take approximately 10 decrease rows (20 rows total). Your piece will now have a noticeable taper on one edge.
Shape the Outer Curve
This next section builds out the opposite side of the crescent, creating the fullness of the wreath. You'll knit straight (no decreases) to widen the piece back out.
- Row 81 (RS): Knit all stitches.
- Row 82 (WS): Purl all stitches.
Repeat Rows 81 and 82 for 30 rows. After completing these rows, bind off loosely. Your first crescent is complete!
Repeat this entire process to create a second identical crescent. Take your time to ensure both pieces are the same size and shape—this is crucial for a symmetrical wreath.
Part 2: Seam the Crescents Together
Now it's time to transform your two crescents into a circular wreath base.
- Place the two crescents together with their right sides facing each other. The curved edges should align.
- Thread your tapestry needle with a length of forest green yarn (about 18 inches).
- Using a whip stitch, sew along the curved edges of both crescents. Start at one end and work your way around the entire curve.
- Leave the straight edges open—these will form the inner and outer circumferences of your wreath ring.
- Once seamed, turn the piece right side out. You should now have a ring shape with a hollow center. The stockinette stitch should be facing outward, showing the smooth "V" pattern.
Gently shape the ring with your hands to ensure it lies flat and forms a perfect circle. Set this aside while you knit the embellishments.
Part 3: Knit the Star Motif
The star is the centerpiece of this wreath. It's made from five identical knitted points that are sewn together at the base. Using your cream yarn, follow these steps.
Knit One Star Point (Make 5)
Cast on 5 stitches with cream yarn.
- Row 1 (RS): Knit all stitches.
- Row 2 (WS): Purl all stitches.
- Row 3: K1, K2tog, K2. (4 stitches remain.)
- Row 4: Purl all stitches.
- Row 5: K1, K2tog, K1. (3 stitches remain.)
- Row 6: Purl all stitches.
- Row 7: K1, K2tog. (2 stitches remain.)
- Row 8: Purl all stitches.
- Row 9: K2tog. (1 stitch remains.)
Cut the yarn, leaving a 6-inch tail. Thread the tail through the remaining stitch and pull tight to secure. This creates one triangular point of the star.
Make 5 identical points total.
Assemble the Star
- Lay out your five points so they radiate from a central point, evenly spaced (like a five-pointed star).
- Using your tapestry needle and the yarn tails from each point, sew the points together at their bases. Overlap the bases slightly and stitch through all layers to secure them firmly.
- Weave in all loose ends on the back of the star.
Your cream star is now ready to be attached to the wreath.
Part 4: Knit the Berries (Make 5)
These tiny spheres add a festive, holly-like touch. Using your burgundy yarn, follow these simple steps.
Knit One Berry
Cast on 6 stitches with burgundy yarn.
- Row 1 (RS): Knit all stitches.
- Row 2 (WS): Purl all stitches.
- Row 3: K2tog across all stitches. (3 stitches remain.)
Cut the yarn, leaving a 10-inch tail. Thread the tail through a tapestry needle, then thread it through the remaining 3 stitches. Pull tight to gather the stitches into a ball shape.
To close the berry, use the same tail to sew the opening closed at the top of the sphere. Take a few small stitches through the gathered edge, pull tight, and secure. Weave in the end.
Make 5 berries total.
Part 5: Assembly & Finishing
Now for the fun part—bringing all your pieces together to create the finished wreath.
Attach the Star
- Position the cream star in the center of the wreath ring, on the front side. The star should sit within the hollow center, with its points extending slightly onto the green base if desired.
- Using a tapestry needle and matching cream thread or a strand of cream yarn, sew the star securely to the wreath. Take small, hidden stitches through the back of the star and into the green fabric. Sew at each point and at the center to ensure it's firmly attached.
Attach the Berries
- Arrange the five burgundy berries around the star, spacing them evenly. A classic placement is one berry at each "valley" between the star's points.
- Using a tapestry needle and burgundy yarn, sew each berry in place. Take a stitch through the base of the berry, into the wreath, and back through the berry. Repeat a few times to secure it firmly, then weave in the ends.
Create the Hanging Loop
- Cut a 12-inch piece of forest green yarn.
- Fold the yarn in half to create a loop.
- Thread the folded loop through the top of the wreath (between the stitches) from front to back.
- Pull the two loose ends through the loop and tighten. This creates a sturdy hanging loop.
- Weave in all remaining loose ends throughout the wreath using your tapestry needle.
Final Thoughts & Styling Tips
Congratulations! Your Evergreen Embrace Wreath is complete. The combination of deep forest green, crisp cream, and rich burgundy creates a timeless Nordic aesthetic that will elevate any doorway, mantel, or wall space.
Because this wreath is knitted, it's incredibly durable and can be stored flat or rolled for next year. It also makes a thoughtful, handmade gift for friends and family. Consider adding a subtle ribbon bow at the bottom or a few tiny jingle bells for extra holiday cheer.
I'd love to see your finished wreath! Share your photos in the comments below or tag me on social media. Happy knitting, and may your home be filled with cozy, handmade warmth this holiday season.


