Cascading Vine Mesh Placemat Free Pattern – Knit a Botanical Table Accent
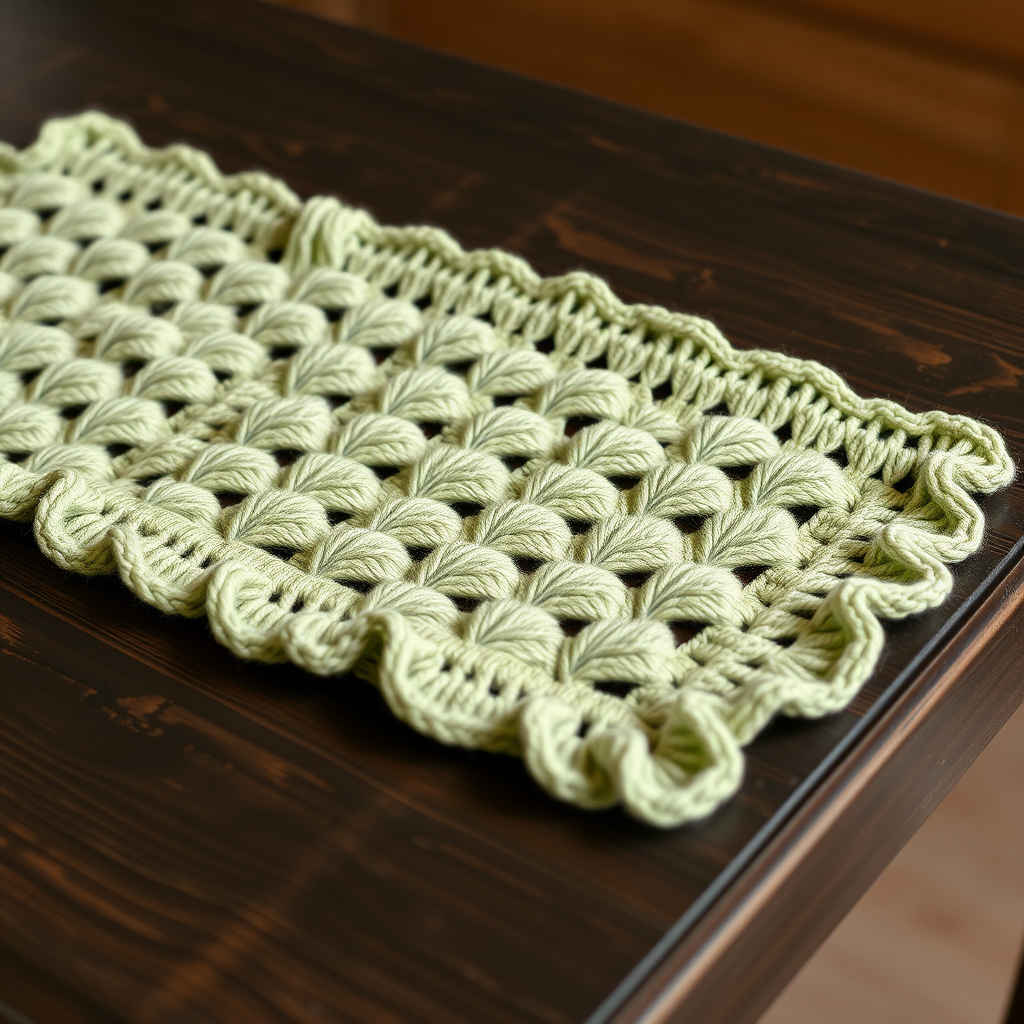
Bring Botanical Beauty to Your Table with the Cascading Vine Mesh Placemat
Imagine setting your dinner table with a touch of wild elegance—a handcrafted placemat that weaves together the serenity of a forest floor with the sophistication of fine dining. The Cascading Vine Mesh Placemat is exactly that: a stunning knitted accessory featuring an intricate lattice of leaf motifs and airy openwork stitches. Crafted in a soft, earthy palette of sage green and cream, this placemat transforms any meal into an organic, cozy experience. Whether you're an intermediate knitter looking for a rewarding project or a home decor enthusiast seeking a unique handmade touch, this free pattern will guide you through creating a botanical masterpiece that's both functional and beautiful.
This pattern is perfect for those who love texture and detail. The mesh body, worked in a repeating leaf-like pattern, is both visually striking and practical—the openwork allows heat to escape while protecting your table. The cream-colored scalloped border adds a delicate, ruffled finish that mimics overlapping leaves, giving the placemat a handcrafted, heirloom quality. Best of all, it's a free pattern that uses readily available worsted weight cotton yarn, making it an accessible project for knitters ready to elevate their skills.
Materials Needed for Your Botanical Placemat
Before you begin, gather the following materials. Using the specified yarn weight and needle size ensures your gauge matches and your placemat turns out the perfect size.
Yarn
- Main Color (MC): Worsted weight cotton yarn (e.g., Lion Brand Kitchen Cotton) in Sage Green – approximately 150g
- Contrast Color (CC): Worsted weight cotton yarn in Cream – approximately 50g
Cotton yarn is ideal here because it's durable, washable, and holds its shape beautifully for table linens. The natural fiber also enhances the botanical, organic aesthetic.
Needles & Notions
- Knitting Needles: US 7 (4.5 mm) – straight or circular (if you prefer, a circular needle can accommodate the large stitch count comfortably)
- Stitch markers (optional, but helpful for tracking pattern repeats)
- Tapestry needle for weaving in ends
- Blocking mats and pins (for finishing)
Gauge
20 stitches and 28 rows = 4 inches in stockinette stitch. Always knit a gauge swatch before starting to ensure your finished placemat measures approximately 14 x 19 inches. Adjust needle size if necessary to achieve the correct gauge.
Step-by-Step Instructions: Knitting the Cascading Vine Mesh Placemat
This pattern is worked flat, back and forth. The mesh pattern is a multiple of 6 + 1 stitches, which creates the repeating leaf lattice. Follow the instructions carefully, and you'll be amazed at how quickly the intricate pattern emerges.
Special Stitches & Abbreviations
- Yo: Yarn over – bring the yarn to the front, then over the needle to create a new loop (creates an eyelet hole).
- K2tog: Knit two stitches together – a right-leaning decrease.
- Ssk: Slip, slip, knit – slip two stitches knitwise one at a time, then knit them together through the back loop. This is a left-leaning decrease.
- Kfb: Knit front and back – knit into the front of the stitch, then without removing it from the left needle, knit into the back of the same stitch. This increases one stitch.
- Sl1: Slip one stitch purlwise (not used in this pattern, but good to know for other projects).
Pattern Notes
- The placemat is worked from the bottom up, starting with the main mesh body in Sage Green (MC).
- After the body reaches 12 inches, you'll switch to Cream (CC) for the decorative leaf border.
- Always end the mesh body with a wrong-side (WS) row before starting the border.
Step 1: Cast On and Begin the Mesh Body
Using your Sage Green (MC) yarn, make a slip knot and cast on 85 stitches using your preferred method (long-tail cast on works well).
Row 1 (Right Side - RS): Knit all stitches. This establishes the bottom edge.
Row 2 (Wrong Side - WS): Purl all stitches.
Step 2: Work the Mesh Pattern
Now you'll begin the repeating mesh pattern. This is where the magic happens—the yarn overs and decreases create the beautiful leaf-like lattice.
Row 3 (RS): K1, *yo, ssk, k1, k2tog, yo, k1; repeat from * to end. (You'll end with a knit stitch after the last repeat.)
Row 4 (WS): Purl all stitches.
Row 5 (RS): K2, *yo, ssk, k1, k2tog, yo, k1; repeat from * to last 2 stitches, yo, ssk. (Notice how the pattern shifts slightly to create the staggered vine effect.)
Row 6 (WS): Purl all stitches.
Row 7 (RS): K1, *k2tog, yo, k1, yo, ssk, k1; repeat from * to end. (This row reverses the decreases to form the leaf shape.)
Row 8 (WS): Purl all stitches.
Row 9 (RS): K2, *k2tog, yo, k1, yo, ssk, k1; repeat from * to last 2 stitches, k2tog, yo.
Row 10 (WS): Purl all stitches.
Repeat Rows 3-10 until the piece measures 12 inches from the cast-on edge. Be sure to end with a WS row (a purl row) so you're ready to start the border on the right side.
Pro Tip: Place a stitch marker after every 6-stitch repeat on Row 3 to help you keep track of your place. If you lose count, look for the yarn-over holes—they should form a clear zigzag pattern.
Step 3: Create the Leaf Border
Now it's time to switch to your Cream (CC) yarn. This border adds a beautiful scalloped, leaf-like edge that frames the mesh body perfectly.
Row 1 (RS): With CC, K1, *kfb, k1; repeat from * to last 2 stitches, kfb, k1. (This increases your stitch count to 127 stitches to create the fullness needed for the ruffled border.)
Row 2 (WS): Purl all stitches.
Row 3 (RS): K1, *yo, k2tog; repeat from * to end. (This creates a row of eyelets that will form the base of the scallops.)
Row 4 (WS): Purl all stitches.
Row 5 (RS): K1, *k2tog, yo; repeat from * to end. (This offsets the eyelets for a more organic look.)
Row 6 (WS): Purl all stitches.
Row 7 (RS): Knit all stitches.
Row 8 (WS): Purl all stitches.
Row 9 (RS): Knit all stitches.
Row 10 (WS): Purl all stitches.
Step 4: Bind Off
Bind off loosely in knit. To avoid a tight edge that pulls the border, use a larger needle for binding off if needed, or bind off with a yarn-over between stitches (bind off 1, yo, bind off 1, etc.) for extra stretch.
Step 5: Finishing Touches
Weave in all loose ends using your tapestry needle, being careful to hide them within the stitches so they're invisible from the right side.
Blocking is essential for this pattern. It opens up the mesh pattern, defines the leaf motifs, and flattens the scalloped border. Here's how:
- Soak the placemat in lukewarm water with a mild wool wash or gentle detergent for 15-20 minutes.
- Gently squeeze out excess water (do not wring or twist).
- Lay the placemat flat on blocking mats, gently stretching it to the finished dimensions of approximately 14 x 19 inches.
- Pin the edges, especially the scalloped border, to open up the points and create a crisp, even shape.
- Allow to dry completely, then unpin and enjoy your handcrafted masterpiece.
Tips for Perfect Results
- Count your stitches after each pattern row, especially in the first few repeats, to catch mistakes early.
- Keep your tension consistent—cotton yarn has less give than wool, so try to knit evenly.
- Blocking transforms this project. Don't skip it! The mesh will look flat and unimpressive until blocked, then it will bloom into the beautiful lattice you see in the photos.
- Make a set. Once you've mastered the pattern, consider knitting a matching set of four or six placemats for a complete tablescape.
The Cascading Vine Mesh Placemat is more than just a table accessory—it's a statement piece that brings the calm beauty of nature into your home. Whether you're hosting a dinner party or enjoying a quiet breakfast, this handcrafted placemat adds warmth, texture, and a touch of botanical charm to every meal. Happy knitting!


