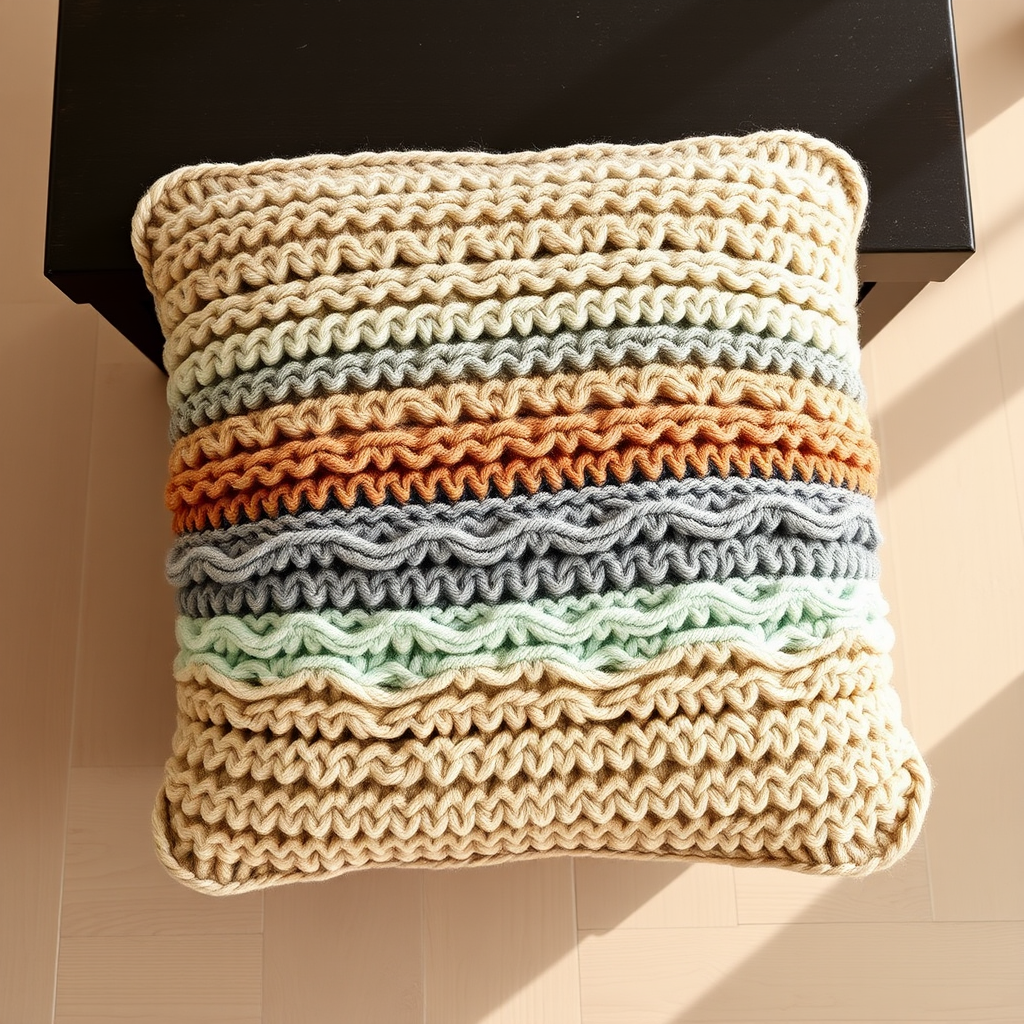
Aurora Borealis Chunky Throw Pillow Free Pattern – Knit a Northern Lights Dream

Bring the Magic of the Northern Lights Into Your Living Room
Imagine curling up on your sofa, surrounded by the cozy glow of a handmade throw pillow that captures the swirling, ethereal beauty of the aurora borealis. With this free knitting pattern, you can transform simple chunky yarn into a stunning piece of textured home decor. The Aurora Borealis Chunky Throw Pillow uses a clever color-blocking technique and a mix of knit stitches to create a gradient effect that feels both modern and dreamy. Whether you're an experienced knitter looking for a quick weekend project or a beginner ready to tackle your first home decor piece, this pattern is designed to be accessible, rewarding, and absolutely gorgeous.
This pillow isn't just a craft project—it's a statement piece. The deep midnight blue base transitions through teal, emerald, and lavender, mimicking the celestial dance of the Northern Lights. The subtle eyelet rows and seed stitch bands add tactile interest, making it as delightful to touch as it is to look at. Best of all, it's knitted flat in one piece, then folded and seamed, so there's no complicated circular knitting or shaping involved. Let's dive in and create something magical.
Materials Needed
Before you begin, gather the following supplies. Using the exact yarn weight and needle size is crucial to achieving the correct gauge and the plush, oversized texture that makes this pillow so special.
Yarn
You will need super bulky weight yarn (size 6) in four colors. For the best aurora effect, choose shades that blend harmoniously:
- Midnight Blue (MC): Approximately 250 grams (this is your main color for the base and top sections).
- Teal (CC1): Approximately 100 grams (for the first swirl section).
- Emerald Green (CC2): Approximately 100 grams (for the transition section).
- Lavender (CC3): Approximately 100 grams (for the glowing center section).
Needles & Tools
- US 13 (9 mm) circular knitting needles with a 24-inch cable. The long cable is perfect for holding all 40 stitches comfortably, even if you're not knitting in the round.
- Tapestry needle for weaving in ends and seaming the pillow together.
- Scissors.
- Stitch markers (optional, but helpful for keeping track of your sections).
- 16-inch square pillow form or fiberfill stuffing.
Gauge
To ensure your pillow is the correct size, it's essential to match the gauge: 8 stitches and 12 rows = 4 inches in stockinette stitch (knit on the right side, purl on the wrong side) with yarn held double. If your gauge is off, your pillow may end up too small or too large. Always knit a swatch first to check your tension.
Step-by-Step Instructions
This pattern is knitted flat in one rectangular piece, then folded and seamed. The color changes create a symmetrical gradient, with the lavender section at the center. Follow the steps carefully, and don't forget to check off each row as you go.
Abbreviations
- K: Knit
- P: Purl
- St(s): Stitch(es)
- RS: Right side (the front of the work)
- WS: Wrong side (the back of the work)
- MC: Main Color (Midnight Blue)
- CC1: Contrast Color 1 (Teal)
- CC2: Contrast Color 2 (Emerald Green)
- CC3: Contrast Color 3 (Lavender)
- K2tog: Knit two stitches together (decrease)
- YO: Yarn over (increase, creates a hole/eyelet)
Cast On
With your Midnight Blue (MC) yarn, cast on 40 stitches loosely. A loose cast-on is crucial here, as it will form the bottom edge of your pillow and needs to be flexible. You can use the long-tail cast-on method, but be sure not to pull the yarn too tight.
Section 1: Midnight Base (Rows 1-10)
This section forms the deep, dark base of the aurora, grounding the pillow in a rich midnight hue.
- Rows 1-10: Work in stockinette stitch. This means you will Knit (K) all stitches on the right side (RS) and Purl (P) all stitches on the wrong side (WS). Repeat this for 10 rows total.
Section 2: Teal Swirl (Rows 11-20)
Now we introduce the first hint of color and texture with the teal yarn.
- Row 11 (RS): Switch to Teal (CC1). Knit all stitches.
- Row 12 (WS): Purl all stitches.
- Row 13 (RS): This is the eyelet row. K1, then repeat *K2tog, Yarn Over (YO)* across the row until you have one stitch left, and K1. This creates a delicate, lacy pattern that mimics the shimmer of the lights.
- Rows 14-20: Return to plain stockinette stitch (K on RS, P on WS) for these 7 rows.
Section 3: Emerald Transition (Rows 21-30)
The emerald green adds a lush, vibrant middle tone to the gradient.
- Row 21 (RS): Switch to Emerald Green (CC2). Knit all stitches.
- Row 22 (WS): Purl all stitches.
- Row 23 (RS): This is the seed stitch row. Repeat *K1, P1* across the entire row. This creates a bumpy, textured fabric.
- Row 24 (WS): Repeat *P1, K1* across the row. This offsets the previous row to create the seed stitch pattern.
- Rows 25-30: Return to plain stockinette stitch (K on RS, P on WS) for these 6 rows.
Section 4: Lavender Glow (Rows 31-40)
This is the heart of the aurora—the bright, glowing center of the pillow.
- Row 31 (RS): Switch to Lavender (CC3). Knit all stitches.
- Row 32 (WS): Purl all stitches.
- Row 33 (RS): Create another eyelet row. K1, then repeat *K2tog, YO* until the last stitch, and K1.
- Rows 34-40: Continue in plain stockinette stitch (K on RS, P on WS) for these 7 rows.
Section 5: Emerald Return (Rows 41-50)
We now begin the journey back down the gradient, mirroring the colors on the other side of the pillow.
- Row 41 (RS): Switch back to Emerald Green (CC2). Knit all stitches.
- Row 42 (WS): Purl all stitches.
- Row 43 (RS): Repeat *K1, P1* across the row for the seed stitch texture.
- Row 44 (WS): Repeat *P1, K1* across the row.
- Rows 45-50: Return to plain stockinette stitch (K on RS, P on WS) for these 6 rows.
Section 6: Teal Swirl Return (Rows 51-60)
Bringing back the teal to complete the swirl effect.
- Row 51 (RS): Switch back to Teal (CC1). Knit all stitches.
- Row 52 (WS): Purl all stitches.
- Row 53 (RS): Create the eyelet row again. K1, then repeat *K2tog, YO* until the last stitch, and K1.
- Rows 54-60: Continue in plain stockinette stitch (K on RS, P on WS) for these 7 rows.
Section 7: Midnight Base Return (Rows 61-70)
Finish the piece with the deep midnight blue, mirroring the beginning.
- Row 61 (RS): Switch back to Midnight Blue (MC). Knit all stitches.
- Rows 62-70: Continue in plain stockinette stitch (K on RS, P on WS) for these 9 rows.
Bind Off
On the right side (RS), bind off all stitches loosely. A loose bind-off is just as important as a loose cast-on, as it will form the top edge of your pillow opening. You can use a standard bind-off but work it very loosely, or use a stretchy bind-off method like "bind off in pattern" or "Jeny's surprisingly stretchy bind-off" for extra give.
Finishing: Assembling Your Pillow
Now that your knitted rectangle is complete, it's time to transform it into a plush pillow. This is where the magic happens.
Step 1: Fold the Rectangle
Lay your knitted piece flat with the right side (RS) facing out. Fold it in half, bringing the cast-on and bind-off edges together. The fold will naturally fall at the center of the lavender section, creating a symmetrical design. Your piece should now be a square, with the two side edges meeting.
Step 2: Seam the Sides
Thread your tapestry needle with a length of Midnight Blue (MC) yarn. Starting at the fold (the bottom of the pillow), use a whip stitch to seam the two side edges together. Work your way up one side, then repeat on the other side. Leave the top edge (where the cast-on and bind-off edges meet) completely open for now.
Step 3: Insert the Pillow Form
Carefully turn the pillow cover right-side out if needed (it should already be right-side out). Insert your 16-inch square pillow form into the opening. If you're using fiberfill, stuff it generously to achieve a plush, firm shape. Make sure the corners are filled out nicely.
Step 4: Close the Top Edge
With your tapestry needle and MC yarn, whip stitch the top edge closed. Weave the yarn through the stitches securely, then tie off and weave in all loose ends with your tapestry needle. Make sure to weave in the ends from your color changes as well, tucking them neatly into the seams or the back of the work.
Step 5: Block and Fluff
To give your pillow a professional finish, gently steam block the seams and the textured areas. This will even out the stitches and enhance the eyelet and seed stitch patterns. Avoid pressing down too hard, as this can flatten the chunky yarn. Once dry, give your pillow a good fluff and place it on your sofa, bed, or favorite reading chair.
Congratulations! You've just created a stunning, one-of-a-kind Aurora Borealis Chunky Throw Pillow. This project is perfect for adding a pop of celestial color to any room, and it makes a thoughtful, handmade gift for a housewarming or holiday. Enjoy the cozy, dreamy ambiance you've crafted with your own two hands.