Woven Look Basketweave Cup Cozy Free Knitting Pattern
A Cozy Little First Project You'll Actually Use
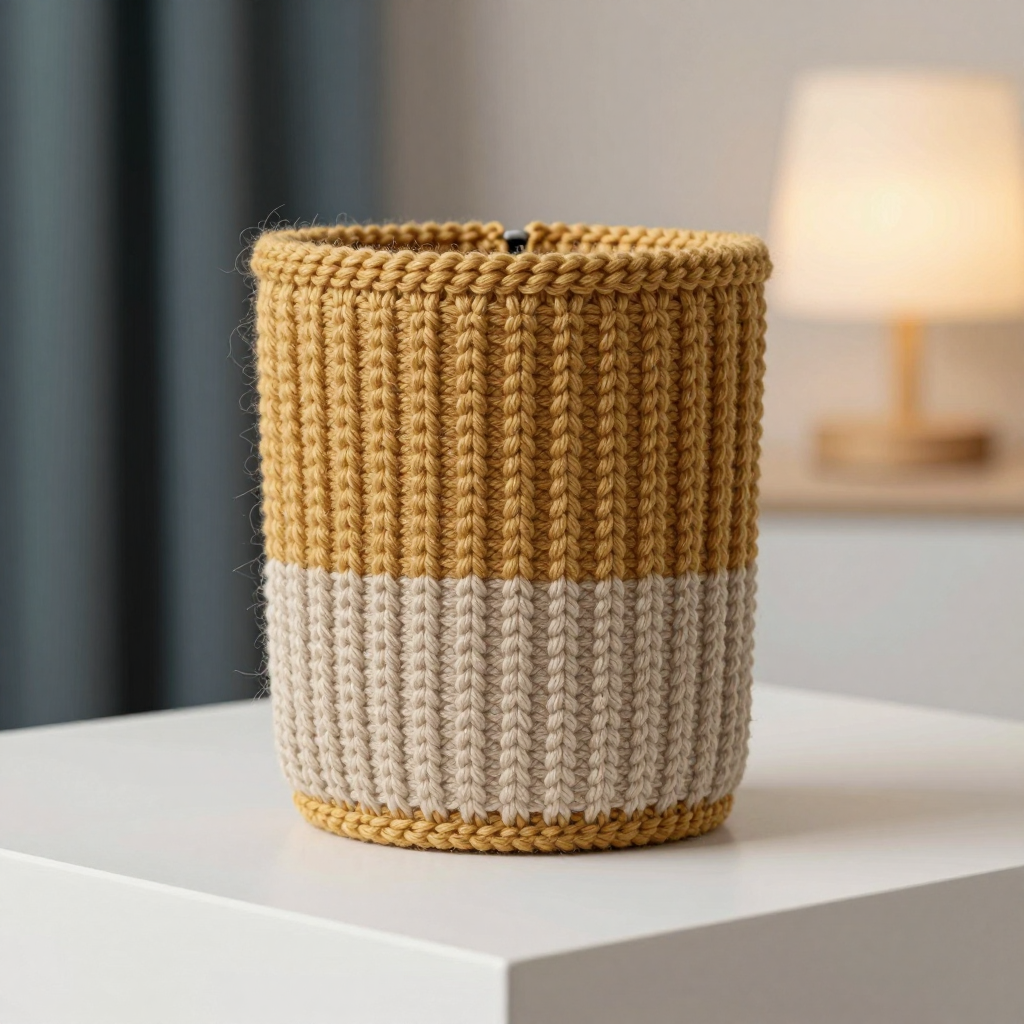
If you have never held knitting needles before, this Woven Look Basketweave Cup Cozy is the perfect place to start. It is a small, flat rectangle — no shaping, no sleeves, no complicated counting — that you knit back and forth and then seam into a simple tube. The finished cozy looks like a tiny woven basket wrapped around your favorite mug: soft, squishy, and warm, with raised squares that swap places every few rows to mimic the look of woven strips. Worked in a creamy warm oat and a mellow honey gold, it feels like a hug for your hands on a cold morning. Best of all, you can finish it in a single cozy evening, and you will have learned knit stitches, purl stitches, color changes, and seaming by the time you bind off.
Materials Needed
- Yarn: Worsted weight (CYC 4) wool or wool-blend yarn, approximately 55 yards total: 30 yards Color A (warm oat — a soft creamy beige) and 25 yards Color B (honey gold — a muted golden yellow). One standard skein of each is far more than you need, so this is a great scrap-busting project.
- Needles: US 7 (4.5 mm) straight knitting needles, or whatever size gives you the gauge below.
- Tapestry needle: A blunt-tipped yarn needle with a large eye, for seaming and weaving in ends.
- Stitch markers: 2 (optional but helpful for tracking the border stitches).
- Scissors: Any sharp pair for cutting yarn.
- Measuring tape or ruler: For checking gauge and finished size.
- Blocking supplies: A towel or blocking mat and a spray bottle of water (or a steam iron used carefully — see Finishing).
Finished size: Flat rectangle before seaming: 9 inches (23 cm) long x 3.25 inches (8.25 cm) wide. After seaming into a tube: approximately 3.25 inches (8.25 cm) tall x 2.75 inches (7 cm) in circumference, fitting a standard 12–16 oz disposable or ceramic cup.
Abbreviations and Beginner Glossary
Every abbreviation used in this pattern is listed below. Read through it once before you cast on — you do not need to memorize anything.
- K — knit stitch. With the yarn behind your work, insert the right needle into the front of the stitch on the left needle, wrap the yarn around the right needle, and pull a loop through. Slide the old stitch off.
- P — purl stitch. With the yarn in front of your work, insert the right needle into the front of the stitch from right to left, wrap the yarn, and pull a loop through to the back. Slide the old stitch off.
- St(s) — stitch or stitches (one loop on your needle).
- RS — right side. The "public" side of the fabric that will face outward on your finished cozy.
- WS — wrong side. The back side of the fabric, which will face the cup.
- * ... ; repeat from * — the instructions between the asterisks are repeated as many times as the pattern says.
- Garter stitch — knitting every stitch on every row. It creates a flat, ridged fabric that does not curl. Used here for the top and bottom borders.
- Stockinette stitch — knit on right-side rows, purl on wrong-side rows. It creates a smooth, flat "V" texture.
- Reverse stockinette — the opposite: purl on right-side rows, knit on wrong-side rows. It creates a bumpy texture.
- Cast on — creating the very first row of loops on your needle. This pattern uses the long-tail cast-on, a stretchy, tidy method; any beginner video will show it in two minutes.
- Bind off — the final row that "locks" your stitches so they cannot unravel. "Bind off knitwise" means you knit each stitch as you bind it off.
- Mattress stitch — an invisible seaming technique that joins two edges side by side with a ladder-like stitch. It is explained fully in the Finishing section.
- Weave in ends — threading your yarn tails onto the tapestry needle and hiding them inside the fabric.
- Block — dampening the finished piece and pinning it flat so it dries to its final size and the stitches even out.
Gauge
18 stitches and 26 rows = 4 inches (10 cm) in stockinette stitch, blocked.
Gauge simply means how big your stitches are. If your stitches are bigger than the pattern expects, your cozy will be too loose and slide off the cup; if they are smaller, it will be too tight to fit. To check, cast on about 25 stitches, knit a small square in stockinette (knit one row, purl one row, repeat) until it is at least 4 inches tall, then bind off. Lay it flat, place a ruler across the middle, and count how many stitches fit in 4 inches. If you have more than 18, your stitches are too small — try a larger needle. If you have fewer, try a smaller needle. A gauge swatch takes 20 minutes and saves you from a cozy that does not fit.
Beginner Tips Before You Start
- Count your stitches after every single row. You should always have 41 stitches. If you have 40 or 42, you accidentally dropped or added a stitch — fix it right away rather than discovering it later.
- Do not pull your yarn tight. Keep your tension relaxed and even. Tight stitches are hard to work into and make a stiff, scratchy cozy.
- Use stitch markers to mark the borders. Place a marker after the first stitch and before the last stitch of every row. Those two edge stitches are always knit, and the markers remind you where the basketweave blocks begin and end.
- Learn to "read" your stitches. A knit stitch looks like a smooth "V"; a purl stitch looks like a little bump. Once you can spot them, you will rarely need to check the pattern mid-row.
- Change colors on a wrong-side row if you can. Here the change happens at the start of Row 33, a right-side row — simply drop Color A, pick up Color B, and give the yarn a gentle tug. Leave a 6-inch tail to weave in later.
- Do not fear mistakes. Wool is forgiving. If a stitch looks wrong, you can slide it off the needle, let it drop one row, and hook it back up with your needle — or simply unravel back to the start. Nobody's first project is perfect, and this one is small enough to redo.
Step-by-Step Instructions
Setup
With Color A (warm oat), cast on 41 stitches using the long-tail cast-on. (41 sts)
Lower Border (Color A)
Rows 1–4: Knit every stitch (garter stitch border). (41 sts)
Color Block 1 — Oat Basketweave (Color A)
The basketweave is made of 4-stitch-wide blocks: some are smooth (stockinette) and some are bumpy (reverse stockinette). Every 4 rows, the blocks swap places, which creates the woven look. The first and last stitch of every row are always knit — these are your neat edge stitches.
Row 5 (RS): K1, *K4, P4; repeat from * to last 8 sts, K4, K1. (41 sts)
Row 6 (WS): K1, *P4, K4; repeat from * to last 8 sts, P4, K1. (41 sts)
Rows 7–8: Repeat Rows 5–6 once more. (41 sts)
Row 9 (RS): K1, *P4, K4; repeat from * to last 8 sts, P4, K1. (41 sts)
Row 10 (WS): K1, *K4, P4; repeat from * to last 8 sts, K4, K1. (41 sts)
Rows 11–12: Repeat Rows 9–10 once more. (41 sts)
Rows 13–20: Repeat Rows 5–12 once more. (41 sts)
Rows 21–28: Repeat Rows 5–12 once more. (41 sts)
Rows 29–32: Repeat Rows 5–8 once more. (41 sts)
You have now worked 32 rows in Color A and the oat half of the cozy is complete.
Color Block 2 — Honey Basketweave (Color B)
Change to Color B (honey gold). The basketweave pattern continues exactly as before, but because the blocks shift every 4 rows, you begin this block on the "opposite" set of rows so the woven texture carries on seamlessly.
Rows 33–36: Repeat Rows 9–12. (41 sts)
Rows 37–44: Repeat Rows 5–12. (41 sts)
Rows 45–52: Repeat Rows 9–12. (41 sts)
Rows 53–56: Repeat Rows 5–8. (41 sts)
You have now worked 24 rows in Color B.
Upper Border (Color B)
Rows 57–60: Knit every stitch (garter stitch border). (41 sts)
Bind off all stitches knitwise on a right-side row. Cut the yarn, leaving a 6-inch tail, and pull it through the final loop to secure. (0 sts)
Total rows worked: 60. At the pattern gauge of 26 rows per 4 inches, 60 rows measures approximately 9 inches (23 cm) — exactly the length of the flat rectangle before seaming.
Assembly and Finishing
- Weave in the color-change ends first. Thread each yarn tail onto the tapestry needle and run it through the back of several stitches, then back through a few more in the opposite direction to lock it. Trim close to the fabric. Do this for the Color A tail at Row 33 and the Color B tail at the bind-off.
- Block the rectangle. Lightly dampen the piece with a spray bottle (or press it gently with a steam iron held just above the surface — never press the iron directly onto the wool). Pin it flat to 9 inches by 3.25 inches on a towel or blocking mat, patting the basketweave squares so they relax evenly. Let it dry completely. This step is what makes the woven texture look crisp and even.
- Fold and seam. Fold the rectangle in half with right sides together so the cast-on edge meets the bound-off edge. Thread Color A onto the tapestry needle. Using mattress stitch, join the two short side edges: bring the needle under the horizontal bar between the first and second stitch on one edge, then under the matching bar on the other edge, and pull gently. Work up the seam, always picking up the same bar on each side. Do not pull tight — the seam should be nearly invisible and slightly stretchy.
- Secure and weave in. Knot the seam tail loosely, run it through the inside of the seam, and weave it in as before. Trim.
- Turn right side out and slip the cozy onto a cup to check the fit. The garter borders should sit neatly at the top and bottom edges, and the seam should sit flat at the back.
Pro Tips and Variations
- Play with color blocks. Try three narrower stripes instead of two halves — for example, 20 rows oat, 20 rows honey, 20 rows oat. Simply change color at the row count you choose and keep the basketweave sequence going.
- Adjust the size. For a larger travel mug, add 8 stitches (one full basketweave block on each side) and add 8 rows to keep the proportions right. For a smaller espresso cup, remove 8 stitches and 8 rows. Always check gauge first so the math holds.
- Substitute yarn. Any worsted weight yarn works — acrylic is machine-washable and great for gifts, cotton gives a crisper, more defined basketweave, and a wool-alpaca blend is extra soft. Just swatch again, because different fibers knit up at different sizes.
- Make it a matching set. This cozy uses only about 55 yards, so one skein of each color makes several. Knit a stack in alternating color orders for handmade gifts, or add a small button and a loop of yarn at the seam for a decorative closure.