The Verdant Sovereign Crown Free Pattern – A Crocheted Tapestry of Leafy Lace and Berry Clusters
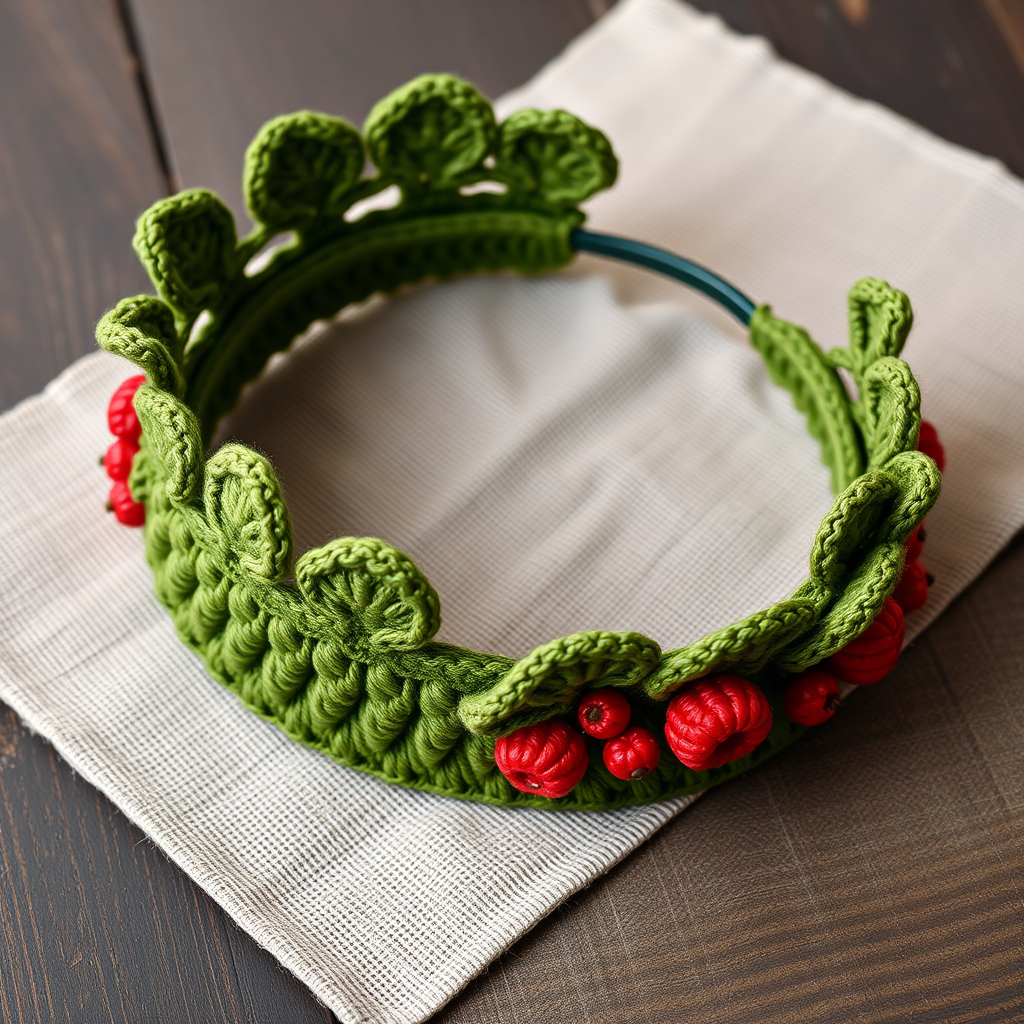
The Verdant Sovereign Crown: A Free Crochet Pattern for a Woodland Masterpiece
Imagine a crown that whispers of ancient forests, where leaves intertwine with plump berries in a regal circlet. This is the Verdant Sovereign Crown—a crocheted tapestry of leafy lace and berry clusters that transforms simple yarn into wearable art. Whether you're crafting for a festive Yule gathering, a whimsical photoshoot, or simply to add a touch of boho charm to your winter wardrobe, this pattern is your gateway to creating a truly unique accessory. The combination of textured stitches and a rich, nature-inspired palette makes this crown a standout piece that feels both medieval and modern. Let's embark on this crochet journey together and weave a crown fit for a woodland sovereign.
Materials Needed
Before we begin, gather your supplies. This project is wonderfully portable and requires minimal materials, making it perfect for crafting on the go. Here's what you'll need:
- Yarn: Worsted weight cotton or cotton-blend yarn in three shades:
- Forest Green (MC): Approximately 120 yards
- Moss Green (CC1): Approximately 60 yards
- Berry Red (CC2): Approximately 30 yards
- Crochet Hook: Size G/6 (4.0 mm) hook, or size needed to obtain gauge
- Gauge: 4 sc = 1 inch, 4 rows = 1 inch in single crochet (Important for sizing!)
- Extras: Yarn needle for weaving in ends, scissors, and a measuring tape.
Understanding the Pattern Structure
This crown is ingeniously constructed in two main parts. First, we'll create a simple, solid base band that forms the foundation. Then, we'll work the decorative overlay—the leaves and berries—directly onto this band. This method ensures a secure, seamless finish and allows the crown to lie flat and comfortable against your head. Don't be intimidated by the cluster stitches and picots; we'll break them down into simple, repeatable steps that even a beginner can master.
Step-by-Step Instructions
Part 1: The Base Band
The base band is a simple rectangle worked in rows of single crochet. This provides a sturdy yet flexible foundation for our leafy overlay.
- Row 1: With your Forest Green (MC) yarn, chain (ch) 8. Single crochet (sc) in the 2nd chain from your hook and in each chain across. You should now have 7 single crochet stitches.
- Row 2: Chain 1 (ch 1) and turn your work. Single crochet (sc) in each stitch across. (7 sc)
- Repeat Row 2 until the band measures your head circumference. For an adult, this is typically 20-22 inches. Keep trying it on or measuring against your head to ensure a perfect, snug fit. Do not fasten off.
- Join the ends: Fold the band so the short edges meet, forming a ring. Chain 1 (ch 1), then slip stitch (sl st) through both layers across the short edge to join them securely into a ring. Fasten off and weave in the ends with your yarn needle.
Part 2: The Leaf Overlay
Now for the magic! We'll be working in rounds around the top edge of the base band to create our leafy rim. This is where the crown truly comes to life.
- Round 1 (Setting the Stage): Join your Moss Green (CC1) yarn with a slip stitch (sl st) to any stitch along the top edge of the band. Chain 1 (ch 1), single crochet (sc) in the same stitch. *Chain 3 (ch 3), skip 1 stitch, single crochet (sc) in the next stitch.* Repeat from * to * around the entire top edge. Join with a slip stitch (sl st) to the first single crochet. You should now have a series of ch-3 loops encircling the top of the band.
- Round 2 (Forming the Leaves): Slip stitch (sl st) into the first ch-3 loop. Chain 1 (ch 1). In that same loop, work the following sequence: (single crochet (sc), half double crochet (hdc), double crochet (dc), half double crochet (hdc), single crochet (sc)). This creates a beautiful, pointed leaf shape. *Skip to the next ch-3 loop and repeat the (sc, hdc, dc, hdc, sc) sequence in that loop.* Repeat from * to * around. Join with a slip stitch (sl st) to the first single crochet. Fasten off CC1 and weave in the ends.
- Round 3 (Creating Depth): Join your Forest Green (MC) yarn with a slip stitch (sl st) to the center double crochet (dc) of any leaf from Round 2. Chain 1 (ch 1), single crochet (sc) in the same stitch. *Chain 5 (ch 5), skip to the center double crochet of the next leaf, single crochet (sc) in that stitch.* Repeat from * to * around. Join with a slip stitch (sl st) to the first single crochet. These ch-5 loops will form the base for our next layer of smaller leaves and the berries.
- Round 4 (Smaller Leaves): Slip stitch (sl st) into the first ch-5 loop. Chain 1 (ch 1). In that same loop, work the sequence: (single crochet (sc), chain 2 (ch 2), double crochet (dc), chain 2 (ch 2), single crochet (sc)). This creates a smaller, more delicate leaf. *Skip to the next ch-5 loop and repeat the (sc, ch 2, dc, ch 2, sc) sequence in that loop.* Repeat from * to * around. Join with a slip stitch (sl st) to the first single crochet. Fasten off MC and weave in the ends.
Part 3: The Berry Clusters
Our crown needs its crowning glory—the plump, red berries nestled among the leaves.
- Round 5 (Adding the Berries): Join your Berry Red (CC2) yarn with a slip stitch (sl st) to the center double crochet (dc) of any small leaf from Round 4. Chain 3 (ch 3). Work (double crochet (dc), chain 2 (ch 2), slip stitch (sl st)) all in the same stitch. This forms a lovely picot-tipped berry. *Skip to the next center double crochet of the next small leaf. In that stitch, work (slip stitch (sl st), chain 3 (ch 3), double crochet (dc), chain 2 (ch 2), slip stitch (sl st)).* Repeat from * to * around. Join with a slip stitch (sl st) to the first slip stitch. Fasten off CC2 and weave in all ends.
Finishing Touches
- Weave in Ends: Carefully weave in all remaining yarn ends with your yarn needle to ensure a clean, professional finish.
- Optional Embellishments: For a more dramatic, regal look, you can add a few extra leaves or berries at the front center of the crown. Simply repeat the relevant rounds on a small section of the band.
- Blocking: If your crown needs a little shaping, gently block it. Mist it lightly with water and shape it over a bowl or your head to dry. This will help the leaves and berries lie perfectly.
And there you have it—your very own Verdant Sovereign Crown! This project is a delightful way to practice new stitches and create a stunning piece of wearable art. The combination of the structured base and the organic, textured overlay makes it a joy to crochet and a treasure to wear. Whether you're a seasoned crocheter or a brave beginner, this pattern is designed to guide you to a beautiful result. Happy crocheting, and may your reign be verdant and full of wonder!


