The Evergreen Star Pillow Trio Free Pattern – Knitted Nordic-Inspired Cushions with Woven Texture
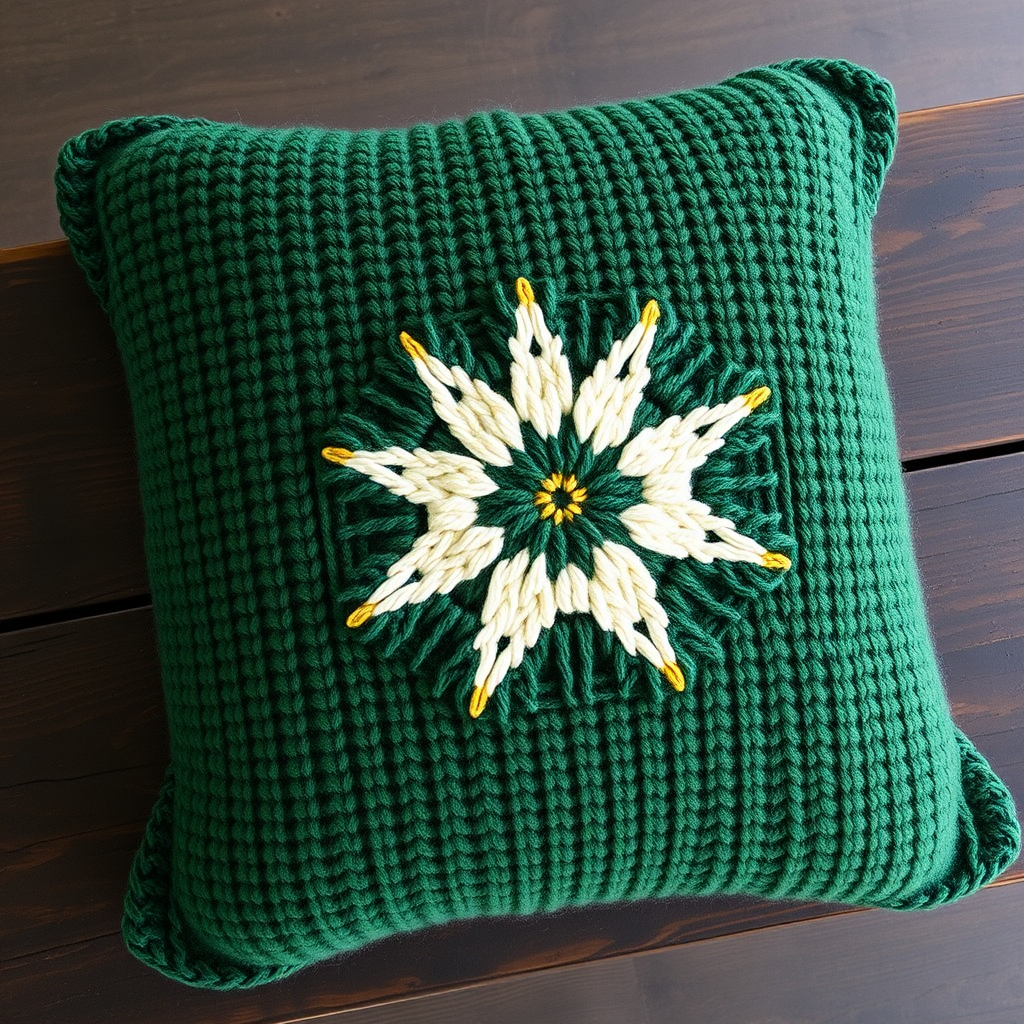
The Evergreen Star Pillow Trio: A Cozy Nordic Knitting Pattern
Bring the quiet magic of a snowy forest into your living room with this trio of knitted throw pillows, each featuring a sculptural star motif and rich evergreen palette. These cozy cushions blend traditional Nordic aesthetics with a modern, textured twist that will anchor your holiday decor for years to come. Whether you're an experienced knitter looking for a meditative project or a confident beginner ready to try stranded colorwork, this pattern offers a rewarding challenge with stunning results.
In this comprehensive guide, we'll walk you through every step—from gathering your materials to seaming your finished cover—so you can create a beautiful, handmade centerpiece for your winter home. Let's dive in!
Materials Needed
Before you begin, gather the following supplies. Having everything ready will make your knitting session smooth and enjoyable.
Yarn
- Main Color (MC): Worsted weight wool or wool-blend yarn in Deep Forest Green. You'll need approximately 350 yards per pillow.
- Contrast Color 1 (CC1): Cream or Ivory worsted weight yarn. Approximately 150 yards per pillow.
- Contrast Color 2 (CC2): Gold or Mustard worsted weight yarn. Approximately 150 yards per pillow.
Pro tip: Choose a soft, slightly woolly yarn that will bloom beautifully when blocked. The texture of the slipped stitches really shines with a yarn that has good stitch definition.
Needles & Notions
- Knitting Needles: US 7 (4.5 mm) straight or circular needles (for flat knitting). Circular needles are great for holding many stitches comfortably.
- Tapestry Needle: For weaving in ends and seaming.
- Stitch Markers: To mark the star chart section and texture repeats.
- Pillow Form: 16-inch square pillow insert (one per cover).
Gauge
18 stitches and 24 rows = 4 inches in stockinette stitch, after blocking. Always knit a swatch first to ensure your pillow comes out the correct size!
Step-by-Step Instructions
This pattern creates a 16-inch square pillow cover, knitted flat in one piece and seamed. The star motif is worked in stranded colorwork, with a woven texture created by a slipped-stitch pattern on the background. Each pillow uses the same base but with a different star color (cream, gold, or a combination).
Abbreviations
- K = knit
- P = purl
- K2tog = knit two together (decrease)
- SSK = slip, slip, knit (decrease)
- MC = main color (Deep Forest Green)
- CC = contrast color (Cream or Gold)
- St(s) = stitch(es)
- RS = right side
- WS = wrong side
Pattern Notes
- Work all stitches in stockinette (knit on RS, purl on WS) unless otherwise stated.
- Background Texture: The background texture is a slipped-stitch pattern. On RS rows, slip every 4th stitch purlwise with yarn in back. On WS rows, slip every 4th stitch purlwise with yarn in front. This creates a subtle woven rib that adds depth to the green background.
- Stranding: Carry the unused color loosely across the back of the work when stranding. Be careful not to pull too tight, or the star will pucker.
Cast On and Base Section
- With MC, cast on 72 stitches.
- Work in stockinette stitch for 6 rows, maintaining the slipped-stitch texture. To do this: On RS rows, knit 3, slip the 4th stitch purlwise with yarn in back. Repeat across. On WS rows, purl 3, slip the 4th stitch purlwise with yarn in front. Repeat across.
- Continue in stockinette with texture until the piece measures 8 inches from the cast-on edge, ending with a WS row. This forms the bottom half of the pillow.
Star Motif (Worked over Center 40 Stitches)
- On the next RS row, begin the star chart: Work 16 stitches in MC with texture, then work the next 40 stitches following the star chart (see below), then work the remaining 16 stitches in MC with texture.
- The star chart is a 40-stitch by 40-row chart. For the cream star, use CC1 for the star shape and MC for the background. For the gold star, use CC2. For the mixed star, alternate CC1 and CC2 in stripes within the star points.
- Continue in pattern, following the chart, until the star is complete (40 rows).
Star Chart (Simplified Written Instructions)
Note: The chart is worked over the center 40 stitches. The "star" stitches are worked in your chosen CC; all other stitches in this section are MC.
- Rows 1-8: Work 4 stitches of star point at each side (CC), center 32 stitches in MC.
- Rows 9-16: Increase star width: work 8 stitches of star on each side, center 24 stitches in MC.
- Rows 17-24: Full star body: work 12 stitches of star on each side, center 16 stitches in MC.
- Rows 25-32: Decrease star width: work 8 stitches of star on each side, center 24 stitches in MC.
- Rows 33-40: Work 4 stitches of star point at each side, center 32 stitches in MC.
Designer Tip: For a more detailed star, you can add small diamond shapes within the star using the opposite color. For example, on the cream star, add a small gold diamond in the center. This adds a beautiful, intricate touch.
Top Section
- After completing the star chart, continue in MC with the slipped-stitch texture for another 8 inches, ending with a WS row. This should mirror the bottom section, making the total piece 16 inches long.
- Bind off loosely in pattern. To bind off in pattern, knit the knit stitches and slip the slipped stitches as you bind off, keeping the edge elastic.
Finishing and Assembly
- Weave in all loose ends with your tapestry needle. Be sure to weave in the colorwork ends securely on the wrong side.
- Block the piece: Soak the knitted panel in lukewarm water with a little wool wash. Gently squeeze out excess water (don't wring!). Lay flat on a towel and roll up to remove more water. Then, lay the piece flat to dry, gently shaping it to the correct 16-inch square dimensions. This step is crucial for evening out the stitches and making the star crisp.
- Fold the knitted piece in half with right sides together, matching the cast-on and bind-off edges. The star should be centered on the front.
- Sew the side seams using mattress stitch. This invisible seam will create a professional finish. Sew up both sides, leaving one side open for the pillow form.
- Turn the cover right side out. Gently push out the corners with a blunt tool.
- Insert the 16-inch pillow form.
- Whipstitch the remaining side closed, or add buttons for a removable cover. For a button closure, overlap the edges and sew on 3-4 large buttons, creating buttonholes on the opposite edge.
Repeat for the Trio
Repeat the entire process for the other two pillows, varying the star color as desired:
- Pillow 1: Cream star (CC1)
- Pillow 2: Gold star (CC2)
- Pillow 3: Mixed star (alternating CC1 and CC2 stripes within the star points)
Final Thoughts
These Evergreen Star Pillows are more than just holiday decor—they're heirloom-quality pieces that bring warmth and Scandinavian charm to any room. The combination of textured slipped stitches and vibrant stranded colorwork creates a visually stunning result that looks far more complex than it actually is.
As you knit, remember to relax and enjoy the process. The rhythmic repetition of the texture pattern is meditative, and watching the star emerge row by row is deeply satisfying. Whether you gift them to loved ones or keep them for your own cozy corner, these pillows are sure to be treasured for many winters to come.
Happy knitting, and may your home be filled with the quiet magic of a snowy forest!


