Spice Market Wave Knit Earflap Hat Free Pattern: Patchwork Twisted-Stitch Topper
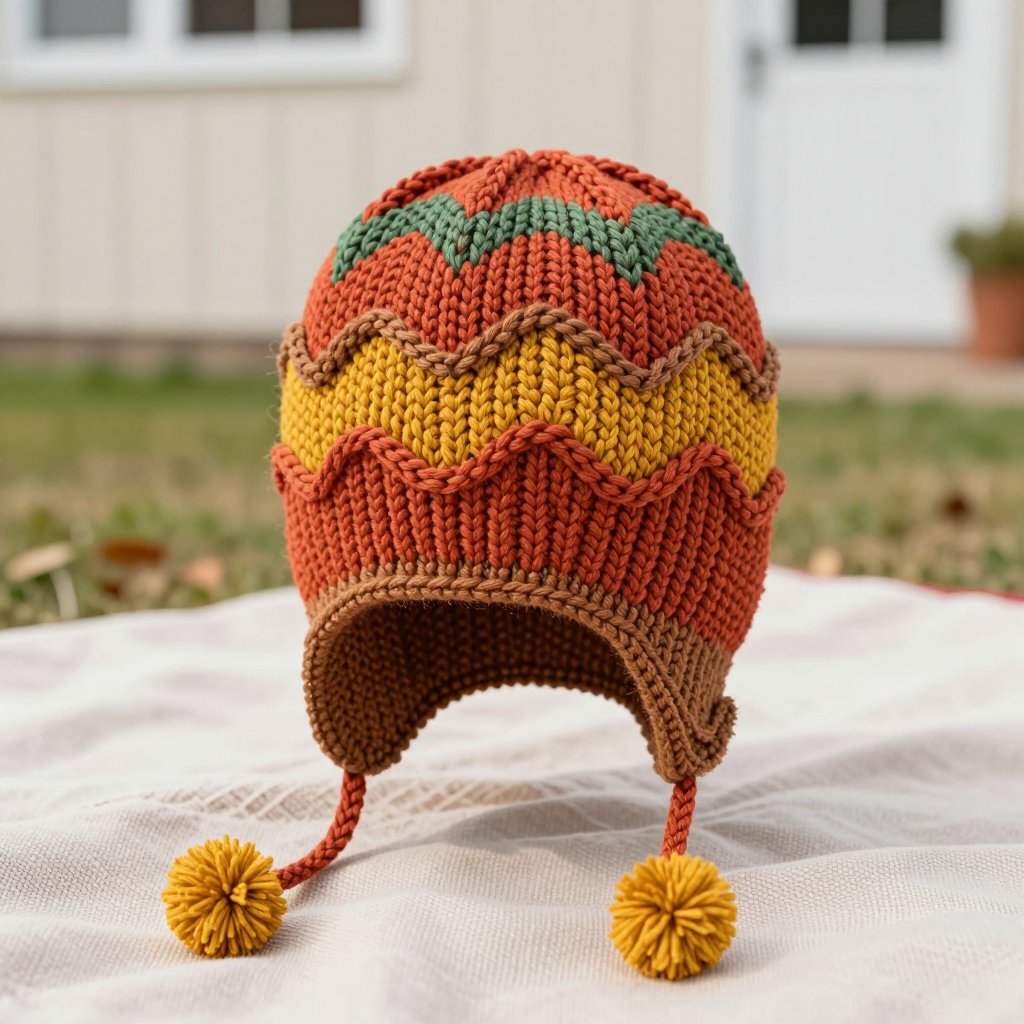
Spice Market Wave Knit Earflap Hat
If you have ever wanted to knit something that looks far more complicated than it actually is, this is your project. The Spice Market Wave Earflap Hat is built from four simple squares of plain knitting, each crossed by one graceful twisted-stitch wave, then joined into a cozy tube and topped with a gently shaped crown. It is perfect for a first "real" hat, because you only ever work a small, flat square at a time — no scary circular knitting until the very end. The finished hat is soft, warm, and squishy in aran-weight wool blend, with two pointed earflaps, thin I-cord ties, and tiny knitted pompoms that swing as you walk. In paprika, turmeric, cinnamon, and cardamom, it looks like a little spice market for your head.
Materials Needed
- Yarn: Aran-weight wool blend (approx. 20% wool, 80% acrylic; 180 yd/165 m per 100 g skein). 1 skein each in Paprika (A), Turmeric (B), Cinnamon (C), and Cardamom (D). Total used: approx. 300 yd/275 m.
- Main needles: US 7 (4.5 mm) straight or circular needles, for the squares, crown, and earflaps.
- Small needles: US 6 (4.0 mm) double-pointed needles (DPNs), for the I-cord ties and tiny pompoms.
- Cable needle: Any small spare needle used to hold stitches temporarily for the twisted wave.
- Stitch markers: At least 4, to mark the beginning of rounds and decrease points.
- Tapestry needle: A large blunt needle with an eye big enough for your yarn, for seaming and weaving in ends.
- Scissors: Sharp, small pair for cutting yarn.
- Finished size: Hat circumference approx. 22 in/56 cm (fits head 21–23 in/53–58 cm). Height from cast-on edge to crown approx. 8.5 in/21.5 cm, plus earflaps. Each square measures approx. 6 x 6 in/15 x 15 cm after blocking.
Abbreviations and Beginner Glossary
- st / sts – stitch / stitches. One "stitch" is one loop on your needle.
- K – knit. With the yarn behind your work, insert the right needle into the front of the stitch from left to right, wrap the yarn around, and pull it through, sliding the old stitch off.
- P – purl. With the yarn in front of your work, insert the right needle into the front of the stitch from right to left, wrap the yarn, pull it through, and slide the old stitch off.
- RS – right side. The "public" side of the fabric that faces out when finished.
- WS – wrong side. The back side of the fabric.
- sl 1 – slip 1 stitch. Move one stitch from the left needle to the right needle without knitting it.
- 1/1 RC – one-over-one right cross (a twisted stitch). Slip 1 stitch onto the cable needle and hold it in front of your work, knit the next stitch from the left needle, then knit the stitch from the cable needle. This makes a small twisted "wave" bump.
- k2tog – knit two stitches together. Insert the needle into two stitches at once and knit them as one. This decreases your stitch count by one.
- ssk – slip, slip, knit. Slip one stitch knitwise, slip a second stitch knitwise, then knit both together through the back loops. This is a decrease that leans the other way.
- M1L – make one left. Pick up the bar of yarn between two stitches with the left needle from front to back and knit into the back of it. This adds one stitch.
- M1R – make one right. Pick up the bar between two stitches from back to front and knit into the front of it. This adds one stitch.
- Rep – repeat.
- Rnd – round. One complete circle of knitting when working in the round.
- * ... ; rep from * – repeat everything between the asterisks as many times as instructed.
- Stockinette stitch – knit on right-side rows, purl on wrong-side rows. This makes the smooth, flat "V" fabric you see on most sweaters.
- I-cord – a thin knitted tube made by knitting a few stitches, sliding them back to the start of the needle, and knitting them again.
- Bind off – the way you finish an edge so stitches don't unravel.
- Mattress stitch – an invisible seaming method that joins two edges with tiny horizontal stitches.
Gauge
18 sts and 24 rows = 4 in/10 cm in stockinette stitch on US 7 needles, blocked. Each square measures approx. 6 x 6 in/15 x 15 cm after blocking.
Why gauge matters: Gauge is how many stitches and rows fit into a set measurement. If your stitches are bigger than the pattern's, your hat will be too big; if smaller, it will be too tight. How to check: Cast on 30 sts with your US 7 needles and work in stockinette for about 5 in/12 cm. Bind off, gently block it, then lay a ruler across the middle and count how many stitches fit in 4 in/10 cm. If you have more than 18, go up a needle size; if fewer, go down. Always swatch before you start.
Beginner Tips Before You Start
- Knit all four squares first. They are small and portable, and finishing them builds your confidence before the crown.
- Use a stitch marker to mark the right side of each square. It is easy to lose track of which row you are on.
- Do not pull your yarn too tight when making the 1/1 RC twists. Tight twists make the wave pucker; keep the cable-needle stitches relaxed.
- Count your stitches at the end of every row. Each square stays at 27 sts the whole time — if you have more or fewer, you have added or dropped a stitch.
- Place a marker at the beginning of the crown round so you always know where each decrease round starts.
- Keep your tension even rather than fast. Slow, steady knitting gives you a smooth, professional-looking fabric.
Step-by-Step Instructions
Square Motif (make 4, one in each color A, B, C, D)
Each square is worked flat in stockinette with a twisted-stitch wave crossing the center. With US 7 needles and one color, cast on 27 sts.
Row 1 (RS): K13, 1/1 RC, k13. (27 sts)
Row 2 and all WS rows: Purl all sts. (27 sts)
Row 3: K12, 1/1 RC, k1, 1/1 RC, k12. (27 sts)
Row 5: K11, 1/1 RC, k3, 1/1 RC, k11. (27 sts)
Row 7: K10, 1/1 RC, k5, 1/1 RC, k10. (27 sts)
Row 9: K9, 1/1 RC, k7, 1/1 RC, k9. (27 sts)
Row 11: K8, 1/1 RC, k9, 1/1 RC, k8. (27 sts)
Row 13: K7, 1/1 RC, k11, 1/1 RC, k7. (27 sts)
Row 15: K6, 1/1 RC, k13, 1/1 RC, k6. (27 sts)
Row 17: K5, 1/1 RC, k15, 1/1 RC, k5. (27 sts)
Row 19: K4, 1/1 RC, k17, 1/1 RC, k4. (27 sts)
Row 21: K3, 1/1 RC, k19, 1/1 RC, k3. (27 sts)
Row 23: K2, 1/1 RC, k21, 1/1 RC, k2. (27 sts)
Row 25: K1, 1/1 RC, k23, 1/1 RC, k1. (27 sts)
Row 27: 1/1 RC, k25, 1/1 RC. (27 sts)
Row 29: K1, 1/1 RC, k23, 1/1 RC, k1. (27 sts)
Row 31: K2, 1/1 RC, k21, 1/1 RC, k2. (27 sts)
Row 33: K3, 1/1 RC, k19, 1/1 RC, k3. (27 sts)
Row 35: K4, 1/1 RC, k17, 1/1 RC, k4. (27 sts)
Row 37: K5, 1/1 RC, k15, 1/1 RC, k5. (27 sts)
Row 39: K6, 1/1 RC, k13, 1/1 RC, k6. (27 sts)
Row 41: K7, 1/1 RC, k11, 1/1 RC, k7. (27 sts)
Row 43: K8, 1/1 RC, k9, 1/1 RC, k8. (27 sts)
Row 45: K9, 1/1 RC, k7, 1/1 RC, k9. (27 sts)
Row 47: K10, 1/1 RC, k5, 1/1 RC, k10. (27 sts)
Row 49: K11, 1/1 RC, k3, 1/1 RC, k11. (27 sts)
Row 51: K12, 1/1 RC, k1, 1/1 RC, k12. (27 sts)
Row 52: Purl all sts. (27 sts) Bind off all sts. Block each square to 6 x 6 in/15 x 15 cm.
Joining the Squares
Arrange the four squares in a strip in this order: A, B, C, D, with all the wave curves running in the same direction. Using mattress stitch, seam the short edges together to form a cylinder, then seam the remaining short edges together to close the ring. You now have a tube approx. 24 in/61 cm around and 6 in/15 cm tall.
Crown Shaping
With US 7 circular needle and color A, pick up 108 sts evenly around the top edge of the tube (approx. 27 sts per square). Place a marker at the beginning of the round.
Rnd 1: Knit. (108 sts)
Rnd 2: *K7, k2tog; rep from * to end. (96 sts)
Rnd 3: Knit. (96 sts)
Rnd 4: *K6, k2tog; rep from * to end. (84 sts)
Rnd 5: Knit. (84 sts)
Rnd 6: *K5, k2tog; rep from * to end. (72 sts)
Rnd 7: Knit. (72 sts)
Rnd 8: *K4, k2tog; rep from * to end. (60 sts)
Rnd 9: Knit. (60 sts)
Rnd 10: *K3, k2tog; rep from * to end. (48 sts)
Rnd 11: Knit. (48 sts)
Rnd 12: *K2, k2tog; rep from * to end. (36 sts)
Rnd 13: *K1, k2tog; rep from * to end. (24 sts)
Rnd 14: *K2tog; rep from * to end. (12 sts)
Break yarn, thread through the remaining 12 sts, pull tight, and secure on the inside.
Earflaps (make 2)
With US 7 needles and color C, cast on 3 sts.
Row 1 (RS): Knit. (3 sts)
Row 2: Purl. (3 sts)
Row 3: K1, M1L, knit to last st, M1R, k1. (5 sts)
Row 4: Purl. (5 sts)
Rep Rows 3–4 until 19 sts remain, ending with a WS row.
Next row (RS): K1, k2tog, knit to last 3 sts, ssk, k1. (17 sts)
Next row: Purl. (17 sts)
Rep last 2 rows twice more. (13 sts)
Work even in stockinette for 4 rows. (13 sts)
Bind off all sts.
Ties
With US 6 double-pointed needles and color A, cast on 3 sts. Work an I-cord for approx. 8 in/20 cm. Bind off. Make 2. Sew one tie to the bottom point of each earflap.
Tiny Pompoms (make 2)
With US 6 double-pointed needles and color B, cast on 8 sts. Work in stockinette for 6 rows. Break yarn, thread through all sts, pull tight, and seam the side edges to form a small stuffed ball. Make 2. Sew one pompom to the end of each tie.
Assembly and Finishing
Seaming the squares: Lay two squares right sides together. Thread your tapestry needle with matching yarn and work mattress stitch: bring the needle up through the edge stitch on one square, then across to the matching stitch on the other square, and pull gently. Work small horizontal stitches along the seam, keeping them loose enough that the fabric does not pucker. Repeat for all four seams.
Attaching the earflaps: Try the hat on and mark where you want the earflaps with a pin, roughly 3 in/7.5 cm apart at the front. Sew each earflap to the lower edge with a few firm stitches, then weave the tail inside.
Weaving in ends: Thread each yarn tail onto the tapestry needle and weave it through the back of several stitches, changing direction once so it cannot work loose. Trim close to the fabric.
Blocking: Lightly steam-block the hat, holding the iron just above the fabric rather than pressing it down. Avoid the pompoms. Let the hat dry completely before wearing.
Finishing touch: Fold the brim up approx. 1 in/2.5 cm if you like a little extra warmth around the ears.
Pro Tips and Variations
- Change the color story: Swap the four spice shades for any palette you love — try navy, cream, mustard, and rust for a coastal look, or all four squares in the same color for a subtle textured hat.
- Adjust the size: For a smaller child's hat, work each square to 5 x 5 in/12.5 x 12.5 cm and pick up 90 sts for the crown; for a larger adult hat, work 7 x 7 in/18 x 18 cm squares and pick up 126 sts.
- Substitute yarn: Any aran-weight yarn will work, but always swatch first — a different fiber may change your gauge. A wool-heavy yarn will be warmer; a cotton blend will be lighter.
- Skip the pompoms: If you prefer a simpler look, finish the I-cord ties with a small knot instead of a pompom, or leave the ties off entirely for a snug pull-on hat.


