Rosegold Waffle Wrist Wrap Pair: Free Crochet Pattern for Sunset Ombre Cuffs
Rosegold Waffle Wrist Wrap Pair: Free Crochet Pattern for Sunset Ombre Cuffs
Introduction
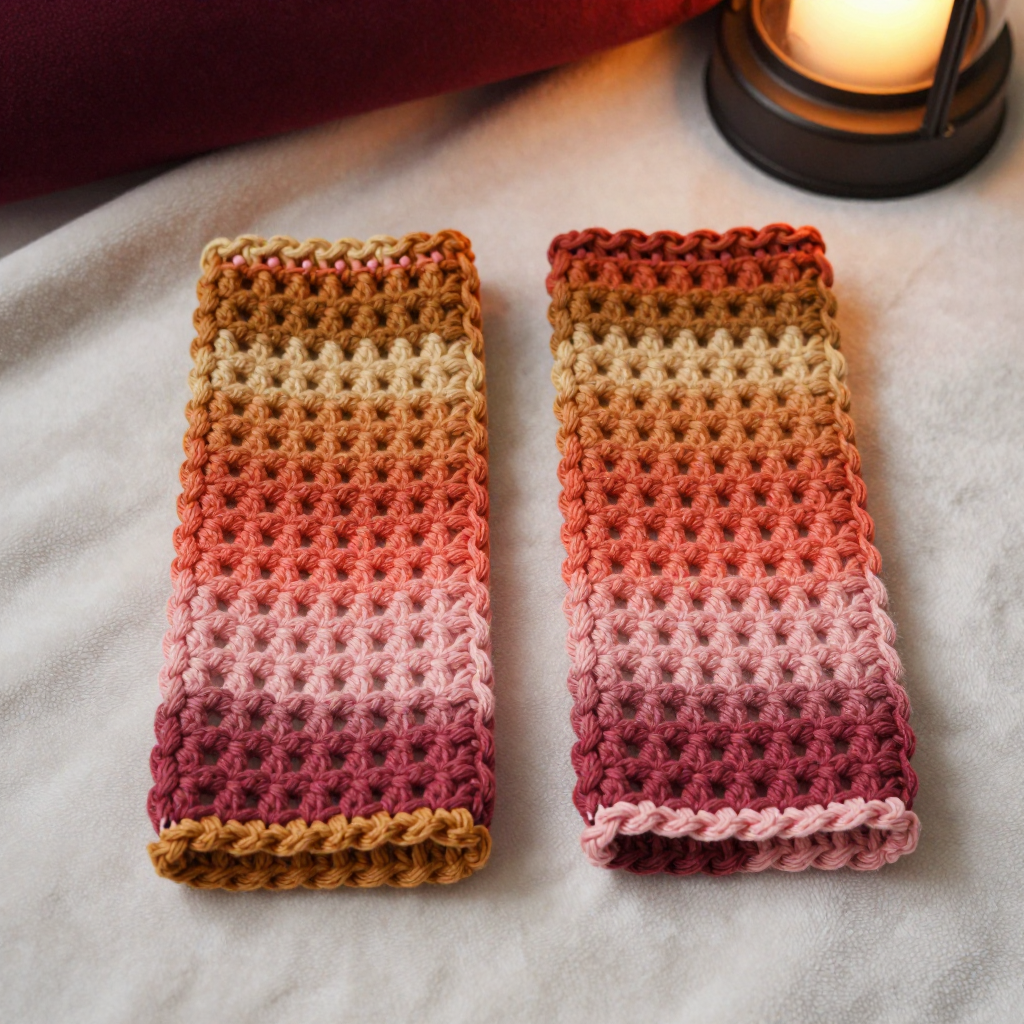
If you have ever wanted a project that looks impressive but is secretly just two stitches repeated over and over, this is the one for you. These Rosegold Waffle Wrist Wraps are short, structured cuffs that hug your wrists during yoga, mat work, or a long day at the keyboard, and they are crocheted flat as simple rectangles before being seamed into tubes. The waffle stitch creates a raised grid of little squares that looks like a tiny waffle, and the sunset ombre of amber, coral, and rose makes each pair look like a slice of golden hour wrapped around your hands. The finished wraps feel firm and supportive, not squishy, because they are made from macrame cord, so they stay put instead of sliding around. This pattern is written for a confident beginner who has made a few double crochets before, and every single step is spelled out below.
Materials Needed
- Yarn: Macrame cord, 3 mm thickness (roughly equivalent to a 4–5 mm yarn). You will need 2 balls total in a sunset ombre gradient: Color A (amber) approx. 45 yd / 41 m, Color B (coral) approx. 35 yd / 32 m, Color C (rose) approx. 35 yd / 32 m. Total approx. 115 yd / 105 m for the pair.
- Hook: 5.0 mm (US H-8) crochet hook, or whatever size you need to match the gauge below.
- Stitch markers: At least 2, to mark your first stitch and your color-change points.
- Tapestry needle (yarn needle): A large-eye blunt needle that fits your cord, for seaming and weaving in ends.
- Scissors: Sharp craft scissors for cutting cord cleanly.
- Measuring tape or ruler: For checking gauge and finished size.
- Finished size: Each wrap measures approx. 7 in / 18 cm long (wrist circumference) x 3.5 in / 9 cm wide. Fits an average adult wrist of 6–7.5 in / 15–19 cm.
Abbreviations and Beginner Glossary
Every abbreviation used in this pattern is listed here with a plain-English explanation. Read this section once before you begin, and come back to it any time a term feels unfamiliar.
- ch – chain. Make a loop with your yarn, then pull a new loop through it. Each loop you pull through is one chain. Chains are the foundation you build on.
- sc – single crochet. Insert your hook into the stitch, yarn over (wrap the yarn around the hook), pull up a loop (you now have 2 loops on the hook), yarn over again, and pull through both loops. One single crochet made.
- dc – double crochet. Yarn over first, insert hook into the stitch, yarn over and pull up a loop (3 loops on hook), yarn over and pull through 2 loops (2 loops left), yarn over and pull through the last 2 loops. One double crochet made.
- fpdc – front-post double crochet. This is a double crochet worked around the post (the vertical body) of a stitch instead of into its top. Yarn over, insert your hook from front to back around the post of the indicated stitch, yarn over, pull up a loop, yarn over and pull through 2 loops, yarn over and pull through the remaining 2 loops. This is what makes the raised waffle grid.
- sl st – slip stitch. Insert hook into the stitch, yarn over, and pull the loop straight through the loop on your hook. It joins without adding height.
- st(s) – stitch or stitches.
- RS – right side. The side of the fabric that will face outward when the wrap is worn.
- WS – wrong side. The back side of the fabric, which faces inward.
- Turn – flip your work over so you can crochet back across the row you just finished.
- Fasten off – cut the yarn a few inches from your work, then pull the tail all the way through the last loop to lock it.
- Weave in ends – thread a tail onto a tapestry needle and run it back and forth through the fabric so it disappears and cannot unravel.
Gauge
Gauge: 14 sts x 8 rows = 4 in / 10 cm in waffle stitch (the dc and fpdc pattern) after gentle blocking.
Gauge simply means how big your stitches come out. If your stitches are bigger than the pattern expects, your wrap will be too loose and slide off; if they are smaller, the wrap will be too tight to wear. That is why gauge matters: it is the only way to guarantee the finished wrap actually fits a wrist.
How to make a gauge swatch: With Color A, ch 18. Work Rows 1–4 of the Wrap instructions below, then repeat Rows 2–4 until you have 8 rows total. Lay the swatch flat, measure a 4 in / 10 cm section in the middle, and count your stitches and rows. If you have more than 14 stitches in 4 in, switch to a larger hook. If you have fewer, switch to a smaller hook. Do not skip this step — it takes ten minutes and saves the whole project.
Beginner Tips Before You Start
- Use stitch markers to track your rows. Place one in the very first stitch of each row so you never lose your place, and a second marker where you plan to change color.
- Do not pull the cord too tight. Macrame cord has no stretch, so tight tension makes a stiff, unwearable cuff. Keep your loops relaxed and even.
- Count your stitches at the end of every row. You should always have 24 stitches. If you are off by one, fix it now rather than three rows later.
- Remember the turning ch 2 does not count as a stitch. Your first dc of each row goes into the very first stitch, right next to the chain.
- Change color on the last yarn over of the final stitch. This hides the join neatly and keeps the ombre line crisp.
- Work both wraps in the same sitting if you can. Matching tension between the two is much easier when you are in the same rhythm.
Step-by-Step Instructions
Pattern Notes
The wraps are crocheted flat as rectangles, then seamed into short tubes. Each wrap is worked sideways: the row length becomes the wrist circumference, and the row count becomes the cuff width. Waffle stitch is built from double crochet (dc) and front-post double crochet (fpdc). The fpdc is worked around the post of the dc two rows below, which creates the raised waffle grid. Work the two wraps identically, changing colors in the same sequence for a matching pair. The turning ch 2 does NOT count as a stitch. Gauge is critical: measure your first 4 in / 10 cm before continuing.
Color Sequence (Both Wraps)
- Rows 1–8: Color A (amber)
- Rows 9–16: Color B (coral)
- Rows 17–24: Color C (rose)
Change color on the last yarn over of the final stitch of the previous row.
Wrap (Make 2)
With Color A, ch 26.
Row 1 (RS): Dc in 3rd ch from hook and in each ch across. Turn. (24 dc)
Row 2 (WS): Ch 2, dc in first st, *fpdc around the post of the next st, dc in next st; repeat from * across, ending with dc in last st. Turn. (12 fpdc, 12 dc)
Row 3 (RS): Ch 2, dc in first st, dc in each st across. Turn. (24 dc)
Row 4: Ch 2, dc in first st, *dc in next st, fpdc around the post of the next st; repeat from * across, ending with dc in last st. Turn. (12 fpdc, 12 dc)
Row 5: Ch 2, dc in first st, dc in each st across. Turn. (24 dc)
Row 6: Repeat Row 2. (12 fpdc, 12 dc)
Row 7: Repeat Row 3. (24 dc)
Row 8: Repeat Row 4. Change to Color B on the final yarn over. (12 fpdc, 12 dc)
Rows 9–16: Repeat Rows 2–4 twice more, then repeat Rows 2–4 once more (total 8 rows in Color B), maintaining the waffle offset: fpdc stitches sit above the dc stitches of the row two below, and dc stitches sit above the fpdc stitches two rows below. Change to Color C on the final yarn over of Row 16. (24 sts each row)
Rows 17–24: Repeat Rows 2–4 twice more, then repeat Rows 2–4 once more (total 8 rows in Color C). Do not fasten off yet. (24 sts each row)
Finishing Edge
Edging round: Ch 1, sc evenly around the entire perimeter of the rectangle, working 1 sc in each row end along the short sides and 1 sc in each st along the long sides, with 3 sc in each corner. Join with sl st to first sc. Fasten off, leaving a 12 in / 30 cm tail.
Seaming
Fold the rectangle in half with RS together so the short ends meet, forming a tube. Using the tail and a tapestry needle, whipstitch the short ends together, matching stitch for stitch. Fasten off and weave in ends. Turn RS out. Repeat for the second wrap.
Blocking
Mist lightly with water and press flat under a towel for 30 minutes to set the waffle texture and even the ombre transitions. Do not iron directly.
Optional Thumb Opening
For a thumb gap, leave the last 3 sts of the seam unsewn on one short end before fastening off.
Assembly and Finishing
Assembly is where your flat rectangle becomes a wearable cuff, so take it slowly. First, lay your rectangle flat with the right side facing you and check that the waffle grid looks even. Fold the rectangle in half so the two short ends meet, with the right sides touching each other on the inside — this is called "right sides together." Thread your 12 in / 30 cm tail onto the tapestry needle. Starting at one corner, bring the needle through the matching stitch on the opposite short end, then back through the next pair of stitches, working a simple over-and-under whipstitch all the way across. Match stitch for stitch so the seam stays straight and does not pucker. When you reach the far corner, fasten off by running the needle through the last stitch twice, then turn the tube right side out and gently push the seam flat with your fingers.
Next, weave in every remaining end. Thread each tail onto the tapestry needle and run it back and forth through about 1 in / 2.5 cm of the fabric, changing direction once so it locks in place, then trim close to the surface. Finally, block both wraps: mist them lightly with water until damp but not soaking, lay them flat on a towel, and press another towel on top for 30 minutes. This sets the waffle texture and smooths the ombre transitions. Never place a hot iron directly on the cord.
Pro Tips and Variations
- Change the ombre: Swap the three colors for any gradient you love — try teal to navy, or cream to blush — and keep the same 8-row color blocks so the proportions stay balanced.
- Adjust the size: To change the circumference, add or remove chains in multiples of 2 (each pair of chains adds one waffle square). To change the width, add or remove rows in multiples of 3 so the waffle pattern stays complete.
- Substitute the yarn: If macrame cord feels too firm, try a bulky (weight 5) cotton or cotton-blend yarn held single. Check your gauge again, because the finished size will change with the yarn.
- Add a thumb opening: Follow the optional instruction and leave the last 3 stitches of the seam unsewn for a comfortable gap that lets the wrap sit lower on the hand.