Moss Ripple Bone Chew Free Pattern: A Minimalist Crochet Dog Toy
Moss Ripple Bone Chew: A Minimalist Crochet Dog Toy
Introduction
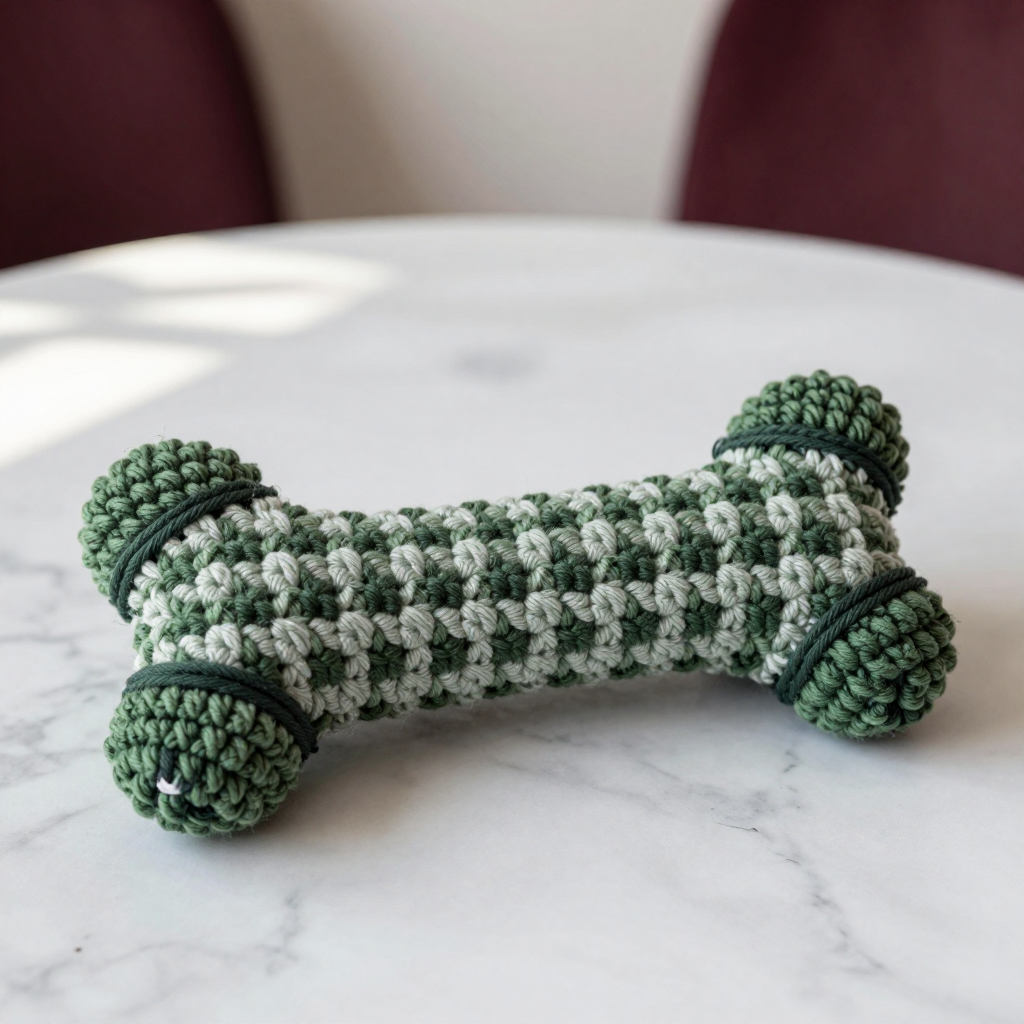
If you have never held a crochet hook before, this is the perfect first project to make something your dog will actually love. The Moss Ripple Bone Chew is a soft, squishy chenille toy worked as one simple tube in gentle wavy stripes of moss green and pale sage-gray, then cinched with dark yarn wraps to create that classic bone silhouette. It is small enough for a lap project, forgiving of tiny mistakes, and finished in just a few evenings. When it is done, you will have a fuzzy, woodland-inspired chew toy about 7 inches long that fits perfectly in a small dog's paws. Let's make one together, one stitch at a time.
Materials Needed
- Yarn: Chenille plush yarn, super bulky (weight 6), approximately 55–65 yd (50–60 m) total: 30 yd (27 m) in Moss (deep muted green), 20 yd (18 m) in Lichen (pale sage-gray), and 10 yd (9 m) in Dark Moss (charcoal-green) for the wraps and knobs.
- Hook: 6.0 mm (US size J-10) crochet hook, or the size needed to match gauge.
- Stitch marker (one, to mark the first stitch of each round).
- Polyester fiberfill (about a handful) for stuffing.
- Tapestry needle (a large, blunt needle with a big eye for sewing thick yarn).
- Scissors.
- Finished size: Approximately 7 in (18 cm) long x 2.5 in (6.5 cm) wide at the end knobs. Suitable for small dogs under 15 lb (7 kg).
Abbreviations and Beginner Glossary
- ch – chain: yarn over the hook, pull the loop through the loop on your hook. This makes a small link.
- sc – single crochet: insert hook into stitch, yarn over, pull up a loop (2 loops on hook), yarn over, pull through both loops. One loop remains.
- hdc – half double crochet: yarn over, insert hook into stitch, yarn over, pull up a loop (3 loops on hook), yarn over, pull through all 3 loops at once.
- dc – double crochet: yarn over, insert hook into stitch, yarn over, pull up a loop (3 loops on hook), yarn over, pull through 2 loops, yarn over, pull through last 2 loops.
- dc2tog – double crochet 2 together (a decrease): yarn over, insert hook into stitch, yarn over, pull up a loop, yarn over, pull through 2 loops (2 loops remain), yarn over, insert hook into the next stitch, yarn over, pull up a loop, yarn over, pull through 2 loops, yarn over, pull through all 3 remaining loops. This turns 2 stitches into 1.
- sc2tog – single crochet 2 together (a decrease): insert hook into stitch, yarn over, pull up a loop, insert hook into next stitch, yarn over, pull up a loop (3 loops on hook), yarn over, pull through all 3 loops. Turns 2 stitches into 1.
- sl st – slip stitch: insert hook into stitch, yarn over, pull the loop straight through the loop on your hook. Used to join rounds.
- st(s) – stitch(es).
- sp – space (the gap between stitches).
- rep – repeat.
- magic ring – an adjustable loop of yarn you crochet into, then pull tight so no hole remains in the center.
- yarn over – wrap the working yarn over your hook from back to front.
- fasten off – cut the yarn, pull the tail all the way through the last loop, and tug to secure.
Gauge
10 sts x 8 rounds = 4 in (10 cm) in ripple pattern.
Why gauge matters: Gauge is how many stitches and rounds fit into 4 inches of your fabric. If your stitches are too loose, the toy will be floppy and stuffing may poke out; if too tight, it will be stiff and hard to work. For a toy, gauge is not critical, but a tighter gauge keeps stuffing secure.
How to make a gauge swatch: With your 6.0 mm hook and Moss yarn, chain 26. Work 8 rounds of the ripple pattern (Rnds 2–7 from the instructions below, repeated). Lay the swatch flat and measure a 4-inch section in the middle with a ruler. Count the stitches across and the rounds up. If you have more stitches than 10, try a larger hook; if fewer, try a smaller hook.
Beginner Tips Before You Start
- Use a stitch marker. Place it in the first stitch of each round so you always know where the round begins and ends.
- Do not pull your yarn too tight. Chenille yarn is fluffy and snaps easily. Keep an even, relaxed tension so the plush fibers stay intact.
- Count every round. The stitch count in parentheses tells you exactly how many stitches you should have. Count before you move on.
- Turn at the end of each round. This pattern turns after joining, which keeps the ripple texture even. It is not a mistake.
- Stuff firmly but evenly. Work from both ends toward the center so the tube holds its shape without bulging.
- Keep your dog away while you work. Chenille fibers shed, and loose yarn is tempting to chew. Store the project out of reach.
Step-by-Step Instructions
Special Stitch: Ripple Stripe
Each ripple repeat uses 12 stitches: [dc, dc, dc, dc, dc, dc2tog, dc2tog, dc, dc, dc, dc, dc]. This creates one peak and one valley. Work in joined rounds, turning at the end of each round to keep the ripple texture even.
Tube (make 1)
With Moss, make a magic ring.
Rnd 1: Ch 2 (does not count as a st), work 24 dc into the ring. Join with sl st to first dc. (24 sts)
Rnd 2: Ch 2, turn. Work ripple pattern: *dc in next 5 sts, dc2tog, dc2tog, dc in next 5 sts; rep from * around. Join with sl st. (20 sts)
Rnd 3: Ch 2, turn. *Dc in next 4 sts, dc2tog, dc2tog, dc in next 4 sts; rep from * around. Join. (16 sts)
Rnd 4: Ch 2, turn. *Dc in next 3 sts, dc2tog, dc2tog, dc in next 3 sts; rep from * around. Join. (12 sts)
Rnd 5: Ch 2, turn. *Dc in next 2 sts, dc2tog, dc2tog, dc in next 2 sts; rep from * around. Join. (8 sts)
Rnd 6: Ch 2, turn. *Dc in next st, dc2tog, dc2tog, dc in next st; rep from * around. Join. (4 sts)
Rnd 7: Ch 2, turn. *Dc2tog, dc2tog; rep from * around. Join. (2 sts)
Rnd 8: Ch 2, turn. Dc2tog. Join. (1 st)
Change to Lichen.
Rnds 9–14: Rep Rnds 2–7 once more, working in Lichen. (1 st at end of Rnd 14)
Change to Moss.
Rnds 15–20: Rep Rnds 2–7 once more, working in Moss. (1 st at end of Rnd 20)
Change to Lichen.
Rnds 21–26: Rep Rnds 2–7 once more, working in Lichen. (1 st at end of Rnd 26)
Change to Moss.
Rnds 27–32: Rep Rnds 2–7 once more, working in Moss. (1 st at end of Rnd 32)
Fasten off, leaving a 12 in (30 cm) tail. Do not stuff yet.
Shaping the Bone
Step 1: Turn the tube right side out. Stuff firmly but evenly with polyester fiberfill, working from both ends toward the center. The tube should hold its shape without bulging.
Step 2: Thread the 12 in (30 cm) tail onto a tapestry needle. Run a gathering stitch (a simple running stitch) around the open end and pull tight to close. Weave in the end.
Step 3: With Dark Moss yarn and a tapestry needle, wrap the tube tightly at two points, each about 1.5 in (4 cm) from the ends, to create the bone shaft. Wrap 6–8 times at each point, pulling firmly to indent the chenille. Secure the wraps with a small knot and weave in the ends. This creates the classic bone silhouette with two rounded lobes at each end.
End Knobs (make 2)
With Dark Moss, make a magic ring.
Rnd 1: Ch 1, work 6 sc into the ring. Join with sl st. (6 sts)
Rnd 2: Ch 1, 2 sc in each st around. Join. (12 sts)
Rnd 3: Ch 1, *sc in next st, 2 sc in next st; rep from * around. Join. (18 sts)
Rnds 4–6: Ch 1, sc in each st around. Join. (18 sts)
Rnd 7: Ch 1, *sc in next st, sc2tog; rep from * around. Join. (12 sts)
Stuff the knob lightly with fiberfill.
Rnd 8: Ch 1, sc2tog around. Join. (6 sts)
Fasten off, leaving a 6 in (15 cm) tail. Thread the tail onto a tapestry needle and run it through the remaining 6 sts, pull tight to close. Weave in the end.
Assembly and Finishing
Sewing the knobs: Sew one knob securely to each end of the bone, positioning it over the gathered closure. Use the Dark Moss tail and a tapestry needle, stitching through the knob and into the bone tube. Make several passes through each knob to secure it firmly.
Weaving in ends: Thread each loose tail onto the tapestry needle and weave it back and forth through the inside of the fabric for about 1 inch, then trim close to the surface. Do not knot the ends; weaving hides them securely.
Reshaping: Gently reshape the bone with your hands, smoothing the ripple stripes and adjusting the wraps so both lobes look even.
Blocking: Lightly mist the finished toy with cool water and pat it into shape with your hands. Let it air dry completely away from direct heat. Do not wring or squeeze hard, as chenille can mat.
Safety check: Check all seams and wraps for security before giving the toy to a dog. Supervise play and remove the toy if any part becomes loose or damaged.
Pro Tips and Variations
- Color changes: Swap the Moss and Lichen stripes for any two colors you like, such as pumpkin and cream for a Halloween look, or gray and white for a winter palette. Keep the Dark Moss for the wraps and knobs so the bone shape stands out.
- Size adjustments: To make a larger bone for a bigger dog, add more ripple repeats to the tube before shaping, or work the tube longer before cinching. To make a smaller toy, reduce the number of ripple repeats.
- Yarn substitutions: Any super bulky (weight 6) plush or chenille yarn will work. If you use a thinner yarn, go down a hook size and check your gauge so the stuffing stays secure.
- Squeaker option: If your dog loves noise, place a small squeaker inside the fiberfill before closing the tube. Make sure it is fully enclosed and check regularly for damage.