Heirloom Meadow Wreath Ornament Free Pattern – Knit a Botanical Garden Hoop
Heirloom Meadow Wreath Ornament Free Pattern – Knit a Botanical Garden Hoop
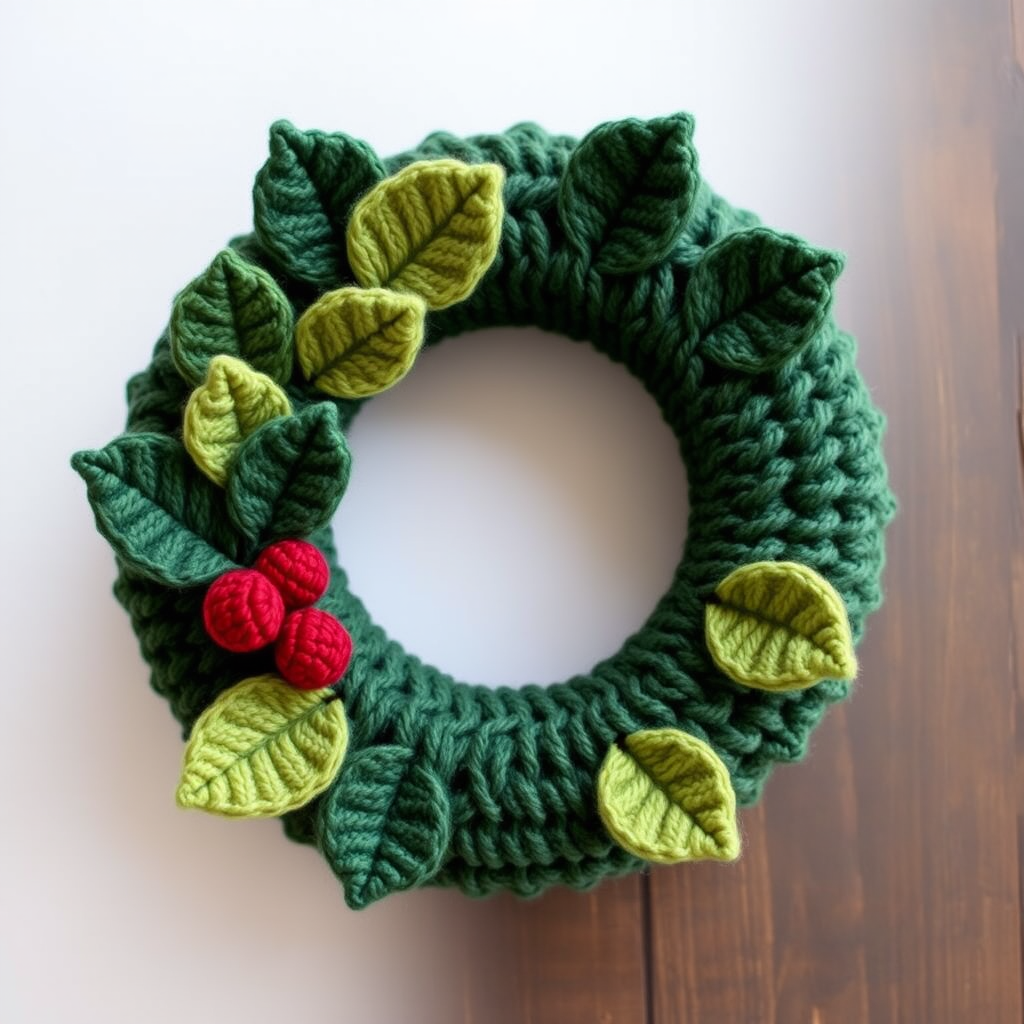
Transform your holiday decor with this knitted botanical wreath, a lush ring of textured leaves and berries that captures the quiet beauty of a winter meadow. This pattern is a meditative knit, perfect for creating a handmade heirloom that will be cherished for seasons to come. Whether you're an experienced knitter looking for a quick weekend project or a beginner eager to try something new, this pattern offers a satisfying blend of simple techniques and beautiful results. The finished wreath measures approximately 6 inches in diameter, making it perfect for hanging on a tree, adorning a gift, or adding a touch of handmade charm to any room.
Materials Needed
Before you begin, gather the following supplies. All items are readily available at your local craft store or online.
Yarn
- Worsted weight yarn in 4 colors:
- Forest Green (MC) – approximately 50g (about 100 yards)
- Sage Green (CC1) – approximately 30g (about 60 yards)
- Cream (CC2) – approximately 20g (about 40 yards)
- Rust Red (CC3) – approximately 10g (about 20 yards)
Note: Any worsted weight yarn will work. For a more heirloom feel, consider a wool blend or a yarn with a subtle sheen. The sample uses a soft, pliable yarn that shows stitch definition beautifully.
Tools & Notions
- US 6 (4.0 mm) knitting needles (straight or circular, whichever you prefer)
- Tapestry needle for weaving in ends and sewing pieces together
- Stitch markers (optional, but helpful for keeping track of rows)
- Wire wreath form (6-inch diameter) OR a cardboard ring cut to size for shaping
- Scissors
Gauge
20 stitches and 28 rows = 4 inches in stockinette stitch. Gauge is not critical for this project, but a firm fabric is desired so the wreath holds its shape. If your gauge is looser, consider using a smaller needle size.
Step-by-Step Instructions
This pattern is worked in pieces and then assembled onto a wreath form. The wreath base is a knitted tube, and the leaves and berries are knitted separately and sewn on. Take your time with each piece – the assembly is where the magic happens!
Part 1: Wreath Base
The base forms the foundation of your wreath. It's a simple stockinette tube that you'll shape into a ring.
- Cast on: Cast on 30 stitches with your Forest Green (MC) yarn. Use a long-tail cast on for a neat edge.
- Knit the tube: Work in stockinette stitch (knit one row, purl one row) for 60 rows, or until the piece measures 12 inches long. Tip: Place a stitch marker every 10 rows to keep track without counting.
- Bind off: Bind off all stitches loosely. Do not cut the yarn yet – you'll use it to sew the seam.
- Form the ring: Fold the piece in half with the right sides together. Sew the short ends together using a mattress stitch or whip stitch. Turn right side out. You now have a knitted tube that forms a ring.
Pro tip: If you're using a wire wreath form, you can slip the knitted tube over it now. If using cardboard, you'll insert it later during assembly.
Part 2: Large Leaves (Make 12)
These leaves use the Forest Green (MC) yarn. They feature a classic leaf shape with a central vein created by the increases and decreases.
- Cast on: Cast on 3 stitches with MC.
- Row 1: Knit all stitches.
- Row 2: K1, yo, k1, yo, k1 (5 stitches on needle). Tip: The yarn overs create the increases that form the leaf's width.
- Row 3: Knit all stitches.
- Row 4: K2, yo, k1, yo, k2 (7 stitches).
- Row 5: Knit all stitches.
- Row 6: K3, yo, k1, yo, k3 (9 stitches).
- Row 7: Knit all stitches.
- Row 8: K4, yo, k1, yo, k4 (11 stitches).
- Row 9: Knit all stitches.
- Row 10: K5, yo, k1, yo, k5 (13 stitches).
- Row 11: Knit all stitches.
- Row 12: K2tog, k9, k2tog (11 stitches). Tip: The decreases now shape the leaf's point.
- Row 13: Knit all stitches.
- Row 14: K2tog, k7, k2tog (9 stitches).
- Row 15: Knit all stitches.
- Row 16: K2tog, k5, k2tog (7 stitches).
- Row 17: Knit all stitches.
- Row 18: K2tog, k3, k2tog (5 stitches).
- Row 19: Knit all stitches.
- Row 20: K2tog, k1, k2tog (3 stitches).
- Row 21: K3tog (1 stitch remains). Bind off. Weave in ends.
Repeat this process 12 times total. Each leaf takes about 10 minutes to knit, so this is a great project for TV knitting.
Part 3: Small Leaves (Make 8)
These leaves use the Sage Green (CC1) yarn. They're smaller and slightly simpler than the large leaves.
- Cast on: Cast on 3 stitches with CC1.
- Row 1: Knit all stitches.
- Row 2: K1, yo, k1, yo, k1 (5 stitches).
- Row 3: Knit all stitches.
- Row 4: K2, yo, k1, yo, k2 (7 stitches).
- Row 5: Knit all stitches.
- Row 6: K3, yo, k1, yo, k3 (9 stitches).
- Row 7: Knit all stitches.
- Row 8: K2tog, k5, k2tog (7 stitches).
- Row 9: Knit all stitches.
- Row 10: K2tog, k3, k2tog (5 stitches).
- Row 11: Knit all stitches.
- Row 12: K2tog, k1, k2tog (3 stitches).
- Row 13: K3tog. Bind off. Weave in ends.
Make 8 small leaves total. These add lovely contrast and fill in gaps during assembly.
Part 4: Berries (Make 10)
These adorable bobbles use the Rust Red (CC3) yarn. They add a pop of color and playful texture to your wreath.
- Cast on: Cast on 1 stitch with CC3. Tip: This is a single stitch – don't worry, it will grow!
- Increase row: Knit into the front and back of the stitch repeatedly until you have 5 stitches on the needle. To do this: Kfb (knit front and back) across the row until you reach 5 stitches.
- Knit even: Knit 3 rows even (no increases or decreases).
- Decrease row: K2tog, k1, k2tog (3 stitches remain).
- Final decrease: K3tog (1 stitch remains). Bind off.
- Finish: Weave in the starting end, but leave a long tail (at least 8 inches) for sewing the berry to the wreath.
Make 10 berries total. The long tails are essential for secure attachment.
Part 5: Assembly
This is where your wreath comes to life! Take your time arranging the pieces for a balanced, natural look.
- Prepare the base: If you haven't already, place the knitted base ring onto the wire wreath form, stretching it evenly. If using a cardboard ring, slide it inside the knitted tube now. The tube should fit snugly – this is why a firm fabric is important.
- Arrange the leaves: Before sewing anything, lay out your leaves around the wreath to plan the arrangement. Alternate large and small leaves, overlapping them slightly. Aim for a full, lush look – you want the base to be mostly covered. Tip: Place leaves at slight angles for a more organic feel.
- Sew the leaves: Using the long tails from each leaf (or a fresh piece of MC yarn if you've already woven them in), sew each leaf securely to the base. Use small, firm stitches that won't show on the front. Start from the back of the wreath and push the needle through to the front, catching the leaf's base.
- Add the berries: Scatter the berries among the leaves, sewing them in place with their long tails. Position them in clusters of 2-3 for a natural look, or space them evenly for a more formal arrangement.
- Create a hanging loop: Thread a piece of yarn (MC works well) through the top of the wreath and tie a knot to form a loop. Make it about 3-4 inches long so the wreath hangs nicely. Tip: Sew the loop securely to the back of the wreath so it doesn't slip.
- Final touches: Weave in all remaining ends. Gently shape the leaves and berries, fluffing them outward for dimension.
Care & Display Tips
- Storage: Store your wreath flat or hanging in a cool, dry place. Avoid crushing it in a box.
- Cleaning: Spot clean with a damp cloth if needed. Do not machine wash.
- Display ideas: Hang on your Christmas tree, attach to a gift, use as a napkin ring, or create a set of three in different sizes for a mantel display.
This pattern is perfect for using up small amounts of worsted weight yarn from your stash. The finished wreath makes a thoughtful handmade gift, especially when paired with a matching ornament or a sprig of fresh greenery. Happy knitting!