Free Pattern: The Meadow Whisper Cottage Apron Halter
Free Pattern: The Meadow Whisper Cottage Apron Halter
Introduction
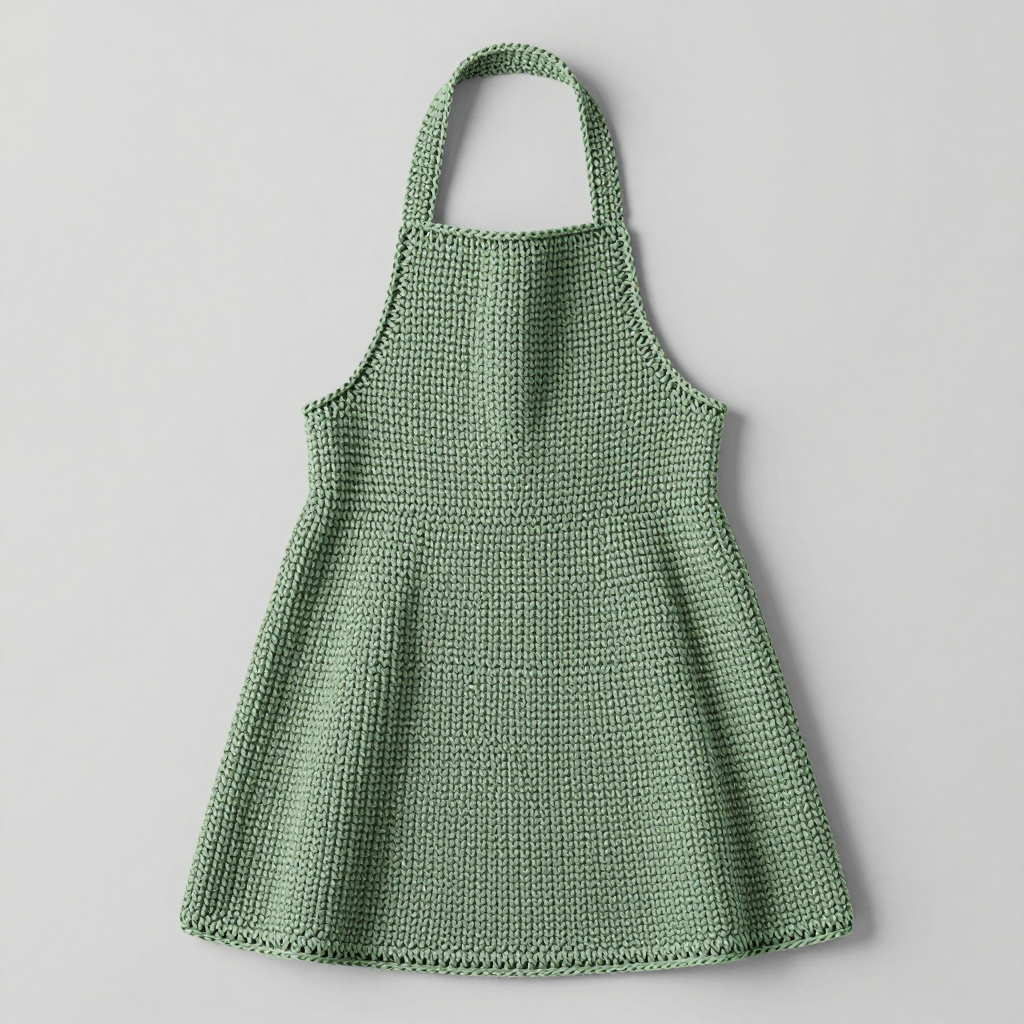
Welcome to the Meadow Whisper Cottage Apron Halter — a sweet, vintage-inspired apron that is absolutely perfect for anyone who has never picked up a crochet hook before. This project is special because it is worked almost entirely in two simple stitches (half double crochet and double crochet), so you can build real confidence while making something genuinely beautiful and useful. The finished apron has a soft sage green cottage feel, with a halter neck loop that ties comfortably behind your neck, a gently widening bib, and a softly flared skirt that drapes like a favorite old apron you have loved for years. It looks lovely layered over a simple dress or jeans and a tee, and it feels light, breezy, and handmade in the best possible way. If you can make a slip knot and a chain, you can make this — let's walk through every single step together.
Materials Needed
- Yarn: Worsted weight (category 4) cotton or cotton-blend yarn — approximately 350–400 yards of sage green. The sample uses Lily Sugar 'n Cream in Sage Green. Cotton is recommended because it is sturdy, washable, and holds the apron shape nicely.
- Crochet hook: Size G/6 (4.0 mm). (The "G/6" is the US size name, and "4.0 mm" is the metric size — they are the same hook.)
- Stitch markers: At least 4. These are small clips or loops of plastic you place in a stitch to mark your place. They are your best friend as a beginner.
- Tapestry needle: A large, blunt-tipped sewing needle with an eye big enough for yarn. Used for weaving in ends.
- Scissors: Any sharp pair for cutting yarn.
- Measuring tape: For checking gauge and finished size.
Finished size/dimensions: The bib measures approximately 15 inches wide at the top edge and widens to about 16.5 inches at the waist. The skirt flares from about 16.5 inches wide at the top to approximately 28.5 inches wide at the bottom hem, and the skirt is about 6 inches tall. The halter neck ties are each about 15 inches long (the 60-stitch chain), and the waist ties are each about 15 inches long. This makes a comfortable, one-size-fits-most apron.
Abbreviations and Beginner Glossary
Every abbreviation used in this pattern is listed below and explained in plain English. You do not need any prior knowledge — read each one slowly and it will all make sense.
- ch — chain: Make a slip knot on your hook, then wrap the yarn over the hook and pull it through the loop already on your hook. That is one chain. A row of chains is the foundation you build on.
- sc — single crochet: Insert your hook into the stitch, wrap yarn over the hook and pull up a loop (you now have 2 loops on the hook), wrap yarn over again and pull through both loops. One single crochet made.
- hdc — half double crochet: Wrap yarn over the hook before inserting it, insert hook into the stitch, wrap yarn over and pull up a loop (3 loops on hook), wrap yarn over again and pull through all three loops at once. One half double crochet made.
- dc — double crochet: Wrap yarn over the hook, insert hook into the stitch, wrap yarn over and pull up a loop (3 loops on hook), wrap yarn over and pull through the first 2 loops (2 loops remain), wrap yarn over and pull through the last 2 loops. One double crochet made.
- sl st — slip stitch: Insert hook into the stitch, wrap yarn over and pull it through both the stitch and the loop on your hook in one motion. It makes a tiny, flat joining stitch.
- st(s) — stitch(es): One completed stitch, or several.
- sk — skip: Do not work into that stitch; simply move past it to the next one.
- sp — space: The gap created by a chain (for example, a "ch-20 space" is the gap made by chaining 20).
- 2 hdc in next st — increase: Work two half double crochets into the same stitch. This adds one stitch and makes the fabric wider.
- turn: Flip your work over so you can work back across the row you just finished.
- fasten off: Cut the yarn leaving a 6-inch tail, then pull the tail all the way through the last loop on your hook to lock it.
- join yarn: Make a slip knot on your hook, insert the hook into the stitch where you want to begin, and pull up a loop to start working.
- right side (RS): The "good" side of the fabric that will face outward when worn.
- weave in ends: Thread a yarn tail onto a tapestry needle and sew it back and forth through the fabric so it disappears and will not unravel.
Gauge
Gauge: 16 stitches x 18 rows = 4 inches (10 cm) in half double crochet (hdc).
Why gauge matters: Gauge is simply how big your stitches come out. If your stitches are bigger than the pattern's, your apron will come out larger than listed; if smaller, it will come out smaller. Checking gauge first means your finished apron will match the measurements above.
How to make a gauge swatch: With your G/6 (4.0 mm) hook and your yarn, chain 22. Work 1 hdc in the 2nd chain from the hook and in each chain across (20 hdc). Then work 20 more rows of hdc, chaining 2 and turning at the start of each row. Lay the swatch flat, place a measuring tape across the middle, and count how many stitches fit in 4 inches and how many rows fit in 4 inches. If you have more than 16 stitches in 4 inches, your stitches are too tight — try a larger hook. If you have fewer than 16, your stitches are too loose — try a smaller hook. Adjust and swatch again until you are close.
Beginner Tips Before You Start
- Count your stitches at the end of every row. The stitch count in parentheses at the end of each row is your safety net. If your count is off, fix it before moving on — it is much easier to fix one row than ten.
- Use stitch markers generously. Place a marker in the first stitch of each row and in the last stitch of each row. Beginners very often miss the last stitch, which makes rows shrink. Markers prevent this.
- Do not pull your yarn too tight. Tension should feel relaxed and even. If your hook squeaks or fights you, you are pulling too hard. Loosen your grip on the yarn.
- Remember the ch-2 at the start of hdc rows does not count as a stitch. That means your first actual hdc goes into the very first stitch of the previous row. This keeps your stitch counts correct.
- Work in good light and take breaks. Your hands and eyes will tire faster than you expect at first. Ten minutes of rest keeps your tension even.
- Keep your turning chain consistent. For hdc rows you chain 2; for dc rows you chain 3 (which does count as the first double crochet). Write this on a sticky note if it helps.
Step-by-Step Instructions
NOTE: The apron is worked top-down, beginning at the halter neck ties, then increasing for the bib, and finally working the skirt with gentle flare. The ch-2 at the beginning of hdc rows does not count as a stitch unless noted. The ch-3 at the beginning of dc rows does count as the first double crochet.
Halter Neck Ties
Row 1: Ch 61. Sc in the 2nd ch from hook and in each ch across. (60 sc)
Row 2: Ch 2, turn. Hdc in each st across. (60 hdc)
Row 3: Ch 2, turn. Hdc in the first 20 sts, ch 20 (this creates the neck opening), sk the next 20 sts, hdc in the last 20 sts. (40 hdc + 20 ch)
Row 4: Ch 2, turn. Hdc in each hdc and in each ch across. (60 hdc)
Fasten off. This creates the halter neck loop and the top edge of the bib.
Bib
Row 1: With the right side facing, join yarn at the left edge of Row 4. Ch 2, hdc evenly across the 60 sts. (60 hdc)
Row 2: Ch 2, turn. Hdc in each st across. (60 hdc)
Row 3: Ch 2, turn. Hdc in each st across. (60 hdc)
Row 4: Ch 2, turn. Hdc in each st across. (60 hdc)
Row 5: Ch 2, turn. Hdc in each st across. (60 hdc)
Row 6: Ch 2, turn. Hdc in each st across. (60 hdc)
Row 7: Ch 2, turn. Hdc in each st across. (60 hdc)
Row 8: Ch 2, turn. Hdc in each st across. (60 hdc)
Row 9: Ch 2, turn. Hdc in each st across. (60 hdc)
Row 10: Ch 2, turn. Hdc in each st across. (60 hdc)
Row 11 (increase row): Ch 2, turn. Hdc in the first 2 sts, 2 hdc in the next st, hdc in each st until 3 sts remain, 2 hdc in the next st, hdc in the last 2 sts. (62 hdc)
Row 12: Ch 2, turn. Hdc in each st across. (62 hdc)
Row 13: Ch 2, turn. Hdc in each st across. (62 hdc)
Row 14: Ch 2, turn. Hdc in each st across. (62 hdc)
Row 15 (increase row): Ch 2, turn. Hdc in the first 2 sts, 2 hdc in the next st, hdc in each st until 3 sts remain, 2 hdc in the next st, hdc in the last 2 sts. (64 hdc)
Row 16: Ch 2, turn. Hdc in each st across. (64 hdc)
Row 17: Ch 2, turn. Hdc in each st across. (64 hdc)
Row 18: Ch 2, turn. Hdc in each st across. (64 hdc)
Row 19 (increase row): Ch 2, turn. Hdc in the first 2 sts, 2 hdc in the next st, hdc in each st until 3 sts remain, 2 hdc in the next st, hdc in the last 2 sts. (66 hdc)
Row 20: Ch 2, turn. Hdc in each st across. (66 hdc)
Row 21: Ch 2, turn. Hdc in each st across. (66 hdc)
Row 22: Ch 2, turn. Hdc in each st across. (66 hdc)
Do not fasten off. Continue directly to the skirt.
Skirt (worked in rows for gentle flare)
Row 1: Ch 3 (counts as the first dc), turn. Dc in each st across. (66 dc)
Row 2: Ch 3, turn. Dc in the first st, 2 dc in the next st, *dc in the next 4 sts, 2 dc in the next st; repeat from * to the last 2 sts, dc in the last 2 sts. (78 dc)
Row 3: Ch 3, turn. Dc in each st across. (78 dc)
Row 4: Ch 3, turn. Dc in the first 2 sts, 2 dc in the next st, *dc in the next 5 sts, 2 dc in the next st; repeat from * to the last 3 sts, dc in the last 3 sts. (90 dc)
Row 5: Ch 3, turn. Dc in each st across. (90 dc)
Row 6: Ch 3, turn. Dc in the first st, 2 dc in the next st, *dc in the next 6 sts, 2 dc in the next st; repeat from * to the last 2 sts, dc in the last 2 sts. (102 dc)
Row 7: Ch 3, turn. Dc in each st across. (102 dc)
Row 8: Ch 3, turn. Dc in the first 2 sts, 2 dc in the next st, *dc in the next 7 sts, 2 dc in the next st; repeat from * to the last 3 sts, dc in the last 3 sts. (114 dc)
Row 9: Ch 3, turn. Dc in each st across. (114 dc)
Row 10: Ch 3, turn. Dc in each st across. (114 dc)
Row 11: Ch 3, turn. Dc in each st across. (114 dc)
Row 12: Ch 3, turn. Dc in each st across. (114 dc)
Fasten off and weave in ends.
Waist Ties
Left tie: With the right side facing, join yarn at the left side of the bib/skirt junction. Ch 1, then sc evenly along the side edge for 3 inches. Ch 60 for the tie, then sl st in the 2nd ch from the hook and in each ch across, then sc back along the side edge to the starting point. Fasten off.
Right tie: Repeat the exact same steps on the right side of the bib/skirt junction to make the second waist tie. Fasten off.
Assembly and Finishing
Weaving in ends: Thread each yarn tail onto your tapestry needle. Turn the apron to the wrong side and sew the tail back and forth through the back of several stitches (about 2 inches), then reverse direction and sew back through a few more stitches. Trim the tail close to the fabric. Do this for every tail — the halter ties, the bib join, the skirt end, and both waist ties.
Seaming: This apron is worked in one continuous piece, so there are no seams to sew. The only "joining" is the halter neck loop created in Row 3 of the halter section, which is already complete. Simply check that the neck loop lies flat and even.
Blocking: Lightly block the apron to shape it. Lay it flat on a towel or blocking mat, mist it evenly with clean water from a spray bottle until slightly damp (do not soak it), and gently pat the bib and skirt into the measurements listed above. Let it dry completely flat, away from direct heat. Cotton blocks beautifully and this step makes the stitches even and the drape lovely.
Optional cottage touch: Add a small crocheted flower or a simple pocket to the bib for extra charm.
Pro Tips and Variations
- Change colors for a cottage stripe: Work the bib in sage green and the skirt in a soft cream, or add a contrast-color border of sc around the entire outer edge for a vintage trim look.
- Adjust the size: To make the apron wider, add extra increase rows in the bib (each increase row adds 2 stitches). To make it longer, simply work more plain dc rows in the skirt before fastening off — the flare stays the same.
- Substitute yarn: Any worsted weight (category 4) cotton or cotton-blend works. Avoid fuzzy or slippery yarns as a beginner, since they make it harder to see your stitches. Always swatch first if you change yarn, because gauge can shift.
- Make the ties longer or shorter: The halter chain (ch 61) and waist tie chains (ch 60) can be adjusted by any number of chains to fit you perfectly — just keep both sides equal.


