Espresso Chip Coffee Cozy Free Pattern – A Knitted Café Cup Sleeve
Wrap Your Morning in Handcrafted Warmth: The Espresso Chip Coffee Cozy
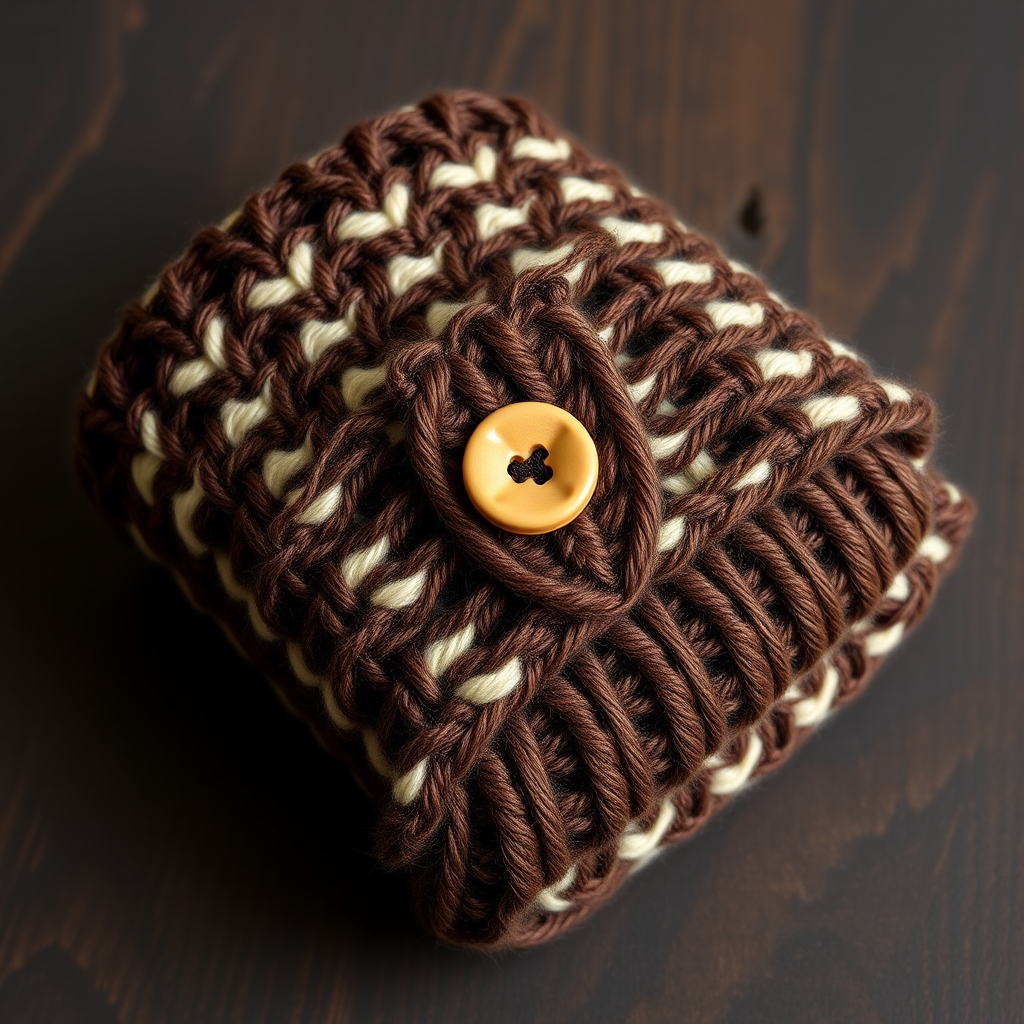
There's something magical about wrapping your hands around a warm cup of coffee, especially when that cup is dressed in something you've made yourself. The Espresso Chip Coffee Cozy is more than just a cup sleeve—it's a love letter to slow mornings, cozy cafés, and the simple joy of creating something beautiful and functional. This quick, beginner-friendly knitting project uses a clever slip-stitch pattern to create a dense, insulating fabric that feels as luxurious as it looks. The deep espresso brown and warm cream stripes evoke the rich texture of chocolate chips scattered through your favorite coffee treat, making this the perfect gift for the barista in your life or a delightful treat for your own morning ritual.
Whether you're a seasoned knitter looking for a satisfying weekend project or a beginner ready to try something new, this pattern is designed to be approachable, forgiving, and endlessly rewarding. Let's dive in and create something that will make every coffee break feel special.
Materials Needed
Before we begin, gather your supplies. This project is wonderfully portable and requires minimal materials, making it perfect for knitting on the go or while enjoying your own cup of coffee.
- Yarn: Worsted weight cotton or cotton-blend yarn in two colors:
- Main Color (MC): Deep espresso brown (approximately 50g)
- Contrast Color (CC): Warm cream (approximately 50g)
- Needles: US 6 (4.0 mm) knitting needles, or size needed to obtain gauge
- Notions: Tapestry needle for weaving in ends and seaming, one wooden button (natural tone recommended), and a small amount of scrap yarn or thread for creating a button loop
Gauge: 22 stitches and 30 rows = 4 inches in slip-stitch pattern (after blocking). While gauge is important for a perfect fit, this cozy is quite forgiving—the button closure allows for some flexibility in sizing.
Step-by-Step Instructions
This cozy is knitted flat and seamed, with a button closure for a snug fit around any mug. The slip-stitch pattern creates a dense, textured fabric that provides excellent insulation. Let's walk through each step together.
Abbreviations
Before we start, let's review the abbreviations used in this pattern:
- CO: Cast on
- K: Knit
- P: Purl
- sl1: Slip 1 stitch purlwise with yarn in back
- k2tog: Knit 2 stitches together (decrease)
- BO: Bind off
- MC: Main color (espresso brown)
- CC: Contrast color (cream)
Getting Started: The Foundation
Row 1 (Right Side): With your Main Color (MC), cast on 34 stitches. Take your time with this step—a neat cast-on edge will make your finished cozy look professional and polished. If you're new to casting on, the long-tail cast-on method works beautifully for this project.
Row 2 (Wrong Side): K1, *sl1, K1; repeat from * to last stitch, K1. This row sets up the slip-stitch rib pattern. Notice how you're slipping stitches with the yarn in back, which creates those lovely elongated stitches that give this pattern its texture.
Row 3 (Right Side): K1, *K1, sl1; repeat from * to last stitch, K1. You're now working the slip-stitch pattern in the opposite direction, which creates the distinctive ribbed texture.
Row 4 (Wrong Side): Repeat Row 2. You've now completed your first set of MC rows. Take a moment to admire the texture you're creating—it's dense, warm, and has a beautiful woven appearance.
Introducing the Contrast Color
Row 5 (Right Side): Switch to your Contrast Color (CC). K1, *sl1, K1; repeat from * to last stitch, K1. When switching colors, simply drop the old color and pick up the new one, leaving a tail of about 6 inches to weave in later. Don't worry about carrying the yarn up the side—we'll be seaming this edge, so the loose strands will be hidden.
Row 6 (Wrong Side): K1, *K1, sl1; repeat from * to last stitch, K1. Notice how the pattern shifts slightly with the color change, creating a beautiful striped effect.
Row 7 (Right Side): Repeat Row 6. Yes, you read that correctly—on this row, you'll knit the slipped stitches and slip the knitted ones. This creates a subtle shift in the texture that adds depth to the cream stripe.
Row 8 (Wrong Side): Repeat Row 6. Your first cream stripe is complete. It should be about 4 rows tall, creating a nice visual break from the brown sections.
Building the Stripe Pattern
Now that you've mastered the basic pattern, we'll alternate between MC and CC to create the beautiful striped design. Each color section is worked in pairs of rows, with the MC sections being 2 rows tall and the CC sections being 4 rows tall. This creates an asymmetrical stripe pattern that's visually interesting and mimics the look of chocolate chips scattered through cream.
Rows 9-10: With MC, repeat Rows 2-3. Remember, Row 2 is K1, *sl1, K1; repeat from * to last stitch, K1, and Row 3 is K1, *K1, sl1; repeat from * to last stitch, K1.
Rows 11-12: With CC, repeat Rows 5-6. Row 5 is K1, *sl1, K1; repeat from * to last stitch, K1, and Row 6 is K1, *K1, sl1; repeat from * to last stitch, K1.
Rows 13-14: With MC, repeat Rows 2-3.
Rows 15-16: With CC, repeat Rows 5-6.
Rows 17-18: With MC, repeat Rows 2-3.
Rows 19-20: With CC, repeat Rows 5-6.
Rows 21-22: With MC, repeat Rows 2-3.
Rows 23-24: With CC, repeat Rows 5-6.
Rows 25-26: With MC, repeat Rows 2-3.
Rows 27-28: With CC, repeat Rows 5-6.
Rows 29-30: With MC, repeat Rows 2-3.
Take a moment to check your work. You should have a beautiful striped fabric with alternating brown and cream sections. The slip-stitch pattern creates a dense, warm fabric that will protect your hands from hot mugs while looking absolutely gorgeous.
Shaping the Cozy
Now we'll begin shaping the cozy to fit snugly around your mug. This decrease section creates a slight taper at the bottom, ensuring a perfect fit.
Row 31 (Right Side): With MC, K1, *k2tog, sl1; repeat from * to last 2 stitches, k2tog. Let's break this down: you'll knit 1, then work the decrease pattern across the row. The k2tog (knit 2 together) decreases your stitch count, while the sl1 maintains the slip-stitch texture. When you reach the last 2 stitches, knit them together. You should now have 23 stitches on your needle.
Row 32 (Wrong Side): With MC, K1, *sl1, K1; repeat from * to end. This row maintains the pattern without further decreases, creating a smooth transition to the bind-off edge.
Row 33 (Right Side): Bind off all stitches knitwise. To bind off knitwise, knit the first stitch, then knit the second stitch. Use the left needle to lift the first stitch over the second and off the needle. Continue this pattern across all stitches until one loop remains. Cut your yarn, leaving a 6-inch tail, and pull it through the last loop to secure.
Finishing Touches
Your cozy is nearly complete! Now for the finishing steps that will transform your knitted rectangle into a beautiful, functional cup sleeve.
Step 1: Weave in All Ends
Using your tapestry needle, carefully weave in all loose ends. Thread the needle with each yarn tail and weave it through the wrong side of the fabric, following the path of the stitches. This hides the ends securely and ensures your cozy will withstand many washes and uses. Take your time with this step—neat finishing makes a world of difference in the final look.
Step 2: Seam the Side
Fold the cozy in half with the right side facing out. The right side is the side with the most even, beautiful slip-stitch texture. Using your tapestry needle and MC yarn, sew the side seam from the bottom edge up about 1 inch. This creates a small tube at the bottom that will help the cozy stay in place on your mug, while leaving the top open for the mug handle to slip through.
To sew the seam, use a mattress stitch or whip stitch, matching stitch for stitch along the edge. Keep your tension even but not too tight—you want the seam to be flexible and comfortable against the mug.
Step 3: Attach the Button
Now for the closure. Attach your wooden button to the overlapping flap on the outside of the cozy. Position it about 1 inch from the top edge and centered on the flap. Sew it securely using your tapestry needle and a doubled strand of MC yarn, creating a shank (a small space between the button and fabric) so the button can easily pass through the loop.
Step 4: Create the Button Loop
On the inside edge of the cozy, create a small loop for the button to pass through. You can do this by crocheting a few chain stitches with MC yarn, or by creating a simple loop with a few strands of yarn twisted together. Attach the loop securely to the inside edge, positioned to align with your button when the cozy is wrapped around the mug.
Alternatively, for a simpler approach, you can use the button as a decorative closure with a loop made from a few chain stitches. Either method works beautifully—choose what feels most comfortable for you.
Step 5: Block Gently
Finally, block your cozy to even out the slip-stitch texture and ensure a professional finish. To block, wet the cozy with lukewarm water, gently squeeze out excess moisture (never wring!), and lay it flat on a towel. Shape it to the desired dimensions and allow it to dry completely. This step helps the stitches relax and settle into their final form, creating a beautifully even texture.
Your Cozy Is Complete!
Congratulations! You've just created a beautiful, functional piece of knitwear that will make every coffee break feel special. Slip it around your favorite mug, button it up, and enjoy the warmth and comfort of your handcrafted creation. The dense slip-stitch fabric provides excellent insulation, keeping your coffee hot and your hands comfortable.
This pattern is wonderfully versatile—experiment with different color combinations to match your style or the seasons. Try a deep burgundy and cream for autumn, or a soft sage and white for spring. The possibilities are endless, and each cozy you make will be a unique expression of your creativity.
Whether you're keeping this cozy for yourself or gifting it to a fellow coffee lover, you've created something truly special. Happy knitting, and enjoy your next cup of coffee—wrapped in warmth and made with love.