Enchanted Acorn Towel Topper Free Pattern – Knit a Woodland Charm
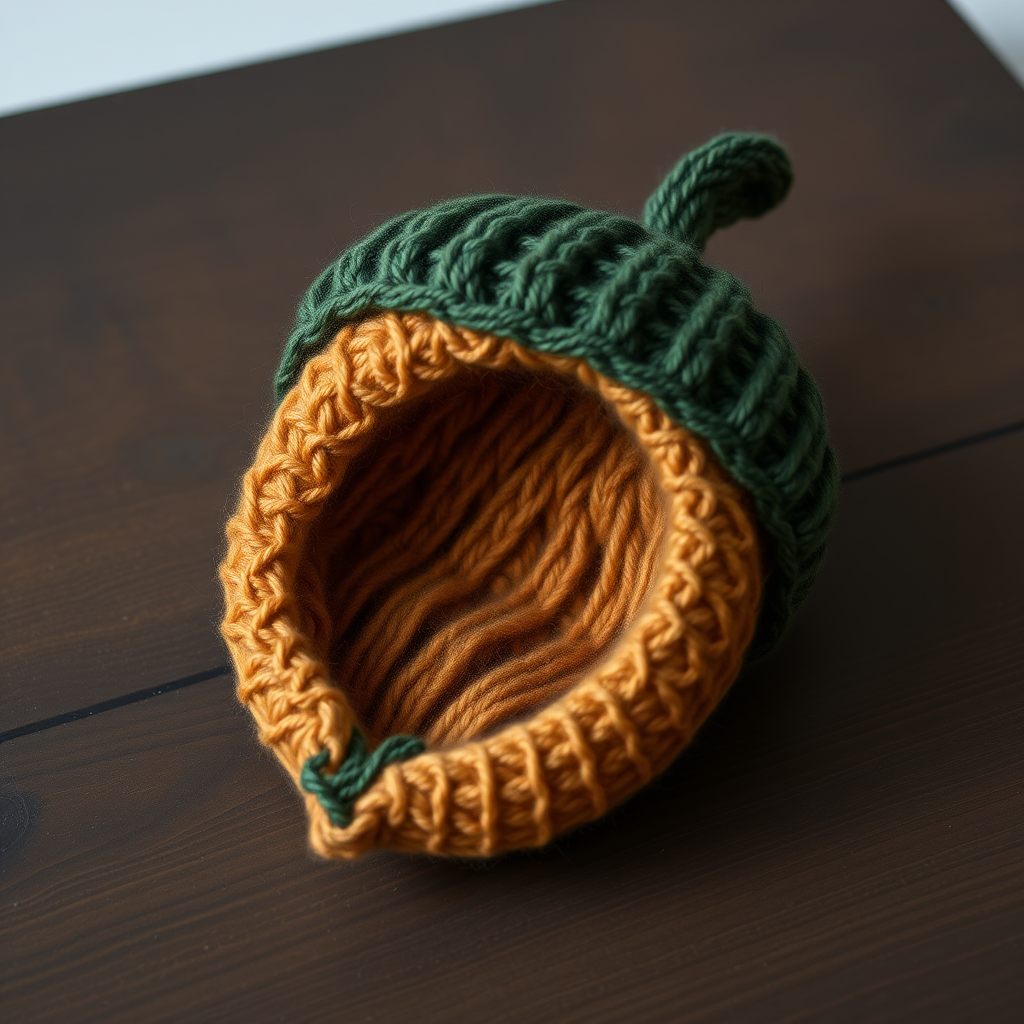
Enchanted Acorn Towel Topper Free Pattern – Knit a Woodland Charm
Transform your kitchen into a whimsical forest with this knitted acorn towel topper, featuring a textured cap and a cozy hanging loop. This charming design adds a touch of rustic elegance to any towel while keeping it within easy reach. Whether you're an experienced knitter looking for a quick weekend project or a beginner ready to tackle your first shaped piece, this pattern offers a delightful blend of simple techniques and satisfying results. The finished acorn measures approximately 4 inches tall (excluding the loop), making it the perfect size to adorn hand towels, dish towels, or even as a decorative gift topper.
This pattern is knitted flat in two pieces and then seamed together, creating a three-dimensional acorn shape that's both sturdy and soft. The acorn cap is worked in deep forest green, while the acorn body uses warm brown yarn, giving it that classic woodland palette. The hanging loop is knitted as an i-cord, a technique that produces a neat, round cord perfect for hanging. With clear instructions and detailed steps, you'll have your very own enchanted acorn towel topper ready in just a few hours of enjoyable knitting.
Materials Needed
Before you begin, gather the following supplies to ensure a smooth knitting experience:
- Yarn: Worsted weight cotton or cotton-blend yarn in two colors:
- Color A (warm brown): approximately 100 yards
- Color B (deep forest green): approximately 100 yards
- Knitting Needles: US Size 7 (4.5 mm) straight needles for the main pieces
- Double-Pointed Needle (DPN): US Size 7 (4.5 mm) for the i-cord loops
- Tapestry Needle: For seaming and weaving in ends
- Stitch Marker: To mark the beginning of rounds if needed (optional but helpful)
- Fiberfill (optional): For lightly stuffing the acorn body to give it a plump shape
- Scissors
- Button or Safety Pin (optional): For attaching the towel topper to your towel
Gauge: 20 stitches and 26 rows = 4 inches in stockinette stitch (knit on RS, purl on WS). Gauge is important for achieving the correct size, so take a moment to knit a small swatch before starting. If your gauge is off, adjust your needle size accordingly – smaller needles for tighter gauge, larger needles for looser.
Step-by-Step Instructions
This pattern is worked in two main pieces (the acorn body and the cap) plus two i-cord loops. Follow each section carefully, and you'll have a beautiful finished acorn towel topper in no time.
Acorn Body (Brown – Color A)
The acorn body is knitted flat, starting from the bottom and working upward. The increases create the rounded bottom, then you work even, and finally decrease to form the top that will be hidden under the cap.
- Cast On: Cast on 12 stitches with Color A using your preferred method (long-tail cast on works well).
- Row 1 (Right Side): Knit all stitches.
- Row 2 (Wrong Side): Purl all stitches.
- Row 3 (Increase Row – RS): K1, M1 (make one – lift the bar between stitches and knit through the back loop), knit to the last stitch, M1, K1. You now have 14 stitches.
- Row 4: Purl all stitches.
- Repeat Rows 3-4: Continue repeating these two rows until you have 24 stitches on your needle. This will take 5 more increase rows (each increase row adds 2 stitches).
- Work Even: Once you have 24 stitches, work even in stockinette stitch (knit on RS, purl on WS) for 10 rows. This creates the straight middle section of the acorn body.
- Decrease Row (RS): K1, k2tog (knit two together – insert right needle into two stitches as if to knit, wrap yarn, pull through, and slip both off), knit to the last 3 stitches, k2tog, K1. You now have 22 stitches.
- Next Row (WS): Purl all stitches.
- Repeat Decrease Rows: Continue repeating these two rows (decrease row on RS, purl row on WS) until you have 12 stitches remaining. This will take 5 decrease rows total.
- Final Decrease Row (RS): K2tog across all stitches. You will have 6 stitches remaining.
- Finish: Cut the yarn, leaving a long tail (about 12 inches). Thread the tail through a tapestry needle, then pass it through all 6 remaining stitches on the knitting needle. Slip the stitches off the needle, pull the yarn tight to gather the stitches closed, and secure with a knot. This forms the rounded bottom of the acorn.
Pro Tip: When pulling the yarn through the final stitches, pull firmly but gently to avoid breaking the yarn. The gathered stitches will create a neat, rounded bottom.
Acorn Cap (Green – Color B)
The acorn cap is worked similarly to the body but is slightly smaller and tapers to a point at the top. It will sit over the top of the body like a little hat.
- Cast On: Cast on 12 stitches with Color B.
- Row 1 (RS): Knit all stitches.
- Row 2 (WS): Purl all stitches.
- Row 3 (Increase Row – RS): K1, M1, knit to the last stitch, M1, K1. You now have 14 stitches.
- Row 4: Purl all stitches.
- Repeat Rows 3-4: Continue repeating these two rows until you have 20 stitches on your needle. This will take 4 more increase rows.
- Work Even: Work even in stockinette stitch for 6 rows. This creates the slightly flared section of the cap that will sit over the acorn body.
- Decrease Row (RS): K1, k2tog, knit to the last 3 stitches, k2tog, K1. You now have 18 stitches.
- Next Row (WS): Purl all stitches.
- Repeat Decrease Rows: Continue repeating these two rows until you have 8 stitches remaining. This will take 5 decrease rows total.
- Finish: Cut the yarn, leaving a long tail. Thread the tail through a tapestry needle, pass it through all 8 remaining stitches, slip them off the needle, pull tight, and secure. This creates the pointed top of the cap.
Note: The cap is intentionally smaller than the body so it fits snugly over the top. The pointed top mimics the natural acorn cap shape.
Finishing the Acorn Pieces
Now it's time to bring the two pieces together into a complete acorn shape.
- Seam the Acorn Body: Using the long tail from the body (or a new piece of Color A yarn threaded on a tapestry needle), use mattress stitch to seam the sides of the acorn body together. Place the right sides together and sew from the gathered bottom up to the open top. Leave the top open – this is where the cap will attach.
- Optional Stuffing: If you'd like a plump, rounded acorn, lightly stuff the body with fiberfill before closing the top completely. Don't overstuff – you want it soft and squishy, not firm. Leave the top edge open for now.
- Seam the Acorn Cap: Using the long tail from the cap (or a new piece of Color B yarn), seam the sides of the cap together using mattress stitch. Leave the bottom open – this is where it will attach to the body.
- Attach the Cap to the Body: Place the cap over the top of the body, aligning the seams. The cap should cover the top edge of the body. Using Color B yarn and a tapestry needle, whipstitch the cap to the body around the opening. Work through both layers to secure them together firmly. Make sure the stitches are neat and hidden as much as possible.
Pro Tip: When whipstitching the cap to the body, insert the needle through the inside of the cap and the outside of the body to hide the seam. Take small, even stitches for a clean finish.
Hanging Loop (I-Cord)
The hanging loop is a simple i-cord that extends from the top of the cap, allowing you to hang the acorn from a hook or towel bar.
- Cast On: With Color B, cast on 3 stitches onto a double-pointed needle.
- Knit the I-Cord: *Knit 3 stitches, then slide the stitches to the other end of the needle (do not turn the work). Repeat from * until the i-cord measures approximately 8 inches. The yarn will be pulled across the back of the work, creating a neat, round cord.
- Bind Off: Bind off the 3 stitches loosely. Cut the yarn, leaving a tail for sewing.
- Attach the Loop: Fold the i-cord in half to form a loop. Using the tail and a tapestry needle, sew the ends of the i-cord to the top of the acorn cap, right at the point. Make sure the loop is securely attached – you'll be hanging the towel from this loop, so it needs to be strong. Weave in the ends.
Tip: If you don't have a double-pointed needle, you can use a regular needle and just slide the stitches to the other end – the technique works the same way.
Towel Attachment
Now for the functional part – attaching your acorn to a towel. There are a few methods, so choose the one that works best for you.
- Pick Up Stitches: On the back of the acorn body, near the top (just below the cap), pick up and knit 4 stitches across the seam. This will be the base for your buttonhole loop.
- Knit a Buttonhole Loop: Using the same i-cord method as above, knit a 2-inch i-cord with these 4 stitches. Bind off and weave in the ends. This creates a small loop on the back of the acorn.
- Attach to Towel: There are several ways to use this loop:
- Button Method: Sew a button onto your towel (near a corner or edge). Slip the buttonhole loop over the button to attach the acorn. This allows you to remove the acorn for washing.
- Safety Pin Method: Use a small safety pin to attach the loop to the towel. This is the quickest and easiest method, and it's completely removable.
- Sew Directly: If you prefer a permanent attachment, sew the loop directly onto the towel using a needle and thread. This is the most secure method but makes the acorn non-removable.
Pro Tip: If using the button method, choose a button that fits snugly through the loop but isn't too tight. A wooden or natural-toned button complements the rustic woodland aesthetic beautifully.
Weave in All Ends
Using your tapestry needle, weave in all loose ends carefully. Thread the needle with each tail, then weave it through the wrong side of the work, following the path of the stitches. Trim any excess yarn close to the work. Take your time with this step – well-woven ends make your finished piece look professional and ensure it holds up to washing and use.
Congratulations! Your Enchanted Acorn Towel Topper is complete. Hang it on your favorite kitchen towel and enjoy the whimsical woodland charm it brings to your space. This pattern is perfect for gift-giving – make a set of acorns in different colors (think autumn oranges, deep reds, or even soft creams) to match any kitchen decor. The techniques you've practiced here – increases, decreases, seaming, and i-cord – are foundational skills that will serve you well in countless future projects.
Happy knitting, and may your kitchen always feel a little more enchanted!


