Emberwood Wrist Cuff Free Pattern – Knit a Cozy Cable-Knit Arm Warmer
Wrap Your Wrists in Cozy Elegance: The Emberwood Cable-Knit Cuff
There's something deeply comforting about wrapping your hands in a handmade knit, especially when the temperature drops. The Emberwood Wrist Cuff is more than just an accessory—it's a small, satisfying project that delivers big on style and warmth. With its rich, textured cable motif and chunky bulky yarn, this cuff feels like a forest cabin hug for your wrists. Whether you're a seasoned knitter looking for a quick weekend project or a brave beginner ready to tackle your first cable, this pattern is designed to guide you through every twist and turn. Let's dive into creating a statement piece that's perfect for chilly fall mornings and cozy winter evenings.
Why You'll Love This Pattern
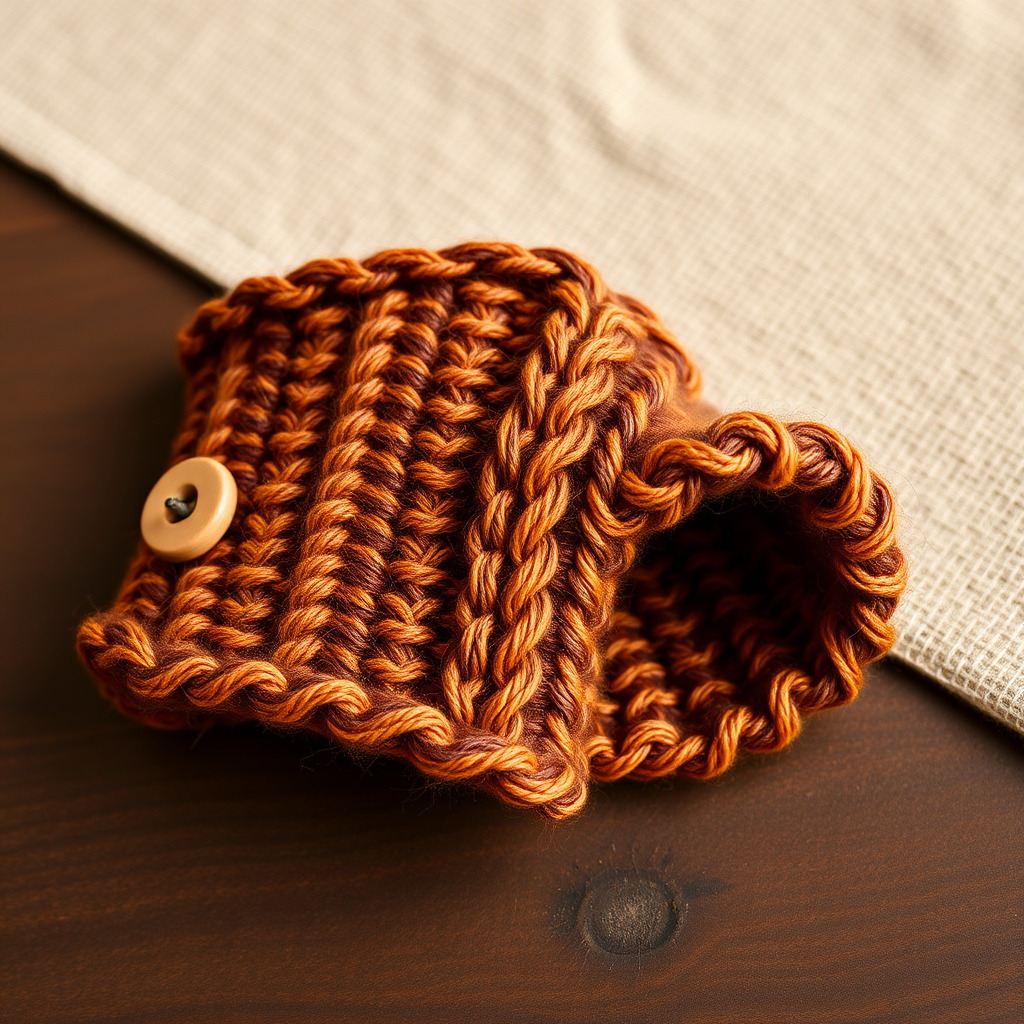
This isn't just any arm warmer. The Emberwood Cuff features a beautifully defined braided cable running vertically down the center, framed by neat ribbed edges that ensure a snug, comfortable fit. The button closure adds a rustic, customizable touch—you can adjust the fit to your wrist perfectly. Plus, because it's knitted flat and seamed, it's a fantastic project for practicing cable techniques without the complexity of knitting in the round. The result? A polished, professional-looking accessory that you'll be proud to wear or gift.
Materials Needed: Your Knitting Toolkit
Before you cast on, gather these simple supplies. The beauty of this project is its minimalism—you don't need a lot to create something stunning.
- Yarn: Bulky weight yarn (approx. 120 yards). The sample shown uses a heathered burnt orange and deep brown tweed, but any bulky yarn will work beautifully. Look for something with good stitch definition to make your cables pop.
- Knitting Needles: US 10.5 (6.5 mm) knitting needles, or the size needed to achieve gauge. A cable needle is also essential for this project.
- Notions: A tapestry needle for weaving in ends, a stitch marker (optional but helpful), and a wooden or leather button for the closure.
- Gauge: 14 stitches and 20 rows = 4 inches in stockinette stitch. Always check your gauge! Getting the right tension ensures your cuff fits perfectly.
Step-by-Step Instructions: Knitting Your Emberwood Cuff
This pattern is knitted flat and seamed, with a button closure for a customizable fit. Follow these detailed instructions carefully, and you'll have a beautiful cuff in no time.
Abbreviations You'll Need to Know
- CO: Cast on
- K: Knit
- P: Purl
- C4F: Slip 2 stitches to cable needle, hold in front, knit 2, knit 2 from cable needle
- C4B: Slip 2 stitches to cable needle, hold in back, knit 2, knit 2 from cable needle
- K2tog: Knit 2 stitches together (a right-leaning decrease)
- SSK: Slip slip knit (a left-leaning decrease)
- BO: Bind off
- YO: Yarn over (creates an eyelet hole for the button)
Getting Started: Cast On and Foundation Rows
CO 22 stitches onto your US 10.5 needles. This stitch count creates a cuff that's about 4 inches wide, perfect for most wrists. If you have a particularly slender or wide wrist, you can adjust the stitch count in multiples of 4, but for this pattern, we'll stick with 22.
The Cable Pattern: Rows 1-8
Now for the fun part—the cables! The pattern is a simple 8-row repeat that creates a stunning braided effect. Here's how to work each row:
- Row 1 (Right Side): K2, P2, K6, P2, K6, P2, K2. This sets up the ribbed edges and the stockinette sections where your cables will form.
- Row 2 (Wrong Side): P2, K2, P6, K2, P6, K2, P2. This row mirrors Row 1, creating the reverse stockinette background for your cables.
- Row 3: K2, P2, C4F, K2, P2, C4B, K2, P2, K2. Here's your first cable twist! The C4F on the first cable section twists to the left, and the C4B on the second section twists to the right, creating a beautiful mirrored effect.
- Row 4: Repeat Row 2.
- Row 5: K2, P2, K6, P2, K6, P2, K2. This is a plain row to let your cables rest and set.
- Row 6: Repeat Row 2.
- Row 7: K2, P2, K2, C4B, P2, K2, C4F, P2, K2. This is where the magic happens! By working the C4B in the first cable section and C4F in the second, you're creating the interlocking braid effect. Notice how the twists are offset from Row 3.
- Row 8: Repeat Row 2.
Repeat Rows 1-8 until the cuff measures about 6 inches from the cast-on edge, ending with a Wrong Side row. This will give you a cuff that's long enough to wrap comfortably around your wrist with room for the button closure.
Creating the Buttonhole
Now we'll add a functional and stylish buttonhole. This row is worked on the Right Side:
Buttonhole Row (RS): K2, P2, K6, P2, K2tog, YO, K2, P2, K2. Let's break this down: You're working across the row as usual, but when you reach the center of the second cable section (the K6 section), you'll knit 2 together (K2tog) to decrease one stitch, then yarn over (YO) to create an eyelet. This creates a neat, round hole that your button will slip through. The YO replaces the stitch you decreased, so your stitch count stays the same.
Finishing Touches: Bind Off and Seam
After the buttonhole row, continue in your established pattern for 2 more rows to reinforce the buttonhole. Then, BO all stitches loosely in pattern. This means if the stitch is a knit, bind it off as a knit; if it's a purl, bind it off as a purl. This keeps the edge stretchy and prevents it from pulling.
Now for the finishing:
- Fold and Seam: Fold the cuff in half lengthwise, right sides together. Sew the side seam using a mattress stitch or whip stitch, leaving a small gap where the buttonhole is. This gap is where your button will sit.
- Attach the Button: Turn the cuff right side out. Position your wooden or leather button on the opposite side of the buttonhole, and sew it on securely. Make sure it aligns perfectly with the eyelet.
- Weave in Ends: Use your tapestry needle to weave in all loose yarn ends on the inside of the cuff. This gives it a clean, professional finish.
- Block Gently: To really make your cables shine, gently block the cuff. You can wet block it by soaking in lukewarm water, gently squeezing out excess, and laying flat to dry, shaping it as needed. This will even out your stitches and open up the cable pattern beautifully.
Your Cozy Companion Awaits
And there you have it—your very own Emberwood Wrist Cuff! This project is a wonderful way to practice cable knitting, and the result is a functional, fashionable piece that adds a touch of rustic charm to any outfit. Whether you're sipping hot cocoa by the fire or heading out for a crisp autumn walk, these cuffs will keep you cozy and stylish. Happy knitting!