Berry Blossom Baby Bib Free Pattern
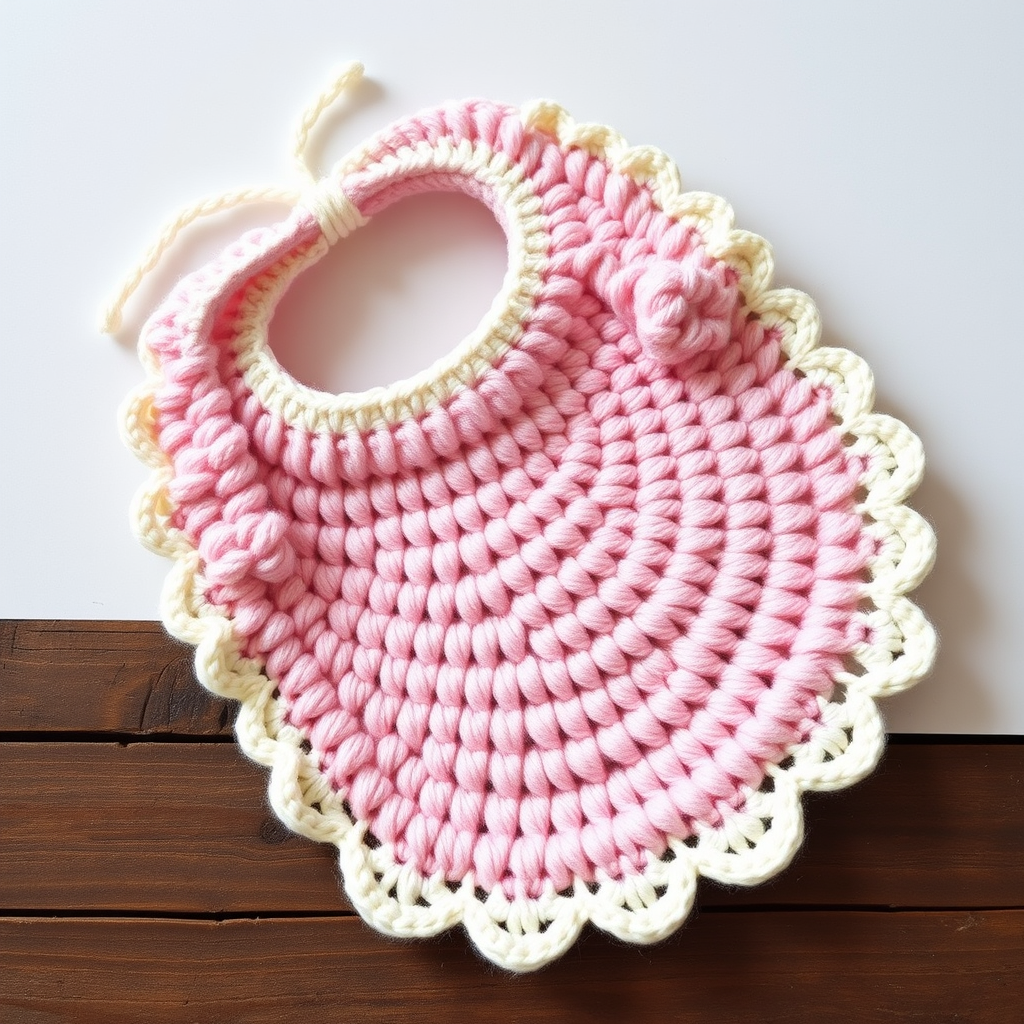
Introducing the Berry Blossom Baby Bib: A Charming Handmade Essential
There is something truly special about creating a handmade gift for a little one. The Berry Blossom Baby Bib is a delightful, textured crochet project that combines practicality with undeniable charm. Featuring a smooth, absorbent single crochet body and a delicate, lacy shell stitch border, this bib is designed to keep babies clean in style. Whether you are a seasoned crafter looking for a quick weekend project or a beginner ready to tackle your first garment, this free pattern is the perfect choice. Made from soft, durable cotton yarn, it is gentle on sensitive skin and makes a thoughtful, beautiful present for baby showers or new arrivals.
This pattern is not only functional but also a joy to create. The construction is straightforward, working from the top down with simple increases to shape the body, followed by a clever neck opening and a gently curved bottom. The finishing touch—a contrasting shell stitch edging—elevates the design from simple to simply stunning. Let’s dive into the materials and step-by-step instructions so you can create this adorable accessory at home.
Materials Needed for Your Crochet Bib
Before you begin, gather the following supplies. This project is highly portable and requires minimal materials, making it perfect for crafting on the go.
- Yarn: Lily Sugar'n Cream or any worsted weight cotton yarn. You will need approximately 1 oz (28 g) in your main color (the sample uses a soft pastel pink) and a small amount in a contrasting color for the edging and ties (cream white is used here). Cotton is essential for absorbency and durability.
- Crochet Hook: A 4.5 mm crochet hook (US size 7).
- Other Tools: A yarn needle for weaving in ends and a pair of scissors.
Gauge: 16 single crochet (sc) x 20 rows = 4 inches (10 cm). While gauge is important for sizing, this bib is quite forgiving. A slightly tighter or looser tension will simply result in a marginally smaller or larger bib.
Step-by-Step Instructions: How to Crochet the Berry Blossom Bib
This pattern is written in US crochet terms. Let's review the abbreviations you'll need to know:
- ch: chain
- sc: single crochet
- hdc: half double crochet
- dc: double crochet
- sl st: slip stitch
- sk: skip
- sc2tog: single crochet two together (a decrease)
- sc3tog: single crochet three together (a decrease)
Special Stitch: Shell = (2 dc, ch 1, 2 dc) all worked into the same stitch.
Finished Size: Approximately 6 inches wide x 7 inches long (excluding ties).
Crocheting the Bib Body
We will start at the top of the bib and work our way down, increasing stitches to create the width.
Row 1: Ch 16. Sc in the 2nd ch from the hook and in each ch across. (15 sc)
Row 2: Ch 1, turn. Sc in each st across. (15 sc)
Row 3: Ch 1, turn. Sc in the first st, 2 sc in the next st, sc in the next 11 sts, 2 sc in the next st, sc in the last st. (17 sc) (This creates an increase at each end.)
Row 4: Ch 1, turn. Sc in each st across. (17 sc)
Row 5: Ch 1, turn. Sc in the first st, 2 sc in the next st, sc in the next 13 sts, 2 sc in the next st, sc in the last st. (19 sc)
Row 6: Ch 1, turn. Sc in each st across. (19 sc)
Row 7: Ch 1, turn. Sc in the first st, 2 sc in the next st, sc in the next 15 sts, 2 sc in the next st, sc in the last st. (21 sc)
Row 8: Ch 1, turn. Sc in each st across. (21 sc)
Row 9: Ch 1, turn. Sc in the first st, 2 sc in the next st, sc in the next 17 sts, 2 sc in the next st, sc in the last st. (23 sc)
Row 10: Ch 1, turn. Sc in each st across. (23 sc)
Row 11: Ch 1, turn. Sc in the first st, 2 sc in the next st, sc in the next 19 sts, 2 sc in the next st, sc in the last st. (25 sc)
Row 12: Ch 1, turn. Sc in each st across. (25 sc)
Shaping the Neck Opening
Now we will create the space for baby's neck. This is done by skipping stitches in the middle of the row.
Row 13: Ch 1, turn. Sc in the first 10 sts, ch 5, sk 5 sts (this creates the neck opening), sc in the last 10 sts. (20 sc + 5 ch)
Row 14: Ch 1, turn. Sc in each of the first 10 sts, sc in each of the 5 ch, sc in each of the last 10 sts. (25 sc) (You are now working across the chain space to close the gap.)
Row 15: Ch 1, turn. Sc in each st across. (25 sc)
Decreasing for the Bottom Curve
To give the bib its rounded, practical shape, we will now decrease stitches at the beginning and end of each row.
Row 16: Ch 1, turn. Sc2tog, sc in the next 21 sts, sc2tog. (23 sc)
Row 17: Ch 1, turn. Sc2tog, sc in the next 19 sts, sc2tog. (21 sc)
Row 18: Ch 1, turn. Sc2tog, sc in the next 17 sts, sc2tog. (19 sc)
Row 19: Ch 1, turn. Sc2tog, sc in the next 15 sts, sc2tog. (17 sc)
Row 20: Ch 1, turn. Sc2tog, sc in the next 13 sts, sc2tog. (15 sc)
Row 21: Ch 1, turn. Sc2tog, sc in the next 11 sts, sc2tog. (13 sc)
Row 22: Ch 1, turn. Sc2tog, sc in the next 9 sts, sc2tog. (11 sc)
Row 23: Ch 1, turn. Sc2tog, sc in the next 7 sts, sc2tog. (9 sc)
Row 24: Ch 1, turn. Sc2tog, sc in the next 5 sts, sc2tog. (7 sc)
Row 25: Ch 1, turn. Sc2tog, sc in the next 3 sts, sc2tog. (5 sc)
Row 26: Ch 1, turn. Sc2tog, sc in the next 1 st, sc2tog. (3 sc)
Row 27: Ch 1, turn. Sc3tog. (1 sc) Fasten off and weave in this end.
Adding the Delicate Shell Edging
Now for the beautiful finishing touch! Switch to your contrasting color yarn. This edging is worked in the round around the entire bib.
Join the contrasting yarn with a sl st at the bottom left corner of the bib (where the curve begins).
Round 1: Ch 1, work sc evenly around the entire outer edge of the bib. When you reach the bottom corners, work 3 sc into each corner stitch to allow the edging to turn smoothly. At the neck opening, work sc evenly along the straight edge. Continue around the entire bib. Join with a sl st to the first sc. Do not turn.
Round 2: Ch 3 (this counts as your first dc). *Sk 1 st, work a Shell (2 dc, ch 1, 2 dc) in the next st, sk 1 st, dc in the next st; repeat from * around the entire edge. You may need to adjust the spacing slightly at the corners to ensure the pattern ends evenly. Join with a sl st to the top of the beginning ch-3. Fasten off and weave in the ends.
Creating the Ties
Finally, we will add the two ties that secure the bib around baby's neck.
Using your contrasting color, make a chain of 30. Attach this chain with a sl st to one top corner of the neck opening. Fasten off. Repeat this process on the other side of the neck opening. Alternatively, you can simply join the yarn at the corner and crochet a chain directly into the edge for a more secure attachment.
Finishing Touches
Weave in all remaining loose ends with your yarn needle. If desired, you can gently block the bib to ensure it lies perfectly flat and the shell edging is crisp. Your beautiful Berry Blossom Baby Bib is now complete and ready to be gifted or used!


