Aurora Borealis Chunky Knit Pillow Free Pattern – A Cozy Northern Lights Accent
Aurora Borealis Chunky Knit Pillow Free Pattern – A Cozy Northern Lights Accent
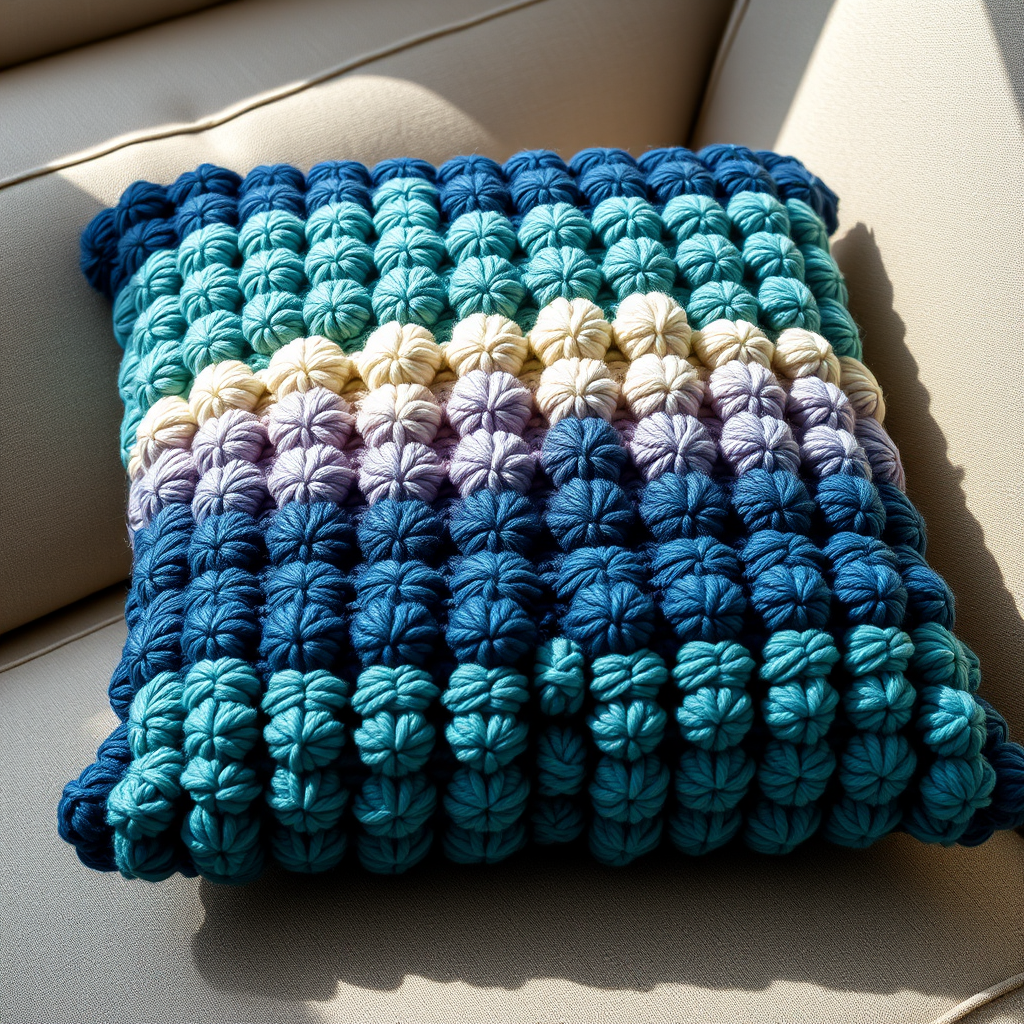
Bring the mesmerizing swirl of the northern lights into your living space with this plush, chunky knit pillow. Its gradient color shifts and tactile bobble texture create a stunning, handcrafted focal point for any cozy corner. This free pattern is perfect for intermediate knitters looking to create a statement piece that combines comfort with artistic flair.
Imagine curling up on your sofa, resting against a pillow that captures the ethereal beauty of the aurora borealis. The deep teal melts into midnight blue, transitions through soft lavender, and finishes with a creamy, cloud-like edge. Each bobble catches the light differently, creating a dimensional wave effect that mimics the dancing lights of the northern sky.
Materials Needed
Before you begin your knitting journey, gather these essential supplies:
Yarn
- Super bulky weight yarn (size 6) in four colors:
- Deep Teal (Color A) – approximately 250g
- Midnight Blue (Color B) – approximately 250g
- Soft Lavender (Color C) – approximately 250g
- Cream (Color D) – approximately 250g
Knitting Needles & Tools
- US 15 (10mm) circular knitting needles with a 24-inch cable
- Yarn needle for finishing and seaming
- Scissors
- Stitch markers (optional, but helpful)
Gauge
8 stitches and 12 rows = 4 inches in stockinette stitch (knit on US 15 needles). Always check your gauge before starting to ensure your pillow comes out the correct size.
Additional Supplies
- 16-inch square pillow form (or polyester fiberfill for stuffing)
- Measuring tape
Step-by-Step Instructions
This pillow is knitted in one piece, folded, and seamed. The bobble pattern creates a dimensional wave effect reminiscent of the aurora. Follow these detailed instructions carefully, and you'll have a beautiful handmade pillow in no time.
Pattern Notes
- Slip the first stitch of every row purlwise to create a neat selvedge edge. This makes seaming much easier later.
- Bobble (MB): Knit into the front, back, front, back, front of the same stitch (creating 5 stitches from 1). Turn your work, purl these 5 stitches. Turn again, knit these 5 stitches together (decreasing back to 1 stitch). This creates a beautiful, raised bobble.
- Color changes are worked in stripes, but the bobble pattern is continuous throughout.
Cast On
With Color A (Deep Teal), cast on 40 stitches using the long-tail cast-on method. This method creates a nice, stretchy edge that will work well for your pillow.
Foundation Rows
Row 1 (Right Side): Slip 1, knit to end.
Row 2 (Wrong Side): Slip 1, purl to end.
Begin Bobble Pattern (worked over 40 stitches)
Row 3: Slip 1, *K3, MB, K3, repeat from * to last stitch, K1. (You will have 5 bobbles across.)
Row 4: Slip 1, purl to end.
Row 5: Slip 1, knit to end.
Row 6: Slip 1, purl to end.
These 4 rows (Rows 3-6) form your bobble pattern repeat. The bobbles will naturally stagger as you work the pattern, creating that beautiful wavy texture.
Color Sequence
Follow this color sequence carefully to achieve the aurora gradient effect:
- Color A (Deep Teal): Work Rows 3-6 for 10 repeats (40 rows total)
- Color B (Midnight Blue): Switch to Color B, work Rows 3-6 for 8 repeats (32 rows)
- Color C (Soft Lavender): Switch to Color C, work Rows 3-6 for 8 repeats (32 rows)
- Color D (Cream): Switch to Color D, work Rows 3-6 for 6 repeats (24 rows)
Pro tip: When changing colors, leave a tail of about 6 inches to weave in later. Don't cut your old color until you're sure you won't need it again.
Shaping the Pillow (Optional Tapered End)
To give your pillow a slight taper at one end, creating that soft, organic silhouette, work the following decreases:
Decrease Row (Right Side): Slip 1, K2tog, knit to last 3 stitches, K2tog, K1. (This decreases 2 stitches)
Work this decrease row every 4th row, 4 times, while continuing the bobble pattern as established. You may need to adjust bobble placement slightly as you decrease. After all decreases, you will have 32 stitches.
Note: If you prefer a perfectly square pillow, skip this shaping section and continue straight to the final section.
Final Section
Continue in stockinette stitch (knit on right side, purl on wrong side) with Color D (Cream) for 10 rows. This creates a smooth, clean edge for your pillow's opening.
Bind Off
Bind off all stitches loosely in pattern. To ensure a stretchy bind-off, use a larger needle or bind off in pattern (knit stitches bound off knitwise, purl stitches bound off purlwise).
Finishing
Now for the satisfying part – bringing your pillow together!
- Fold the knitted piece in half, right sides together, matching the cast-on and bind-off edges. The fold will be the bottom of your pillow.
- Sew the side seams using a mattress stitch or whip stitch. The slipped selvedge stitches you created will make this step a breeze. Leave one end open for inserting the pillow form.
- Turn right side out – your beautiful bobble texture will now be facing outward.
- Insert a 16-inch square pillow form through the opening. Gently push the form into the corners to ensure a smooth, plump appearance. Alternatively, stuff with polyester fiberfill, being careful to distribute it evenly.
- Sew the remaining opening closed with a ladder stitch (also called an invisible stitch). This will create a seamless finish that looks professional.
Weave in Ends
Using your yarn needle, weave in all loose ends carefully. Make sure to weave them in on the wrong side of the work so they're completely hidden. Trim any excess yarn.
Care Instructions
To keep your Aurora Borealis pillow looking its best:
- Hand wash in cold water with a gentle wool wash
- Lay flat to dry – never hang or tumble dry
- Reshape while damp to maintain the pillow's form
- Avoid direct sunlight when drying to prevent fading
Tips for Success
- Check your gauge before starting. If your gauge is off, your pillow may end up too large or too small for your pillow form.
- Count your stitches regularly, especially when working the bobble pattern. It's easy to accidentally add or drop stitches.
- Keep your tension consistent – this is especially important when switching colors to avoid puckering.
- Block your work before seaming if possible. This helps even out the stitches and makes the bobbles look more uniform.
- Take breaks – working with super bulky yarn can be tiring on your hands. Stretch your fingers regularly.
Customization Ideas
While this pattern is beautiful as written, feel free to make it your own:
- Change the color palette to match your decor – sunset oranges and pinks, ocean blues and greens, or monochromatic neutrals
- Adjust the size by casting on more or fewer stitches (in multiples of 7 plus 5 for the bobble pattern)
- Make it a lumbar pillow by working fewer rows and adjusting the pillow form size
- Add a decorative button closure instead of seaming the final edge
Your Aurora Borealis Chunky Knit Pillow will be a stunning addition to your home, bringing the magic of the northern lights into your everyday space. The combination of plush, super bulky yarn and dimensional bobble texture creates a pillow that's not just beautiful to look at, but wonderfully comfortable to rest against.
This project is perfect for those cozy evenings when you want to create something special. The rhythmic repetition of the bobble pattern is almost meditative, and watching the colors transition from deep teal through midnight blue to lavender and cream is deeply satisfying.
Once you've completed your pillow, share your creation with fellow knitters! This pattern is perfect for gift-giving, and the recipient will surely treasure a handmade piece that captures the ethereal beauty of the aurora borealis. Happy knitting!