Asteroid Belt Newsboy Hat Free Crochet Pattern: African Flower Wavy Stripe Sun Hat
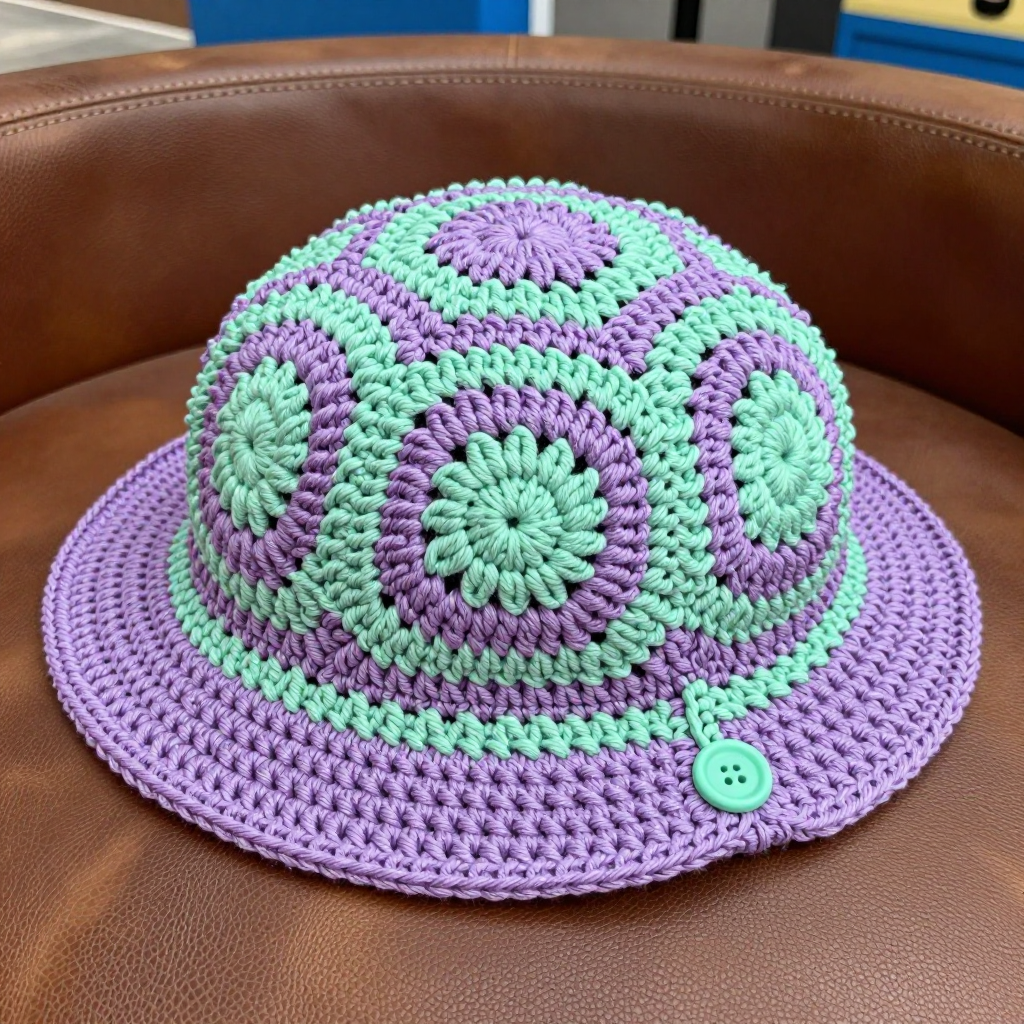
Asteroid Belt Newsboy Hat: A Beginner-Friendly African Flower Sun Hat
Introduction
Welcome to your very first crochet adventure! This Asteroid Belt Newsboy Hat is the perfect first project for anyone who has never held a hook before, because it is built from small, friendly pieces that you join together at the end. The crown is a shallow round dome made from seven African flower hexagon motifs, and because the centers alternate between lavender and mint, they stagger into soft, undulating wavy stripes that look like a little galaxy spinning across your head. Below the dome, a wavy striped band hugs your head, and a short straight brim with a buttoned tab gives it that classic newsboy silhouette. When it is finished, you will have a light, breathable cotton sun hat that measures about 21.5 inches (55 cm) around, with a crown depth of about 6.5 inches (16.5 cm) and a brim about 1.75 inches (4.5 cm) deep. It feels soft, slightly matte, and sturdy enough to wear all summer. If you can make a slip knot, you can make this hat, and we will walk through every single stitch together.
Materials Needed
- Yarn: Worsted weight (category 4) cotton yarn, approximately 220 yards total. You need about 120 yards of lavender (Color A) and about 100 yards of mint (Color B). Cotton is recommended because it holds the brim shape and breathes well in the sun.
- Crochet hook: 5.0 mm, which is a US size H-8 hook.
- Stitch marker: At least one, to mark the first stitch of each round.
- Tapestry needle: A large blunt needle with an eye big enough for worsted yarn, used for sewing motifs together and weaving in ends.
- Scissors: Any sharp pair for cutting yarn.
- Button: One button, 0.75 inch (2 cm) across.
- Finished size: Teen / average teen head, 21 to 22 inches (53 to 56 cm) circumference. Finished hat circumference is approximately 21.5 inches (55 cm), crown depth approximately 6.5 inches (16.5 cm), band depth approximately 1.25 inches (3 cm), and brim approximately 1.75 inches (4.5 cm) deep and 7.5 inches (19 cm) wide.
Abbreviations and Beginner Glossary
- ch - chain. Make a loop of yarn over your hook and pull it through the loop already on your hook. This creates a small chain link.
- sl st - slip stitch. Insert your hook into the stitch, yarn over, and pull that loop straight through both the stitch and the loop on your hook. It joins things without adding height.
- sc - single crochet. Insert hook into stitch, yarn over, pull up a loop (2 loops on hook), yarn over, pull through both loops. One loop remains.
- dc - double crochet. Yarn over first, insert hook into stitch, yarn over, pull up a loop (3 loops on hook), yarn over, pull through 2 loops, yarn over, pull through last 2 loops.
- tr - treble crochet. Yarn over twice, insert hook, yarn over, pull up a loop (4 loops), yarn over and pull through 2 loops three times. (Listed for reference; not used in this pattern.)
- sc2tog - single crochet two together. Insert hook into first stitch, pull up a loop, insert hook into next stitch, pull up a loop (3 loops on hook), yarn over, pull through all 3 loops. This decreases by one stitch.
- ch-1 sp - chain-1 space. The little hole made by a single chain in the previous round. You work into the hole, not into the chain itself.
- ch-2 sp - chain-2 space. The larger hole made by two chains; used as the corner of each hexagon.
- st(s) - stitch or stitches.
- sp - space.
- beg - beginning.
- rep - repeat.
- FO - fasten off. Cut the yarn leaving a tail, then pull the tail through the last loop and tug to secure.
- magic ring - an adjustable loop of yarn you crochet into, then pull closed so no hole remains in the center.
- whipstitch - a simple sewing stitch: bring the needle up through both pieces, over the edge, and back down, working small even stitches along the seam.
Gauge
Gauge: One African flower motif measures 3 inches (7.5 cm) across when lying flat. In single crochet, 4 sc = 1 inch (2.5 cm) and 4 sc rows = 1 inch (2.5 cm).
Gauge matters because it is how you make sure your hat actually fits a head. If your stitches are bigger than the pattern expects, your hat will come out too large; if they are smaller, it will be too tight. To check your gauge, crochet one complete African flower motif following the instructions below and lay it flat without stretching it. Measure straight across from corner to corner. If it is bigger than 3 inches, try again with a smaller hook; if it is smaller, try a larger hook. For the single crochet gauge, work a small square of about 20 sc and 20 rows, then measure 4 stitches and 4 rows in the middle of the square. Always make your gauge swatch before starting the real hat.
Beginner Tips Before You Start
- Use a stitch marker. Place it in the first stitch of every round so you always know where the round began and where to join. This single habit prevents most beginner mistakes.
- Do not pull your yarn too tight. Hold the yarn with gentle, even tension. Tight stitches make the hat stiff and too small, and they make your hook hard to insert.
- Count your stitches at the end of every round. The stitch counts in parentheses are your safety net. If a count is off, fix it right away rather than continuing.
- Work the motifs first, then join. Making all seven hexagons before any joining means you can lay them out and check the color arrangement before committing.
- Keep your chain-1 spaces loose. The little holes between double crochet groups are where you will work the next round, so they need to be big enough for your hook to enter easily.
- Cotton does not stretch much, so trust the measurements. If your band measures about 21.5 inches around, it will fit; do not tug it to make it seem bigger.
Step-by-Step Instructions
Part 1: African Flower Hexagon Motif (make 7 total: 4 with lavender centers, 3 with mint centers)
Rnd 1: With the center color, make a magic ring. Ch 3 (this counts as your first dc), then work 11 dc into the ring. Join with a sl st to the top of the beginning ch-3. (12 dc) Fasten off the center color.
Rnd 2: Join the next color with a sl st in any dc. Ch 3, dc in the same stitch, ch 1. Then [2 dc in the next stitch, ch 1] 11 times. Join with a sl st to the top of the beginning ch-3. (12 groups of 2 dc, 12 ch-1 spaces)
Rnd 3: Sl st into the next ch-1 space. Ch 3, work 2 dc in that same space, ch 1. Then [3 dc in the next ch-1 space, ch 1] 11 times. Join with a sl st to the top of the beginning ch-3. (12 groups of 3 dc)
Rnd 4 (hexagon shaping): Ch 1, sc in each of the next 3 dc. Then [sc in the next ch-1 space, ch 2, sc in the same ch-1 space] to form a corner, sc in each of the next 3 dc, sc in the next ch-1 space. Repeat the section in brackets around, working 6 corners total, then join with a sl st to the first sc. (6 corners, 6 flat sides) Fasten off and weave in ends. Each motif measures approximately 3 inches (7.5 cm) across.
Part 2: Crown Assembly (round dome)
Step 1: Arrange your 7 hexagons on a flat surface. Place one lavender-centered motif in the middle; this becomes the top of the dome. Surround it with the remaining 6 motifs, alternating lavender-centered and mint-centered, so the colors stagger around the circle.
Step 2: With right sides facing, whipstitch or sc-join the motifs edge to edge through both loops, matching the corner ch-2 spaces so the corners line up. First join the 6 outer motifs to the center motif. Then join each outer motif to its two neighbors, leaving the bottom outer edges free (these free edges are where the band will be worked).
Step 3: This forms a shallow round crown with 6 radiating seams. The staggered lavender and mint centers create the undulating wavy stripe effect across the dome.
Part 3: Wavy Stripe Band (worked directly onto the free bottom edges of the outer motifs)
Rnd 1: Join Color A with a sl st at a seam on the bottom edge. Work sc evenly around the bottom edge of the joined motifs, working 1 sc in each stitch and 1 sc in each seam join, adjusting so the total is a multiple of 6 stitches (approximately 84 sc). Join with a sl st to the first sc. (approx. 84 sc)
Rnd 2: With Color B, ch 1. Sc in the first 3 stitches, then [2 sc in the next stitch, sc in the next 3 stitches, sc2tog over the next 2 stitches] around. Join with a sl st. (84 sts) The staggered increase and decrease make the band undulate in a gentle wave.
Rnd 3: With Color A, ch 1, sc in each stitch around. Join with a sl st. (84 sts)
Rnd 4: With Color B, repeat the Rnd 2 wave sequence. Join with a sl st. (84 sts)
Rnd 5: With Color A, ch 1, sc in each stitch around. Join with a sl st. (84 sts) Do not fasten off.
The band is now approximately 1.25 inches (3 cm) deep, and the hat circumference is approximately 21.5 inches (55 cm).
Part 4: Brim (short straight buttoned brim)
Row 1: With Color A, ch 1, sc in the next 30 stitches of the band (this is the front of the hat), turn. (30 sc)
Rows 2-5: Ch 1, sc in each stitch across, turn. (30 sc)
The brim measures approximately 1.75 inches (4.5 cm) deep and 7.5 inches (19 cm) wide. Fasten off and weave in ends.
Part 5: Button Tab and Closure
Row 1: With Color B, ch 9. Sc in the 2nd ch from the hook and in each ch across. (8 sc)
Rows 2-3: Ch 1, sc in each stitch across. (8 sc) Fasten off, leaving a 10 inch tail.
Sew the tab to one short end of the brim using the tail and your tapestry needle. Sew the button to the opposite short end so the tab buttons across the front for the newsboy silhouette.
Assembly and Finishing
Seaming: If you have not already joined the motifs, do so now with the tapestry needle and a length of matching yarn. Hold two motifs with right sides facing. Bring the needle up through both edge stitches, pass over the edge, and back down, working small, even whipstitches all along the seam. Keep the stitches loose enough that the seam lies flat. Match the corner ch-2 spaces first, then work outward along each side.
Weaving in ends: Thread each yarn tail onto the tapestry needle and run it through the back of several stitches, changing direction once so it cannot work loose. Trim the tail close to the fabric. Never tie a knot; knots create bumps that show on the outside.
Blocking: Dampen the finished hat lightly with cool water, either by misting it or by pressing it between damp towels. Pin the brim flat and straight on a towel-covered board, and gently shape the crown into a round dome. Let it dry completely, which usually takes several hours or overnight. Blocking sets the brim shape and evens out the stitch texture.
Fit note: The hat stretches slightly with wear. If you need a snugger fit, reduce the stitch count in band Rnd 1 while keeping it a multiple of 6.
Pro Tips and Variations
- Change the color story: Swap lavender and mint for any two worsted cotton colors you love. Keep one light and one darker so the wavy stripes still read clearly across the dome.
- Adjust the size: For a smaller child's hat, use a 4.5 mm hook and join only 6 motifs (1 center plus 5 around). For a larger adult hat, add a sixth band round in Color B before the brim and work the brim over 34 stitches instead of 30.
- Substitute yarn: A worsted weight cotton blend works well, but avoid very slippery acrylic for the brim, since it will not hold its shape as nicely. Always re-check your motif gauge if you change yarn.
- Make it reversible-looking: Use a contrasting color for the button tab and button, or add a second small button on the opposite side so the tab can fasten either way for two different looks.


