Alpine Pumpkin Cat Bonnet Free Pattern: A C2C Crochet Mountain Hat
Alpine Pumpkin Cat Bonnet: A Beginner-Friendly C2C Crochet Mountain Hat
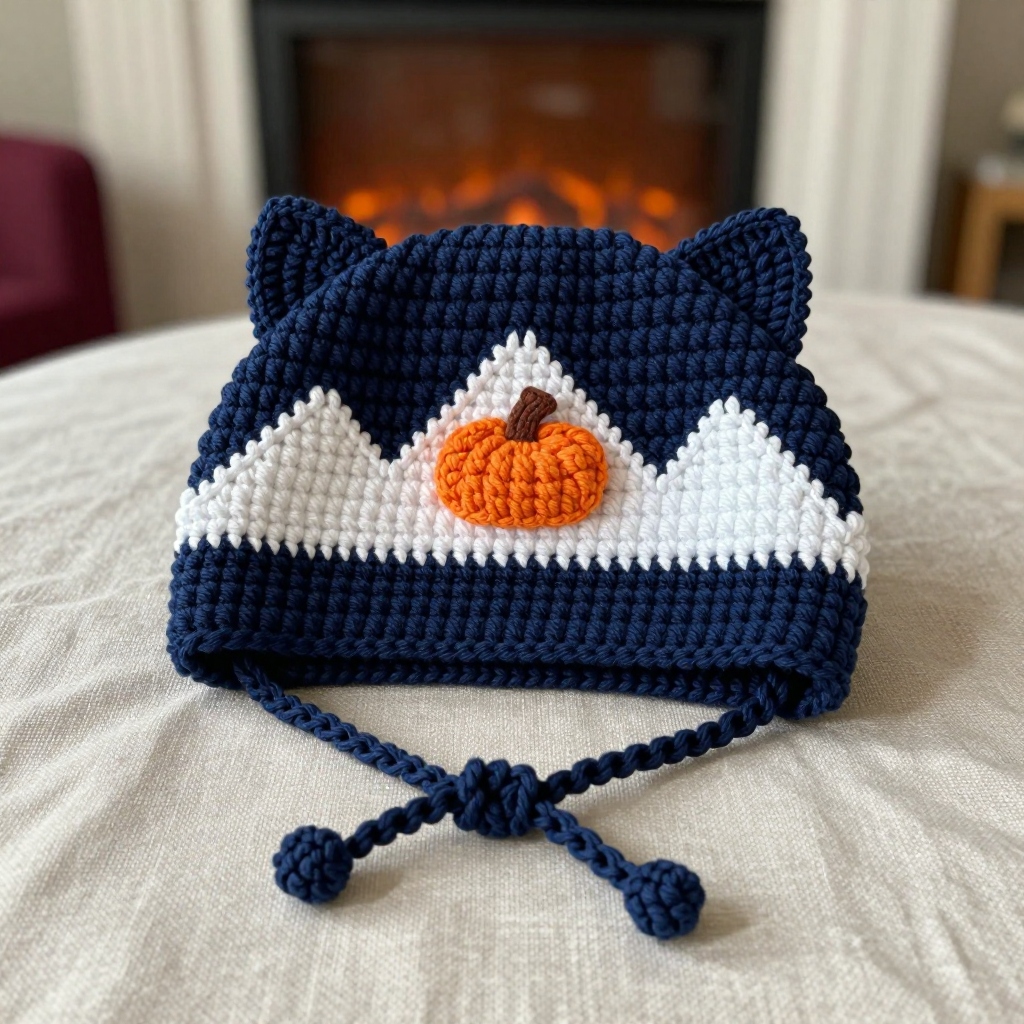
If you have never held a crochet hook before, this is the perfect first project to fall in love with. The Alpine Pumpkin Cat Bonnet is a cozy, bulky-wool hat for your cat, worked in a technique called corner-to-corner (C2C) crochet that builds the fabric one small square "block" at a time. It looks like a tiny fairy-tale mountain scene: a deep navy sky, a snowy white mountain range across the front, and a little orange pumpkin appliqué sitting right on the ridge line. The finished bonnet is soft, matte, and squishy, with a rounded point at the back and two chained ties that fasten under your cat's chin. It is sized for an average adult cat and makes a charming photo prop for pumpkin season.
Materials Needed
- Yarn: Bulky (weight 5) wool yarn — approximately 90 yd / 82 m navy, 25 yd / 23 m white, 8 yd / 7 m orange, and 2 yd / 2 m brown.
- Crochet hook: 6.0 mm (US size J-10).
- Stitch markers: At least 4, to mark the first and last block of each row.
- Tapestry needle: A blunt-tipped needle with a large eye for weaving in ends and sewing on the pumpkin.
- Scissors: Any sharp pair for cutting yarn.
- Small scrap of orange yarn: For lightly stuffing the pumpkin.
- Finished size: Approximately 7 inches (18 cm) wide across the front edge and 6 inches (15 cm) deep from front edge to back point, sized for an average adult cat head (9–11 inch head circumference). The ties add about 8 inches (20 cm) per side.
Abbreviations and Beginner Glossary
- ch — chain: wrap the yarn over your hook and pull it through the loop on your hook. This makes a small link.
- sl st — slip stitch: insert your hook into the stitch, wrap yarn over, and pull it through both the stitch and the loop on your hook at once. It joins things without adding height.
- dc — double crochet: wrap yarn over your hook, insert hook into the stitch, wrap yarn over and pull up a loop (3 loops on hook), wrap yarn over and pull through 2 loops, wrap yarn over and pull through the last 2 loops.
- sc — single crochet: insert your hook into the stitch, wrap yarn over and pull up a loop (2 loops on hook), wrap yarn over and pull through both loops.
- C2C block — corner-to-corner block: ch 3, then work 3 dc into the ch-3 space of the block below (or into the starting ring for the very first block). Each block is one square of the chart.
- magic ring — an adjustable loop of yarn you crochet into, then pull closed so there is no hole in the center.
- turn — flip your work over so you can work back along the row you just made.
- fasten off — cut the yarn a few inches from your work and pull the tail through the last loop to lock it.
- weave in ends — thread a yarn tail onto a tapestry needle and sew it back and forth through the fabric so it is hidden and secure.
Gauge
Gauge: 1 C2C block = 1 inch (2.5 cm) square; 4 blocks x 4 blocks = 4 x 4 inches (10 x 10 cm).
Gauge simply means how big your stitches turn out. It matters because it decides whether the bonnet fits your cat. If your blocks are bigger than 1 inch, the hat will be too large; if smaller, it will be too tight. To check, work the first 4 rows of the bonnet (4 blocks), then measure one block with a ruler. If it is not about 1 inch, try a smaller or larger hook until it is. Do not skip this step — it takes five minutes and saves the whole project.
Beginner Tips Before You Start
- Use stitch markers. Place one in the first block and one in the last block of every row so you never lose your place.
- Do not pull your yarn too tight. Keep your tension relaxed and even; tight stitches make the blocks shrink and the hat stiff.
- Carry colors loosely. When you switch from navy to white, leave the unused yarn resting gently along the back — never pull it tight or the fabric will pucker.
- Count your blocks every row. The block count tells you exactly where you are in the increase and decrease sections.
- Work in good light. Navy yarn is dark; bright light helps you see your stitches clearly.
- Read the whole pattern once first. Knowing the shape of the journey makes every row easier.
Step-by-Step Instructions
Note on C2C: Each block is one square of the chart. You work the square diagonally, increasing at both ends until the widest row, then decreasing at both ends. Carry colors loosely along the back of the work; do not cut navy between color changes unless a section is finished.
Chart Overview (17 x 17 blocks)
- Rows 1–10: all navy.
- Rows 11–13: navy, with white blocks forming the mountain peaks: Row 11 white at blocks 6–7 and 11–12; Row 12 white at blocks 5–8 and 10–13; Row 13 white at blocks 4–14 (solid white ridge line).
- Rows 14–17: navy below the ridge, with white only at blocks 4 and 14 (snowy foothill edges).
- The pumpkin appliqué is made separately and sewn onto the white ridge line at the center front (around block 9 of Row 13).
Bonnet Body — Increase Section
Row 1: With navy, ch 4, join with sl st to form a ring. Ch 3, 3 dc in ring. (1 block)
Row 2: Ch 6, turn. 3 dc in 4th ch from hook (first block made), sl st in top of ch-3 of previous row, ch 3, 3 dc in same ch-3 space. (2 blocks)
Row 3: Ch 6, turn, 3 dc in 4th ch from hook, sl st in top of next block, ch 3, 3 dc in same space, sl st in top of next block, ch 3, 3 dc in same space. (3 blocks)
Rows 4–10: Continue increasing 1 block per row in the same way (ch 6, turn, work a block in the 4th ch from hook, then one block in each block space across), all navy. (Row 10 = 10 blocks)
Row 11: Increase as before, following the chart: white at blocks 6–7 and 11–12, navy elsewhere. (11 blocks)
Row 12: Increase as before: white at blocks 5–8 and 10–13, navy elsewhere. (12 blocks)
Row 13: Increase as before: white at blocks 4–14 (solid white ridge line), navy elsewhere. (13 blocks)
Rows 14–17: Increase as before, navy with white only at blocks 4 and 14. (Row 17 = 17 blocks wide) Fasten off white after Row 17; keep navy attached.
Bonnet Body — Decrease Section (shaping the back point)
Row 18: Turn, sl st across first block, ch 3, 3 dc in next block space, continue across to last block, do not work last block. (15 blocks)
Rows 19–24: Repeat Row 18, decreasing 1 block at each end every row, navy only. (Row 24 = 3 blocks)
Row 25: Repeat Row 18 once more. (1 block) Fasten off navy, weave in all ends.
Front Edge and Ties
With navy, join yarn at the bottom right corner of the front edge (the wide 17-block edge).
Row 1: Ch 1, sc evenly along the front edge (approximately 34 sc), turn. (34 sc)
Row 2: Ch 1, sc in each sc across. Do not fasten off. (34 sc)
Ties: Ch 45 (about 8 inches), sl st back along the chain to the edge, sc across the front edge to the opposite corner, ch 45, sl st back along the chain. Fasten off and weave in ends.
Pumpkin Appliqué (make 1)
With orange, make a magic ring.
Round 1: Ch 2, 10 dc in ring, join with sl st. (10 dc)
Round 2: Ch 2, 2 dc in each dc around, join with sl st. (20 dc)
Round 3: Ch 1, sc in each dc around, join with sl st. Fasten off, leaving a 10-inch tail. (20 sc)
Stuff lightly with a small scrap of orange yarn, then use the tail to sew the pumpkin closed into a rounded shape. With brown yarn, make 3 short straight stitches at the top center for the stem. Sew the pumpkin onto the white ridge line at the center front of the bonnet using navy thread.
Assembly and Finishing
Weaving in ends: Thread each yarn tail onto your tapestry needle. Sew it back and forth through the inside of the fabric for about 1 inch, then snip close to the surface. This hides the tail and keeps it from working loose.
Sewing on the pumpkin: Position the pumpkin centered on the white ridge line. Using navy thread and your tapestry needle, take small stitches all around its lower edge, catching only the back of the pumpkin so the stitches do not show on the front.
Blocking: Dampen the bonnet lightly with cool water (do not soak it). Pin it to a towel or blocking mat, gently stretching the front edge straight and shaping the back point. Let it dry completely — usually overnight. Blocking relaxes the wool so the bonnet sits smoothly.
Fitting: The bonnet should sit snugly over the cat's head with the point at the back and the ties fastening under the chin. Never leave a tied bonnet on an unsupervised pet.
Pro Tips and Variations
- Change the colors: Swap navy for forest green or deep plum, and white for cream, to match any season. The chart stays exactly the same.
- Adjust the size: For a smaller cat, stop increasing at Row 15 (15 blocks wide) and begin the decrease section there. For a larger cat, add two more increase rows (19 blocks wide) and add two matching decrease rows.
- Substitute yarn: Any bulky (weight 5) yarn works — acrylic is machine washable and great for pets, while wool is warmer and blocks beautifully. Always check your gauge again with a new yarn.
- Make it a dog hat: Work the same chart but add 4 extra increase rows and 4 extra decrease rows for a wider fit, and lengthen the ties to 60 chains.