Whispering Willow Cropped Cardigan Free Pattern – A Textured Knit Kimono
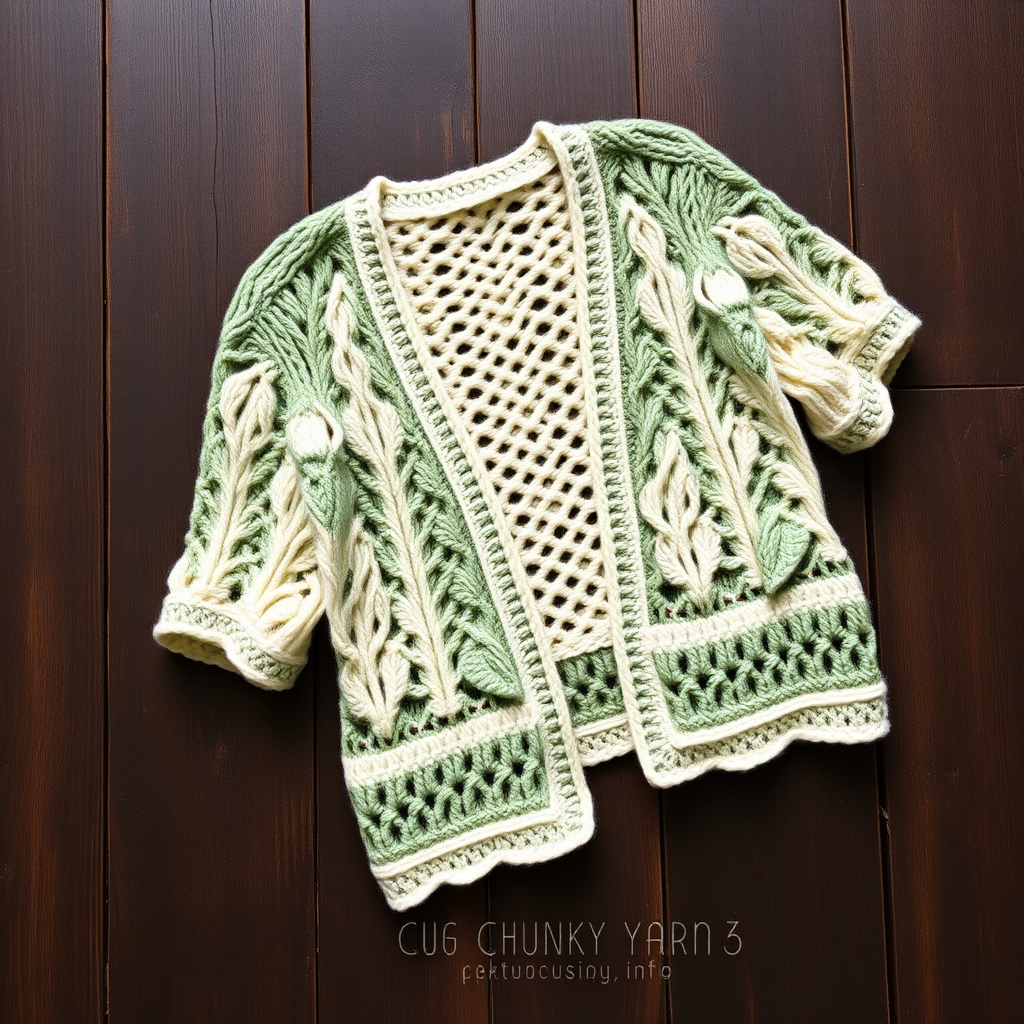
Introducing the Whispering Willow Cropped Cardigan
Embrace the season with this airy, cropped cardigan that drapes like a gentle breeze. The Whispering Willow Cropped Cardigan is a modern, romantic layering piece featuring a textured leaf motif and a soft gradient yarn that transitions from sage green at the hem to cream at the shoulders. This open-front kimono-style cardigan is perfect for spring and summer evenings, designed to be worn over a summer dress or a simple camisole. With its delicate eyelets and twisted stitches, this pattern creates a botanical, handcrafted feel that is both cozy and breathable. Whether you're a seasoned knitter or looking for a rewarding next project, this free pattern will guide you through creating a stunning, drapey garment that showcases your skills.
Materials Needed
Before you begin, gather the following materials to ensure a smooth knitting experience. The key to this project's beauty is the gradient yarn, which adds depth and interest without extra work.
- Yarn: Worsted weight cotton blend yarn in a gradient from sage green to cream (approx. 600-700 yards). A cotton blend provides the perfect drape and breathability for this design.
- Knitting Needles: US 7 (4.5 mm) knitting needles – suitable for the main body and sleeves.
- Crochet Hook: US G/6 (4.0 mm) crochet hook – used specifically for the edging finish.
- Other Tools: Stitch markers, tapestry needle for weaving in ends, and scissors.
Gauge: 18 stitches and 24 rows = 4 inches in stockinette stitch. It is crucial to check your gauge to ensure the finished measurements match the pattern, especially for the bust size.
Step-by-Step Instructions
This pattern is written for sizes S (M, L) with a finished bust of 36 (40, 44) inches and a length of 18 (19, 20) inches. Follow the instructions carefully, and you'll have a beautiful cardigan in no time.
Abbreviations
- CO: Cast on
- BO: Bind off
- K: Knit
- P: Purl
- K2tog: Knit two together (right-leaning decrease)
- SSK: Slip, slip, knit (left-leaning decrease)
- YO: Yarn over (increase creating an eyelet)
- PM: Place marker
- SM: Slip marker
Back Panel
The back panel sets the foundation with the beautiful leaf lace pattern. Take your time with the lace rows to ensure accuracy.
- Cast On: CO 72 (80, 88) sts.
- Initial Stockinette: Work in stockinette stitch (K on RS, P on WS) for 2 inches. This creates a clean, solid base for the lace to emerge from.
- Begin Leaf Lace Pattern: The pattern is a multiple of 8 + 4 stitches. Follow these rows carefully:
- Row 1 (RS): K4, *YO, SSK, K4, K2tog, YO, K2; repeat from * to last 4 sts, K4.
- Row 2 and all WS rows: Purl all stitches.
- Row 3: K3, *K2tog, YO, K2, YO, SSK, K2; repeat from * to last 5 sts, K5.
- Row 5: K2, *K2tog, YO, K4, YO, SSK; repeat from * to last 6 sts, K6.
- Row 7: Repeat Row 1.
- Row 9: K1, *K2tog, YO, K6, YO, SSK; repeat from * to last 7 sts, K7.
- Row 11: Repeat Row 3.
- Row 12: Purl.
- Work Even: Repeat rows 1-12 until the piece measures 12 (13, 14) inches from the cast-on edge, ending with a WS row.
- Shape Armholes: BO 4 (5, 6) sts at the beginning of the next 2 rows. Continue in the lace pattern until the armhole measures 6 (6, 7) inches.
- Shape Shoulders: BO 8 (9, 10) sts at the beginning of the next 4 rows. BO the remaining 24 (26, 28) sts for the neck.
Left Front Panel
The front panels introduce a garter stitch border for a clean, no-button finish. Pay attention to the stitch counts to keep the border intact.
- Cast On: CO 40 (44, 48) sts.
- Initial Stockinette: Work in stockinette for 2 inches.
- Begin Pattern with Border: Begin the leaf pattern as for the back, but only work the first 36 (40, 44) sts in pattern, keeping the last 4 sts in garter stitch (K every row) for the front edge. This creates the vertical, no-roll border.
- Work Even: Continue until the piece measures the same as the back to the armhole.
- Shape Armhole: BO 4 (5, 6) sts at the beginning of the next RS row.
- Continue: Work in pattern until the armhole measures 4 (4, 5) inches, ending with a WS row.
- Shape Neck: At the beginning of the next RS row, BO 6 (7, 8) sts, then decrease 1 st at the neck edge every RS row 4 times. This creates a gentle V-neck slope.
- Finish: Continue until the armhole measures the same as the back. Shape the shoulder as for the back.
Right Front Panel
Work as for the left front, but reverse the shaping. This means the armhole BO happens on a WS row, and the neck shaping is performed on WS rows to mirror the left side.
- Cast On & Work: CO 40 (44, 48) sts and work the initial stockinette and lace pattern, keeping the last 4 sts in garter stitch.
- Shape Armhole: BO 4 (5, 6) sts at the beginning of the next WS row.
- Shape Neck: When the armhole measures 4 (4, 5) inches, ending with a RS row, BO 6 (7, 8) sts at the beginning of the next WS row. Decrease 1 st at the neck edge every WS row 4 times.
- Finish: Continue to the same armhole length as the back and shape the shoulder.
Sleeves (Make 2)
The sleeves are worked flat and seamed, with increases to create a slight flare towards the elbow.
- Cast On: CO 40 (44, 48) sts.
- Initial Stockinette: Work in stockinette for 2 inches.
- Increase Rows: Increase 1 st each edge every 6th row until you have 56 (60, 64) sts. This is typically done by picking up the bar between stitches (M1) or knitting into the front and back of the edge stitches (Kfb).
- Work Even: Work even (no increases) until the sleeve measures 12 (13, 14) inches from the cast-on.
- Bind Off: BO all sts.
Finishing
The finishing touches bring the cardigan together and give it that polished, professional look.
- Seams: Sew the shoulder seams. Set in the sleeves, then sew the side and sleeve seams. Use a mattress stitch for a nearly invisible seam on stockinette.
- Crochet Edging: Using the crochet hook, work a round of single crochet (sc) around the entire front opening and bottom edge. This stabilizes the edges.
- Crab Stitch Finish: Work a round of reverse single crochet (crab stitch) over the single crochet. This creates a neat, twisted-cord look that matches the cardigan's aesthetic.
- Weave in Ends: Weave in all loose ends with a tapestry needle.
- Block: Block the cardigan to the specified measurements. This is essential for the lace to open up and the garment to drape correctly. Pin it out to the finished dimensions and steam or wet block as per your yarn's instructions.
Your Whispering Willow Cropped Cardigan is now complete! This beautiful, textured piece is perfect for adding a romantic, handcrafted touch to any outfit. Enjoy wearing your new creation, and don't forget to share your finished project with the community!


